I’m still pretty new to using a vinyl cutting machine (I have a Cricut) but one thing I learned the hard way, is that you can quickly ruin a roll of vinyl by not storing it properly. After realizing my mistake it was time to build a DIY Craft Vinyl Storage Rack.

The Buffalo Plaid Christmas Ornaments (my first published project using my Cricut) was pretty popular at Christmas time, I also have a few more projects from my daughter’s wedding that I’ll be publishing soon.
By now you know I love to participate in challenges with other talented bloggers. I was excited to join a group of over 30 DIY bloggers for a monthly “At Home DIY” Challenge.
This month’s theme is Build to Organize so check out all the projects linked below to see what organizational goodies they created.
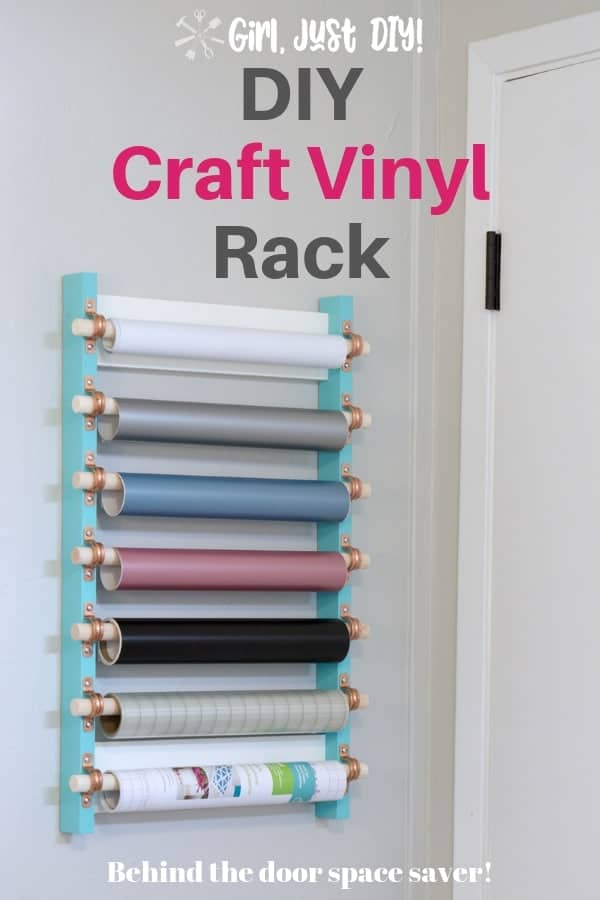
This is a pretty simple build which you can easily adjust to fit the size of your vinyl library. I’m just getting started with my vinyl collection so I made mine smaller than you might need yours.
My office/craft/guest room is multi-purpose and space is very limited so my plan is to locate my craft vinyl storage behind the door on an otherwise empty wall.
DIY Vinyl Storage Rack Materials
I used scraps I had in the garage from other projects to build my rack. But below you’ll find I give you common lumber dimensions in case you need to purchase wood and don’t currently have a scrap pile to pull from.
This page contains links to products, if you purchase something after clicking on a link I may earn a small commission (at no cost to you). If you do make a purchase, thank you!
You can read about affiliate links here.
Vinyl Storage Rack Supplies
- 1″ x 2″ Lumber – 6.5′ cut as follows:
- 2 side pieces cut at 24″
- 2 cross pieces cut at 13″
- 2 Wood Dowels 6′ x 3/4″ cut as follows:
- 7 lengths cut at 15-1/2″ ea
- 14 Copper Tube Straps (3/4″)
- 8 SML-C125 pocket hole screws
- 32 Wood Screws #6 x 1/2″
- Pocket Hole Jig
- Miter Saw or Miter Box
- Cordless Drill
- Scratch Awl
- 18″-24″ Level
- Clamps – 18″-24″
- Craft Paint (if desired)
- Sanding Sponge
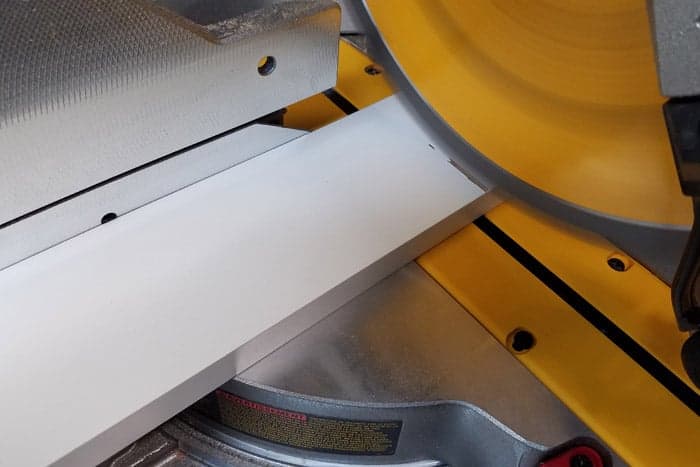
Step 1: Build the Frame
- Start by cutting your lumber to size according to the above measurements.
- Dry fit the boards for the vinyl storage rack to make sure they’re even and square.

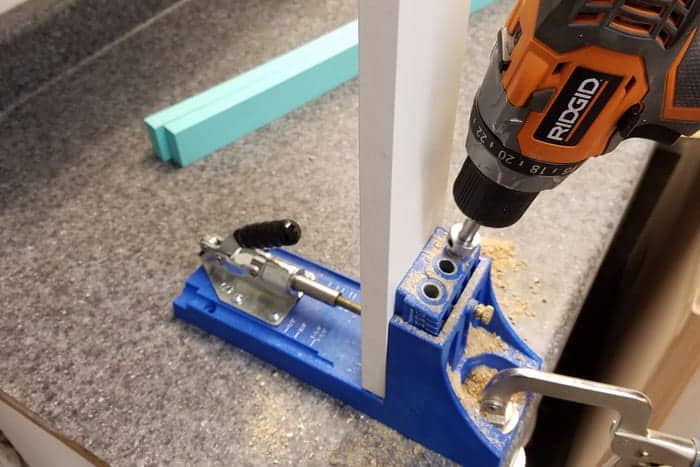
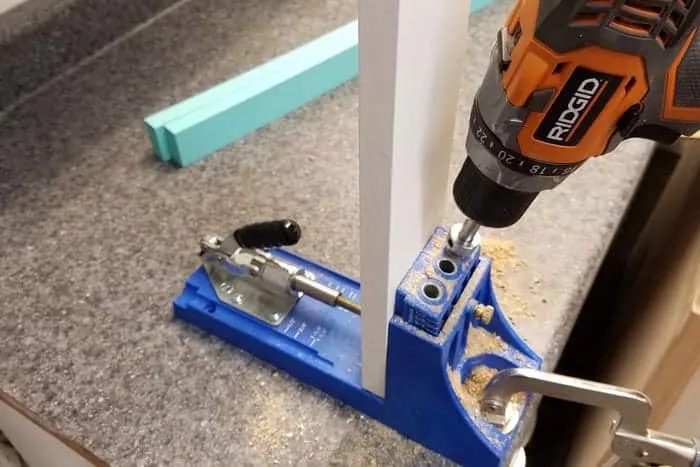
Step 2: Make pocket holes.
- Use the Pocket Hole Jig to drill holes into the back sides of the Cross Support pieces. My piece was 3″ wide so I drilled two pocket holes, yours might only need one hole.
Paint your pieces, if desired and let them dry fully.
Craft Vinyl Storage Assembly
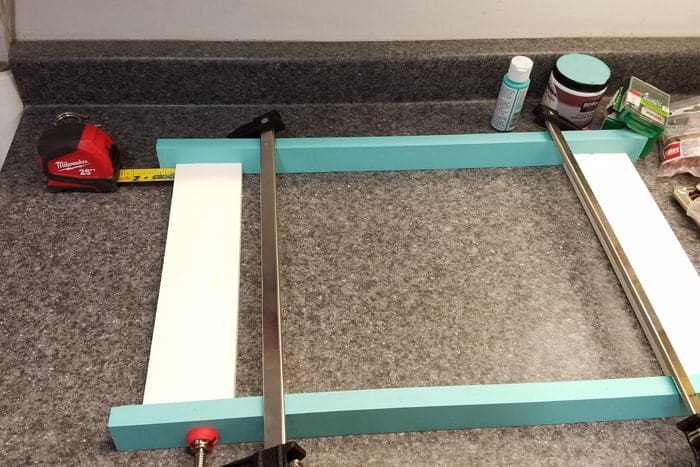
Step 3: Assemble the frame.
- On a flat surface lay out the two side and two cross pieces with the cross pieces 1″ from either end.
- Apply wood glue to either end of the cross pieces and spread evenly with a brush or your finger

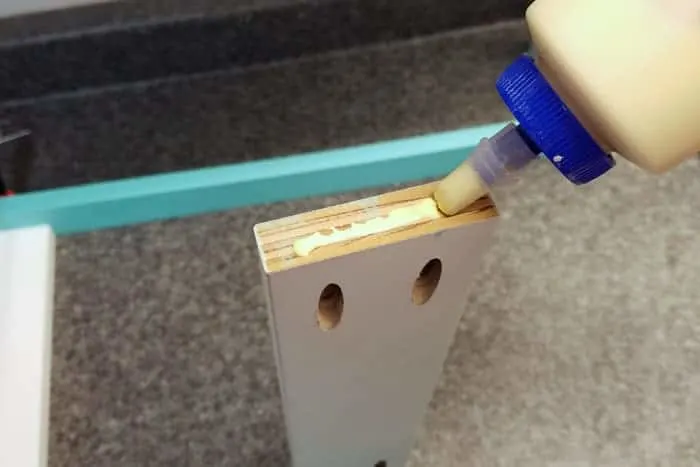
- With the cross pieces glued make necessary adjustments so they are 1″ from the edge on both sides.
- Carefully clamp the boards.
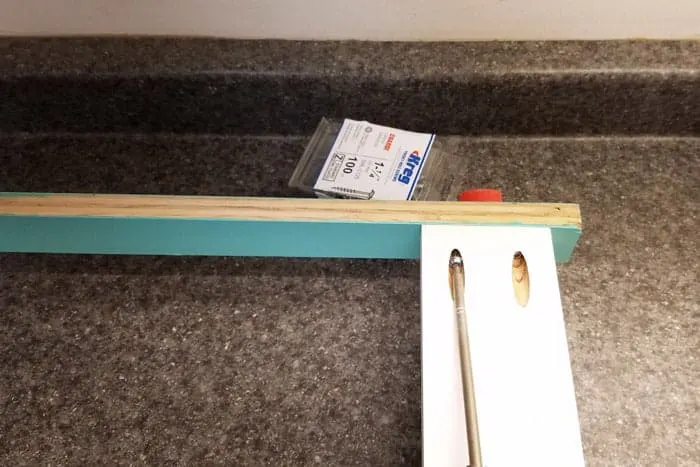
- Flip the boards over and Screw the 1-1/4″ pocket hole screws into place.
- Remove clamps, wipe away excess glue and flip over.


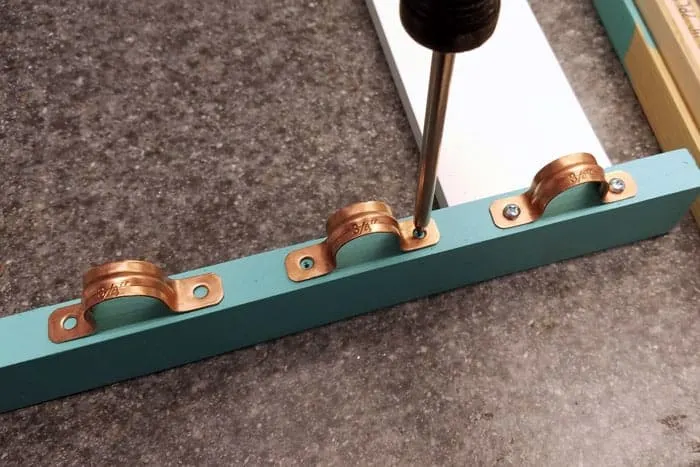
Step 4: Add dowel holders.
With the body is assembled it’s time to attach the tube straps. This took me a bit of measuring and calculating and measuring and calculating. The math wasn’t working, because my stupid calculator refused to let me insert a fraction without first converting it to a decimal ? ?
In the end, after much cussing and hair pulling I figured it out. I centered the top and bottom tube straps first then figured I’d tackle the even spacing of the remaining 5 sets.
I tried math again (ouchie) and then started grabbing scrap wood to see if any one of those would allow me to evenly space the remaining tube straps. A plywood scrap was too narrow and a paint stick laid flat was too wide.
But…… sandwich them together, for the WIN!!!!!


With my spacing dilemma solved it was time to finish making the vinyl storage rack.
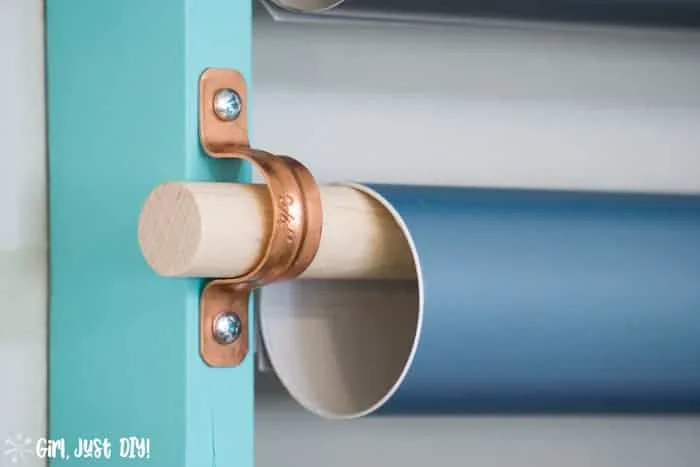
- Hold the copper tube strap in place and use the Scratch Awl to make an indent in the center of each hole. This will give the screw head something to catch quickly and ensure it stays centered.
- You may want/need to do a little pre-drilling. I did some tests on mine and it looked good enough not to pre-drill with the small 1/2″ screw. Full transparency, I had one screw make a tiny split.
- The actual spacing of the straps turns out this way:
- Top and Bottom straps are 1-1/16″ from ends
- Spacing between the rest of the tube straps is 15/16″
- Yes, yes I do honestly do have OCD and it would drive me crazy, even though it’s mostly hidden behind the door, if they weren’t evenly spaced or were lopsided.

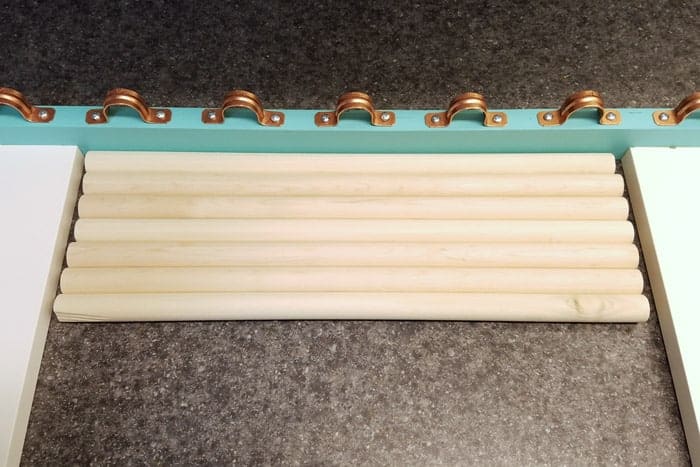
Step 5: Cut dowels to length
Now that all the straps are installed cut the dowels to 15.5″ long. Or you may have done that already when you cut the other boards. Give the ends a little sanding to smooth them out and you’re ready for installation.

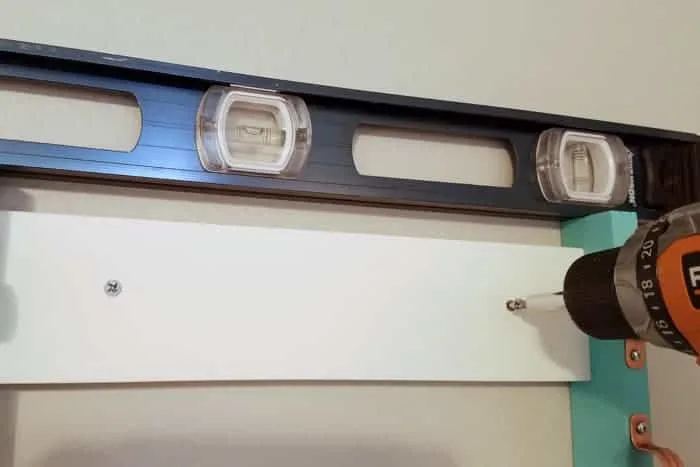
Install your new craft vinyl storage rack to the wall with the proper hangers. This portion of my wall actually happens to be plywood so I was able to screw directly into the wall. You may need to use plastic wall anchors or something similar that can hold the weight of the vinyl storage rack and the rolls of vinyl.
Make sure you use a carpenter’s level before securing the other side to the wall. And I recommend pre-drilling the holes in the cross support.

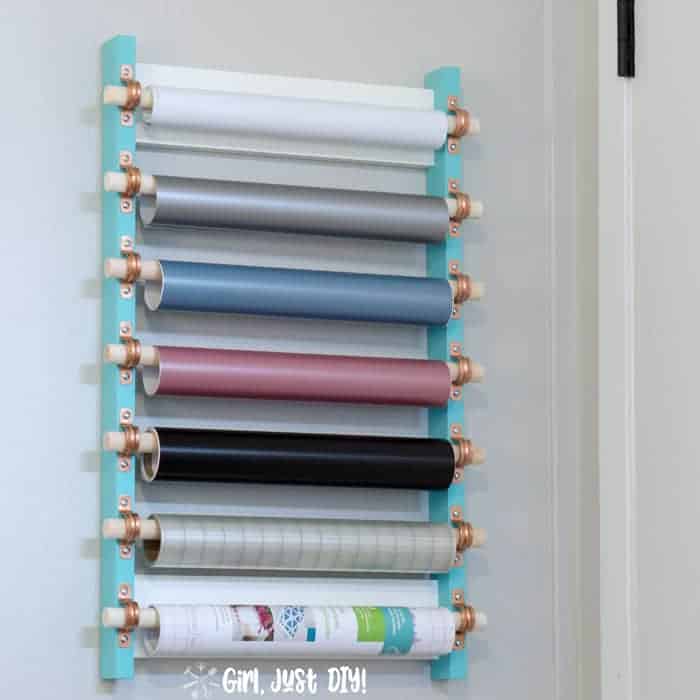
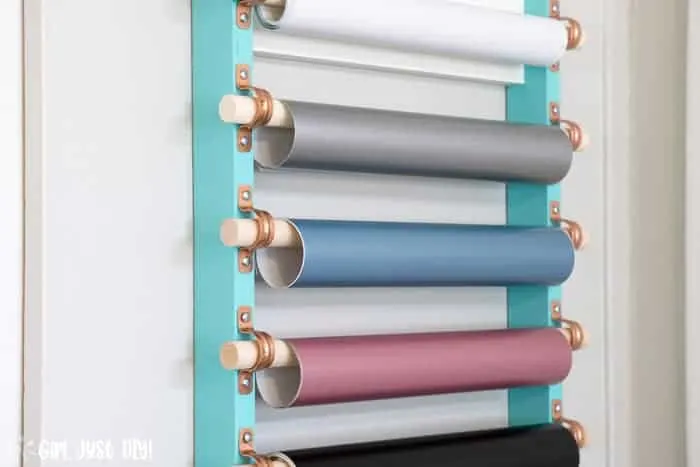
When I was searching the hardware store for these tube straps I never imagined they’d turn out so fabulous!

Now my vinyl will no longer get damaged, sad truth, I lost half a roll because it got squished.
Doesn’t it look pretty? Not that I’ll see it often since the door is usually open 😀

LOVE IT, PIN IT!!
As promised now you get to see 30 other creative organizing project by my talented friends. Click on the Image below to see all of their amazing projects.


Leave a comment and let me now which ones you love.
Belle Miller
Friday 1st of March 2024
Great idea! Thank you!
Holly
Wednesday 20th of March 2019
I love the vinyl storage rack! Do you have any problems with the vinyl unrolling? If so, what do you do? Thanks!
Toni | Girl, Just DIY!
Wednesday 20th of March 2019
Thank you, I'm glad you love my project and thank you for commenting! So far I haven't had any issues with the the longer rolls unrolling. But I have a few samples of 12"x12" that came on a roll and they want to unroll. For those I used a bit of blue painter's tape to keep them together. You could also slip a rubber band around the roll, or maybe some of those plastic clips that are made for wrapping paper.
15 Built for Organizing Projects you can Build - Girl, Just DIY!
Thursday 28th of February 2019
[…] projects together and the rest are in no particular order. They are all some of my favorites from our first At Home DIY monthly challenges. It was hard to choose but I focused on the projects that required at least a little […]
15 Organizing DIYs for Your Entire Home | By Brittany Goldwyn | Live Creatively
Tuesday 26th of February 2019
[…] 14. Beautiful Vinyl Storage Rack // Girl, Just DIY […]
Christine Cook
Tuesday 19th of February 2019
Oh!! What a great way to store vinyl!!! I want one!!!