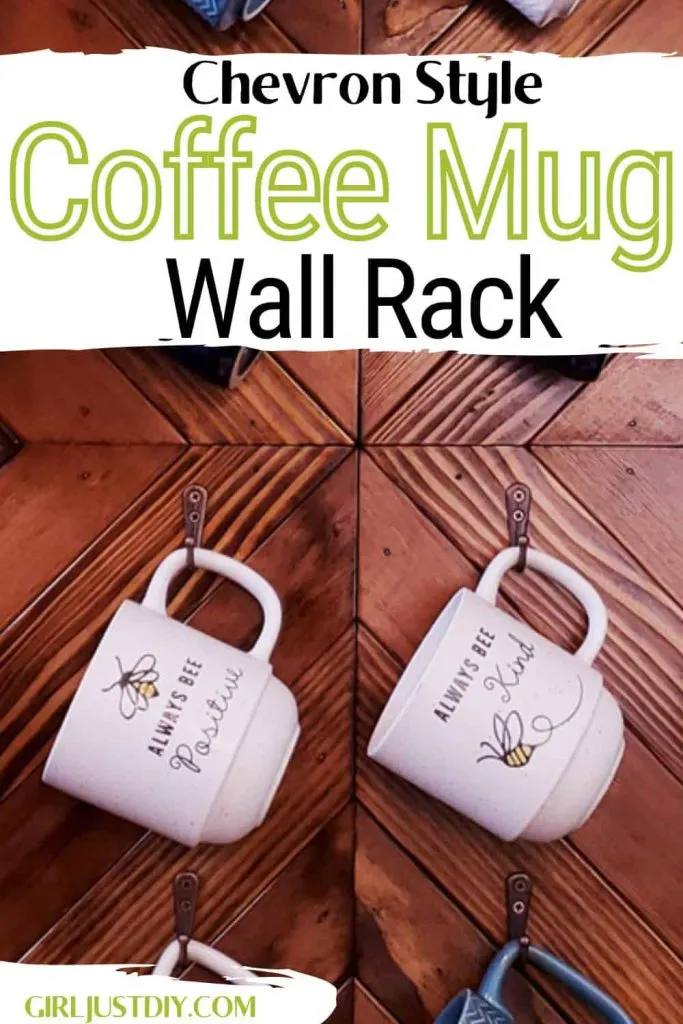
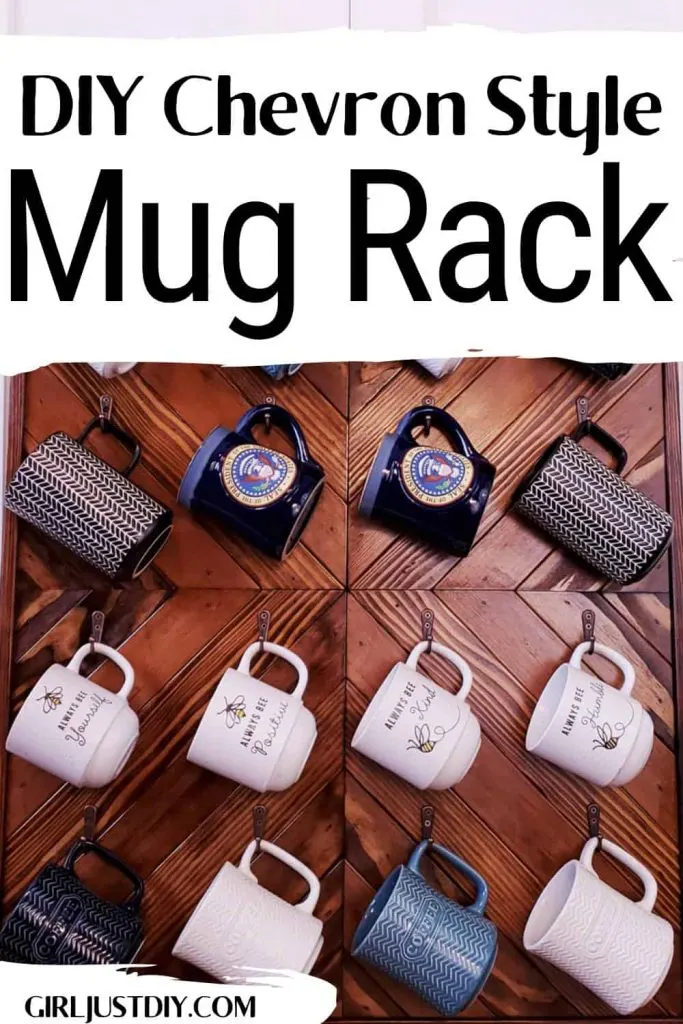
Does your coffee mug collection exceed your available cabinet space? If you have this problem too I’ll show how to make this DIY Coffee Mug Rack that also doubles as wall art for your kitchen.

My daughter started collecting some cute coffee mugs and when she got engaged and after they got married the collection exploded. There were more than a few sets of Mr. & Mrs. and Bride & Groom mugs 😀
When I asked if they wanted me to build them a coffee mug holder she said, “Yes! Can you make one to hold 40?” What? 40?! OMG that’s a lot of coffee mugs.
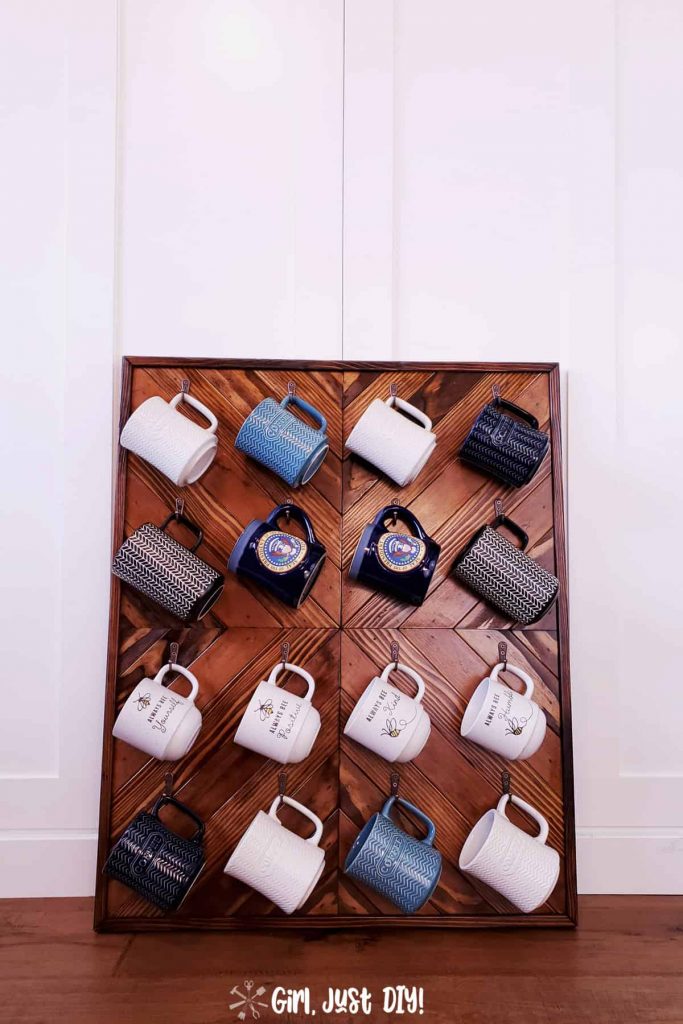
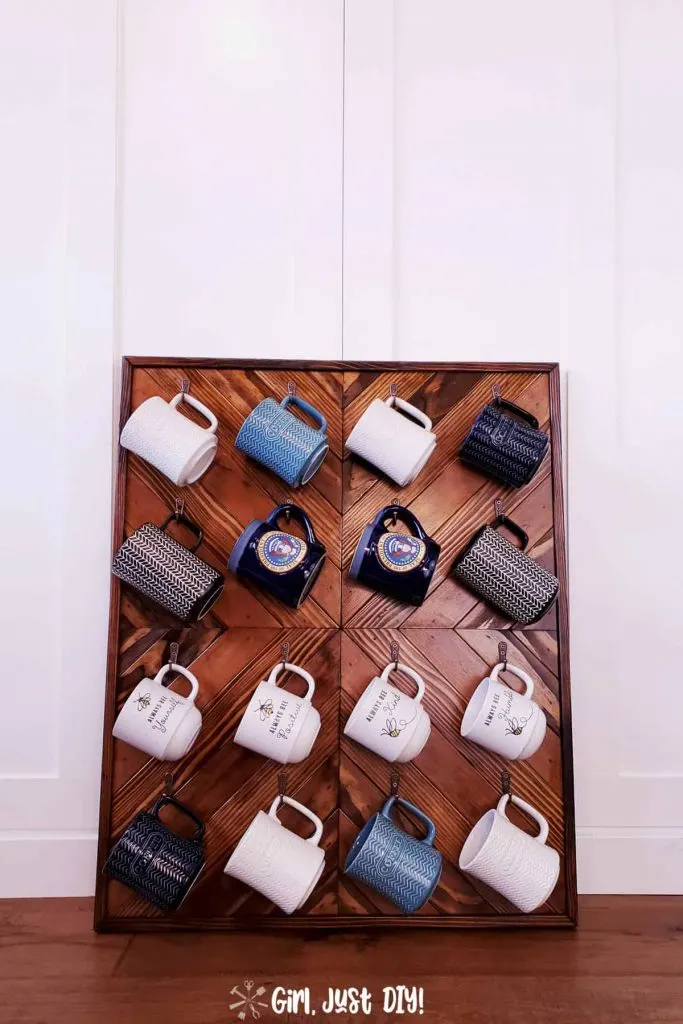
This one doesn’t hold 40 (that would take up the entire wall) but it does hold 16 mugs nicely with enough space to get them on and off without any clanking.
This page contains links to products, if you purchase something after clicking on my link I may earn a small commission (at no extra cost to you).
Mug Rack Supply List
- 1/4″ Plywood
- 1″ x 3″ x 8′ Douglas Fir Boards (6, or 7 if framing)
- Craft or Builder’s Paper
- Table Saw
- Miter Saw
- Circular Saw
- Brad Nailer
- Straight Edge
- Carpenter’s square
- Speed Square
- Tape Measure
- Electric Sander
- Sanding Sponge
- Painter’s Tape
- Wood Glue
- Wood Stain – I used Honey Stain
- Paint Brush or Rag
- Polyurethane or similar top coat
- I used these Mug Hooks
- Drywall Picture Hangers
- D-Ring Picture hangers
Design your DIY Coffee Mug Holder
- Pick a size that will work for your space.
- Do you want a Rack or a Shelf?
- How many do you want it to hold?
- What’s your interior style?
I sent my daughter and son-in-law a few ideas I found on Pinterest to see what they liked. A lot were made from pallets for a more shabby chic or farmhouse style mug holders.
That’s not their style so I knew I’d be using new lumber.
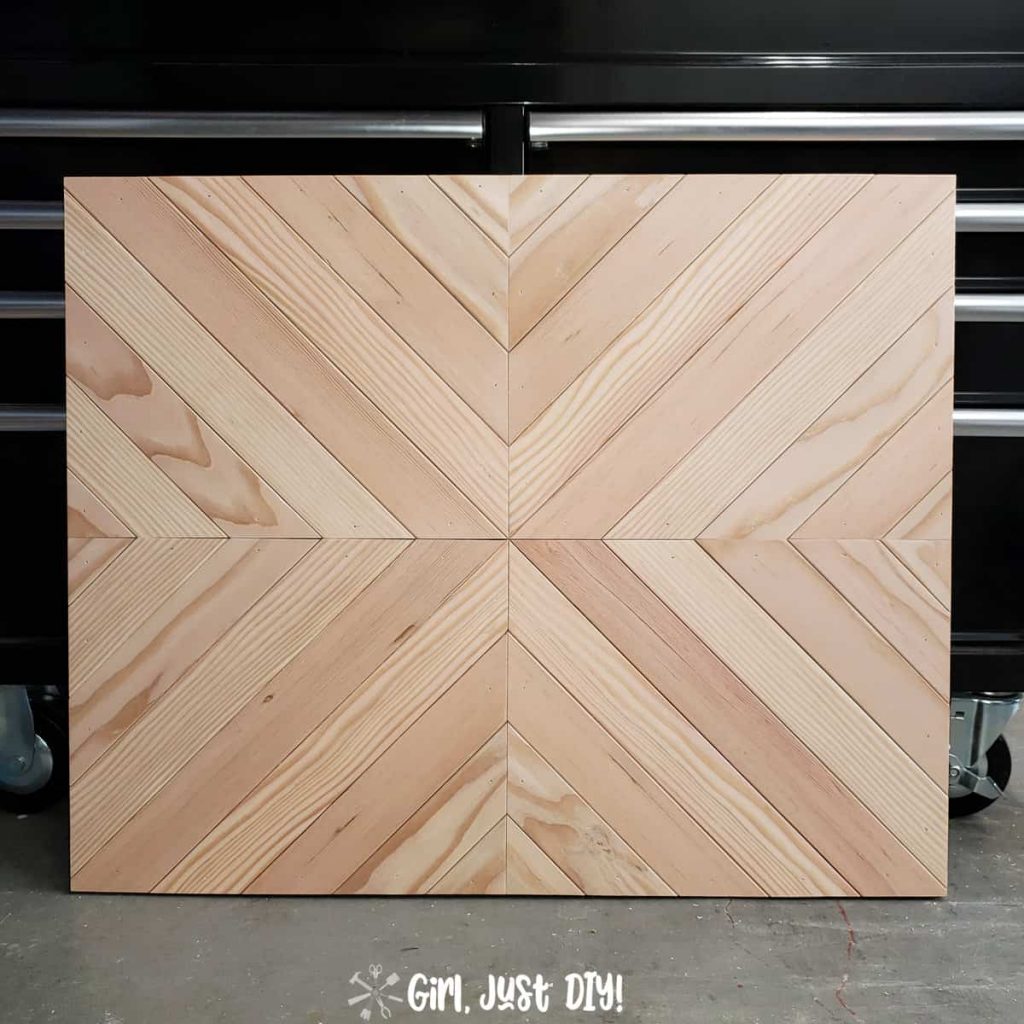
Some had hooks and some were like a display shelf. They definitely wanted hooks and settled on a chevron-pattern. Which is amazing!
It’s so pretty you could seriously use this as chevron wall art if you wanted to, without the hooks of course. I’ll show you what that looks like in a little bit.
Building a DIY Coffee Mug Wall Rack
Step 1: Determine the proper size rack for your space
While visiting my daughter we measured her space and decided it should be no bigger than 30″ square. Before I purchased or made any cuts into wood I planned it out the on paper.
I had already purchased the mug hooks and I suggest you at least know the size you want to use for this step.
- Cut a large section of craft or builder’s paper. Tape two pieces together if necessary.
- Gather your mugs and lay them out how you want them once on the wall. Tilt them how they’d hang from the cup handle.
- Allow space for the hooks.
- Once you have your mugs spaced out how you like them measure top to bottom and side to side. Allow an inch or so on all sides.
When I did my plan I used the same size coffee cups and this DIY Mug Rack measures 26″ x 32″ before I added the trim.
Step 2: Cut the plywood backing for your coffee mug rack
Since I planned to make this mug rack with a chevron pattern I’d need a backing to glue and nail the boards to. I had a huge scrap of 1/4″ plywood on hand so off to the table saw I went.
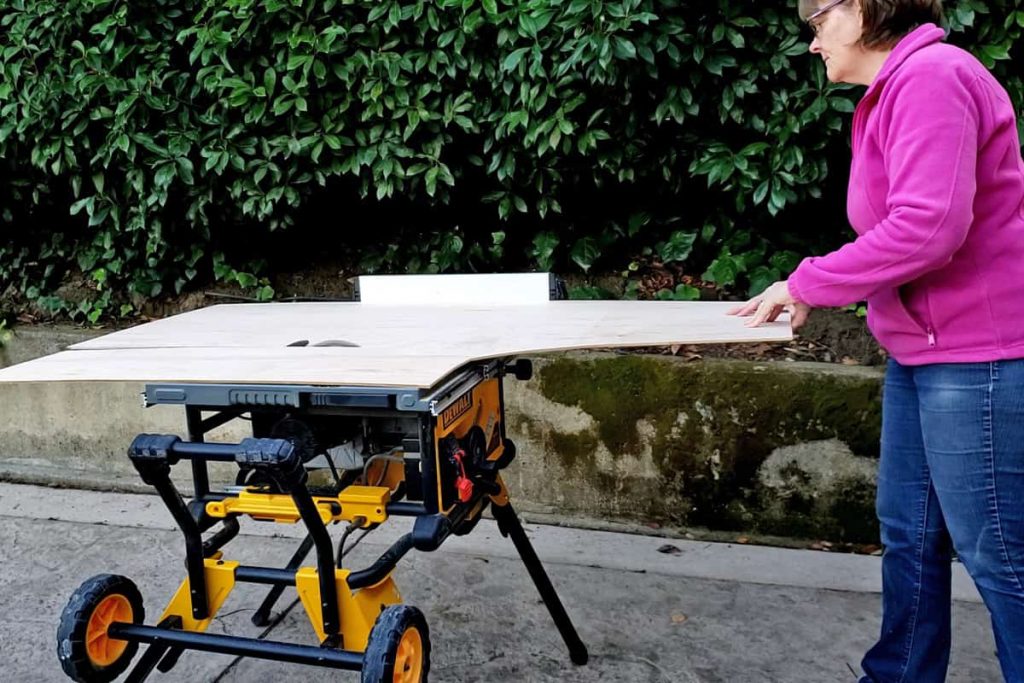
Thankfully my table saw has a good extension for the fence so I was able to rip a section 26″ wide off the factory edge. This assured my cut would be square. Alternatively you could use a circular saw with a clamped straight edge or a rip-cut guide.
Some big box hardware stores sell sections of plywood, but they’re generally 2’x4′ so too narrow for my project.
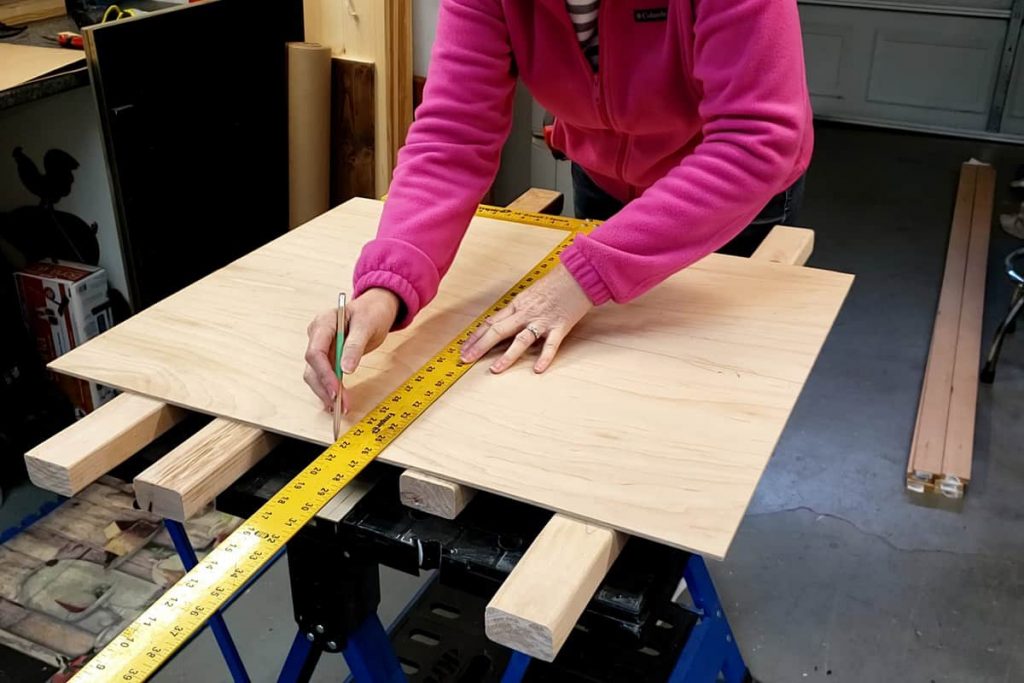
Step 3: Measure and mark the sections
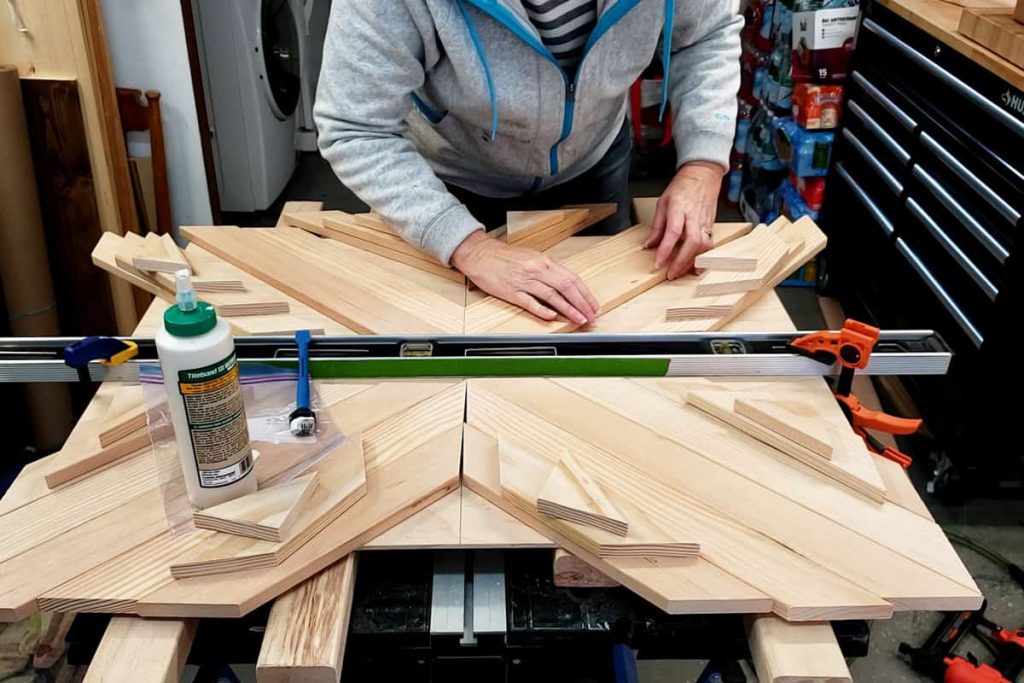
The design for this DIY mug rack has the chevron pattern meeting in the middle so it’s necessary to mark 4 even quadrants.
- Measure and mark with a pencil the center of all edges. So 13″ on the top and bottom and and 16″ on the sides.
- Using a straight-edge, a carpenter’s square or a T-square draw the lines across the marks to make the four sections
- With a pencil mark the sections 1-2-3-4 in whatever order makes sense to you you. I did mine top left to bottom right. You’ll see why I did this in a bit.

Step 4: Measure and cut the lumber to create the chevron pattern
You can use whatever boards or lumber you want for your DIY mug rack. I wanted some grain variation to make the chevron pattern really stand out once stained. You can find mixed-grain Douglas Fir boards at Home Depot or at Lowes (where I bought mine).
I used this same type of wood when I built the Chevron Storage Cabinet and the quality I found at Lowe’s was great. It costs a little more for this particular Douglas Fir but it’s worth it for the quality over cheaper lumber.
Because the DIY mug rack is taller than it is wide, and the cuts intersect in two directions the measurements vary slightly along the top and bottom versus the left and right sides.

I cut my boards just slightly longer than the backer so they could be trimmed all at once after they were attached. This way my cuts didn’t need to be super exact.
Also, since I planned to frame it I wanted the edges all to be smooth.
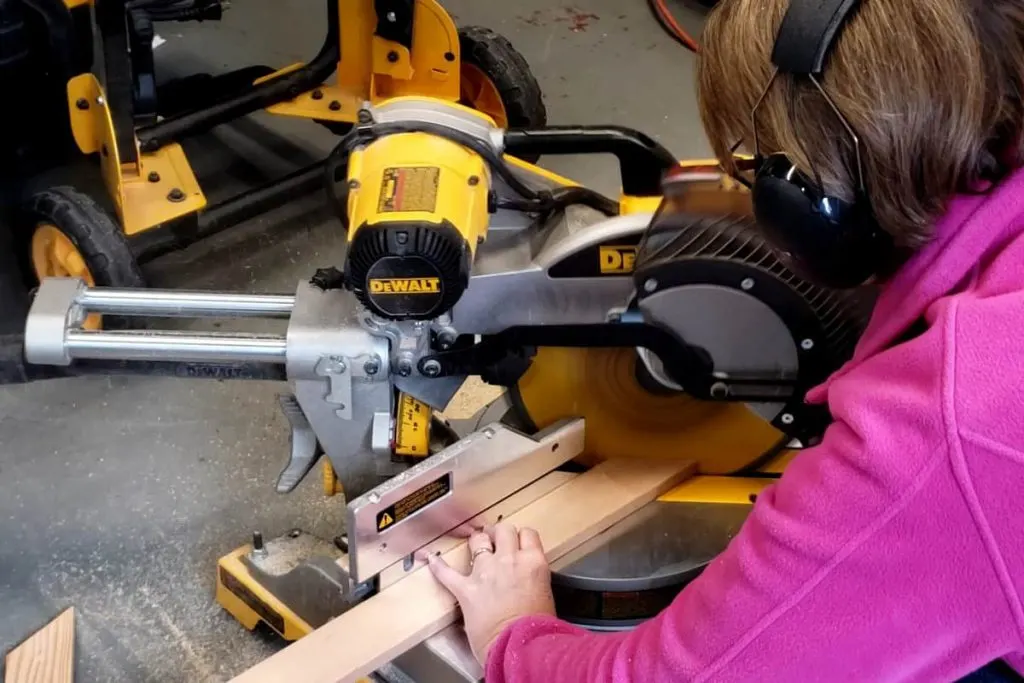
Starting with the 26″ edge closest to me I cut the following lengths going counter-clockwise for the lower right section. These are the same length cuts for all 4 sections (the sections mirror each other)
At the miter saw start with a 45° cut and measure along the longest points to make the cuts below.
- 3-3/4″ (I cut the shortest ones last)
- 8-1/2″
- 13-1/4″
- 18″
- 19-1/2″
- 18-1/2″
- 13-3/4″
- 9″
- 4-1/2″
When all the chevron pieces are cut and laid in place turn them over and mark them on the back with a pencil 1-1 thru 1-9 and 2-1 thru 2-9 etc for each section.

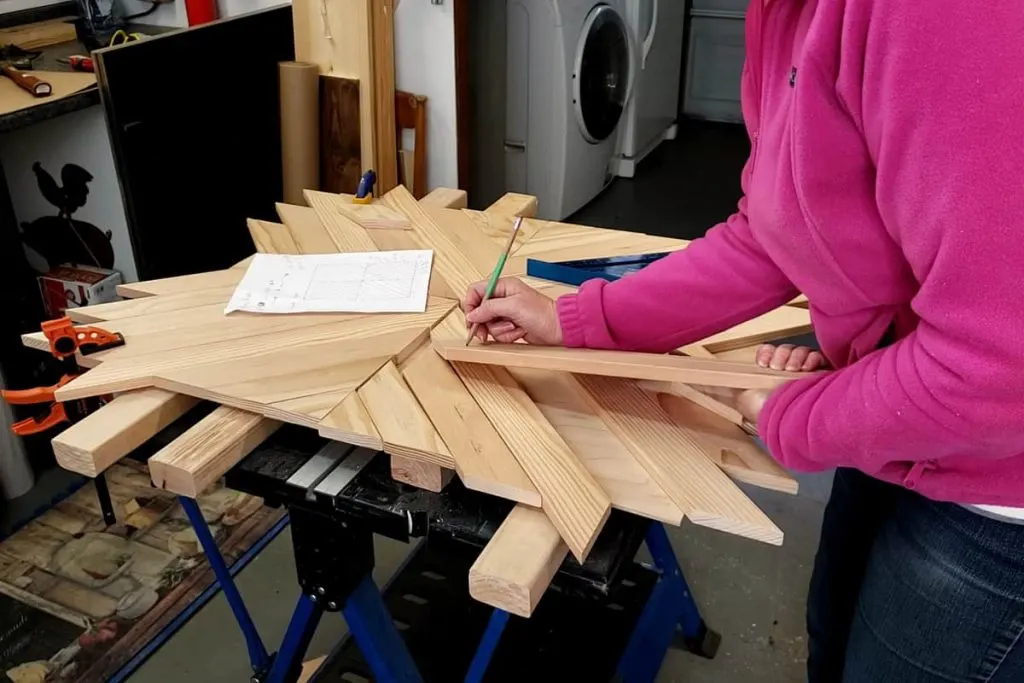
If yours look like my pictures you can mark the underside along the edge of backer with a pencil and trim off some of the excess. The numbers you added to the back side will help keep them in the correct order.
I took a few at a time to the miter saw and trimmed the excess with a 90° and put them back in place. When it’s time to assemble and the pieces get moved around you’ll be glad for the numbers.
Take a few minutes to sand the cut ends where they’ll meet. We’ll do a full sand a bit later.
It’s Time to Build the Mug Rack
Step 5: Assemble the Chevron Pattern
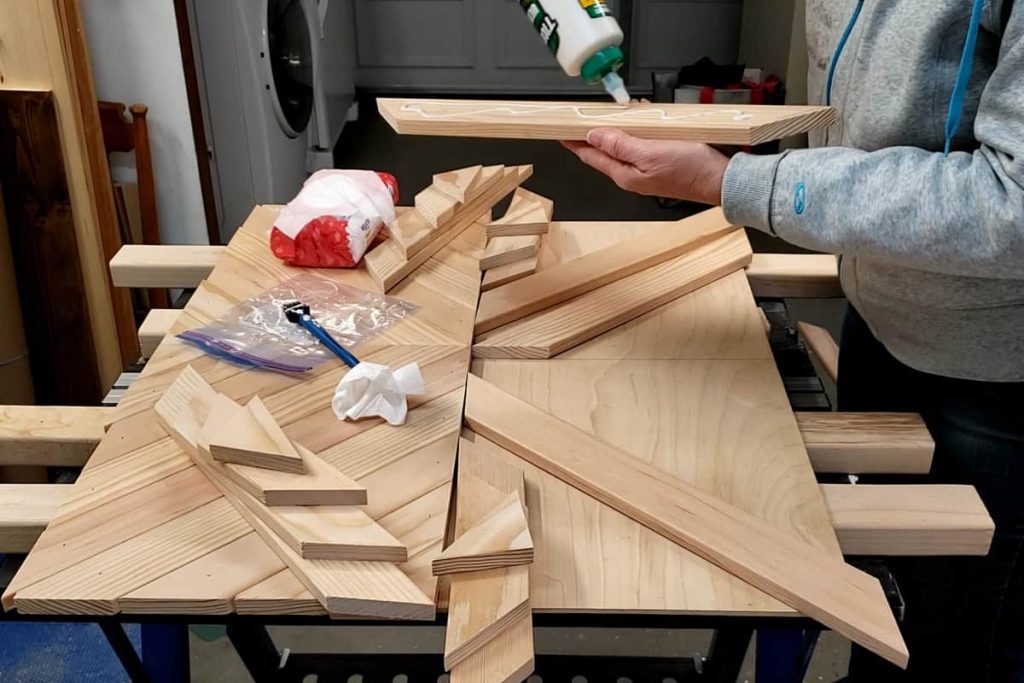
Grab your wood glue and your brad nailer.to start the fun part. Ok ok, it might be a little stressful at first until you get started.
You could make this without brad nails if your going to use it only for Chevron Wall Art and not as a mug rack. I wanted to make it as strong as possible so I used a few brad nails.
- Stack your cut pieces out of the way a bit.
- Clamp a 4′ level or stright edge across the wood backer just at your pencil mark that divides the sections. Use the carpenter square to make sure it’s square on the backer or all your pieces will be off.
- Put wood glue on the back of one of the pointed center pieces and line it up to the level and even with the pencil line.
- Attach with one 3/4″ brad nail on each end.
- Apply glue to the opposite piece and include a little glue on the end where the two boards will meet. Put it in place and brad nail like the other.
- As you continue to work on this section apply a little wood glue where the boards will meet. After nailing in place wipe off excess glue with a damp rag or baby wipe.
- Attach all the center pieces that make a point, then move to the outer pieces.


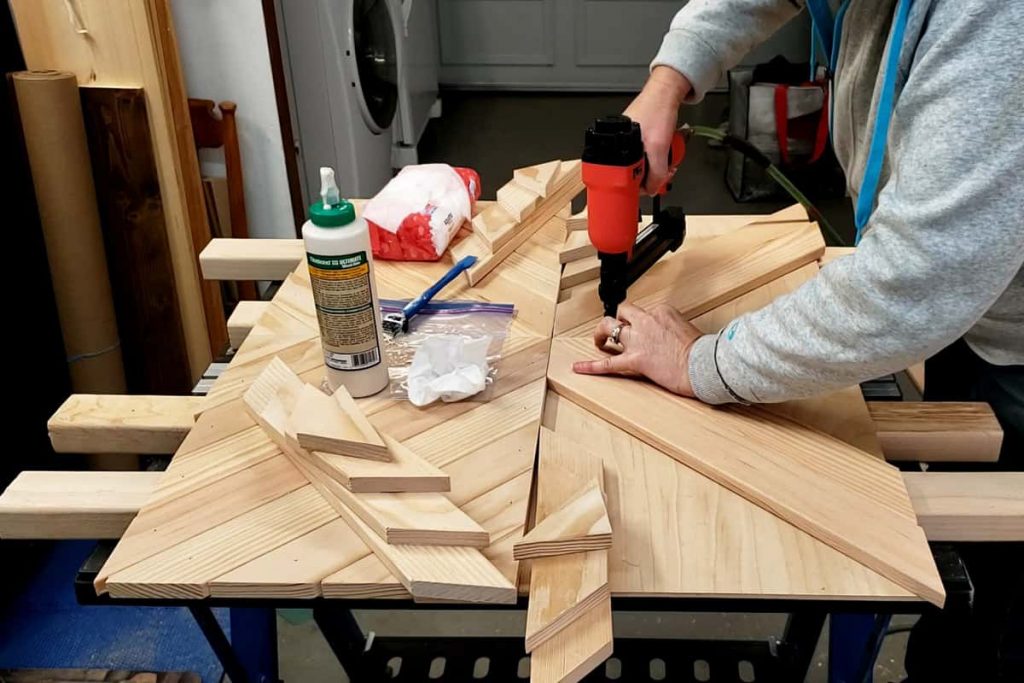

- When the first half is completed remove the clamped level and begin working on the other side.
- Follow the same pattern as the first side and attach the remaining chevron boards.
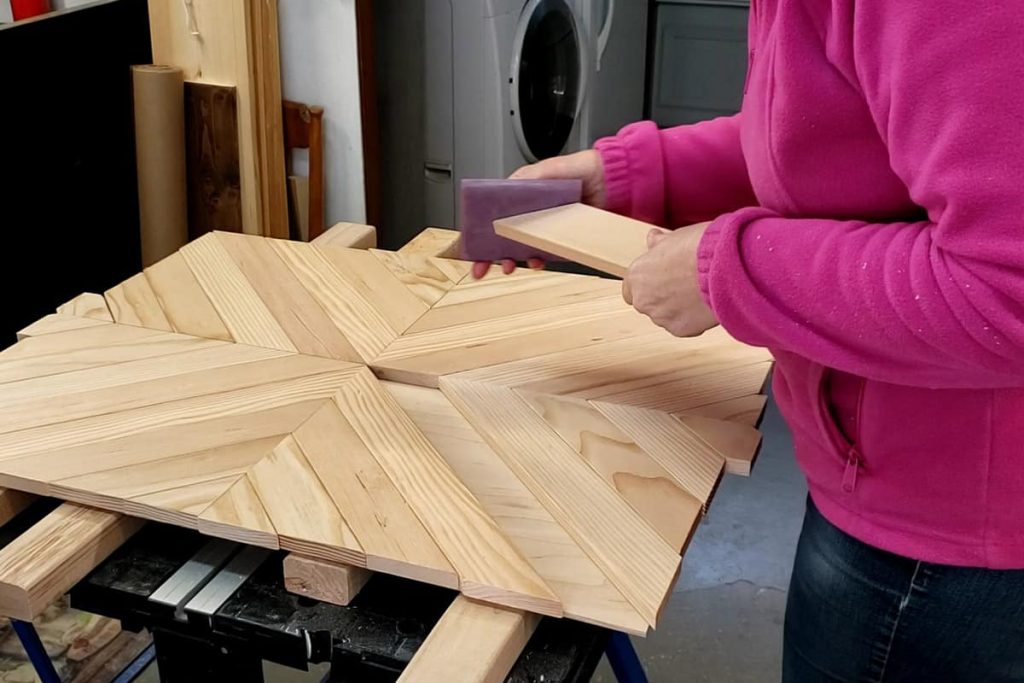
Step 6: Sand for a smooth finish
Grab your electric sander. You an use either a 1/4 sheet sander or an orbital sander.
- Start with 120 grit sandpaper and sand thoroughly.
- Switch to 220 grit and sand thoroughly again.

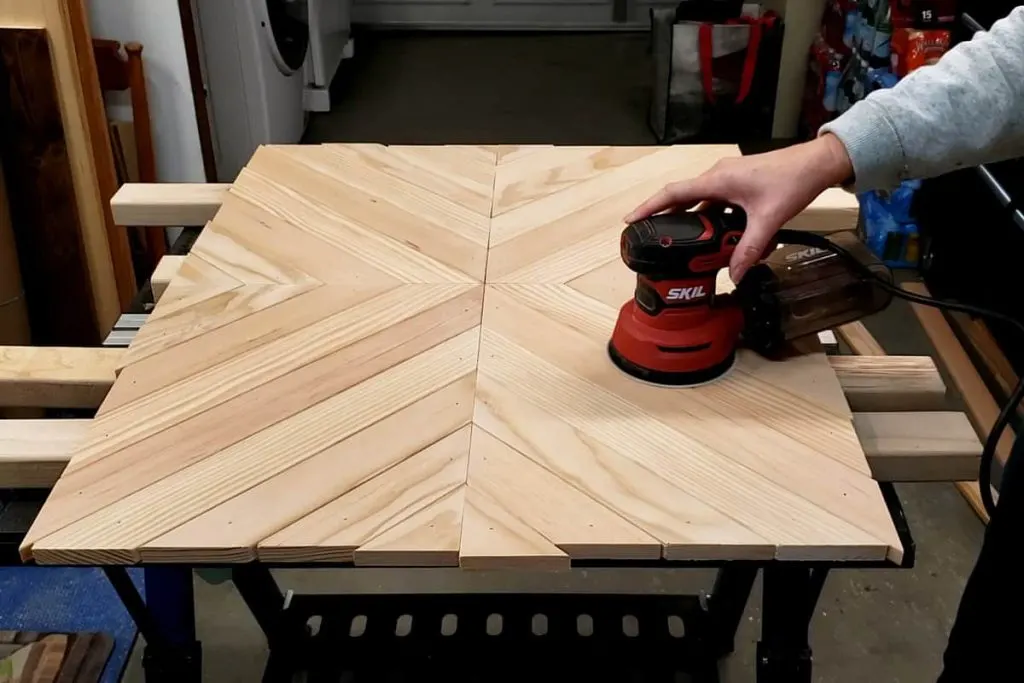
You could probably stop at 220 if this will be hung on the wall and used as a mug rack. Since I planned on putting a top coat on mine I wanted the surface to be smooth so I went all the way to 320 grit.
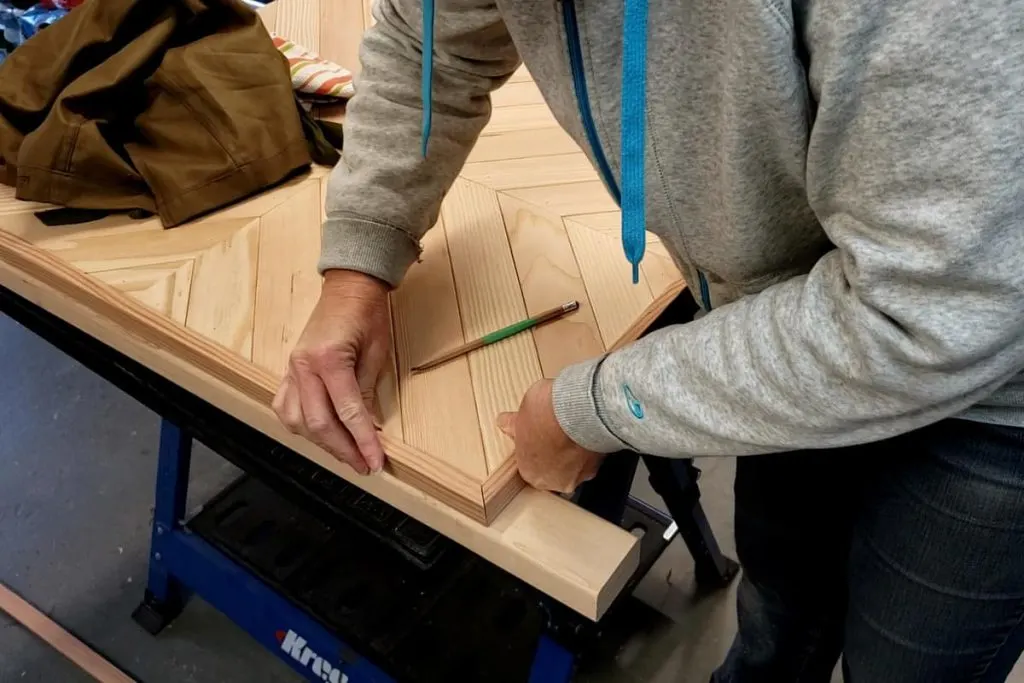
Step 7: Trim the excess
Now it’s time to trim off the excess wood that extends over the wood backer. A circular saw with a good 60 tooth blade will give you the best possible cut with the least tearout.
Because of the direction the blade spins, when using a circular saw you want to cut with the finished side down. So flip your DIY mug rack over onto your work surface.
- Measure the distance between the left-side edge of the deck of saw and the tooth of the saw blade.
- Clamp your straight edge this far from the edge of the backer. Measure both ends for symmetry.
- Line up the saw against the straight edge and with the blade a bit away from the mug holder start the saw.
- Slowly push it the saw toward the wood and cut slightly first to test, adjust the clamped straight edge as needed and complete your cut.
- Do this on the other three sides.

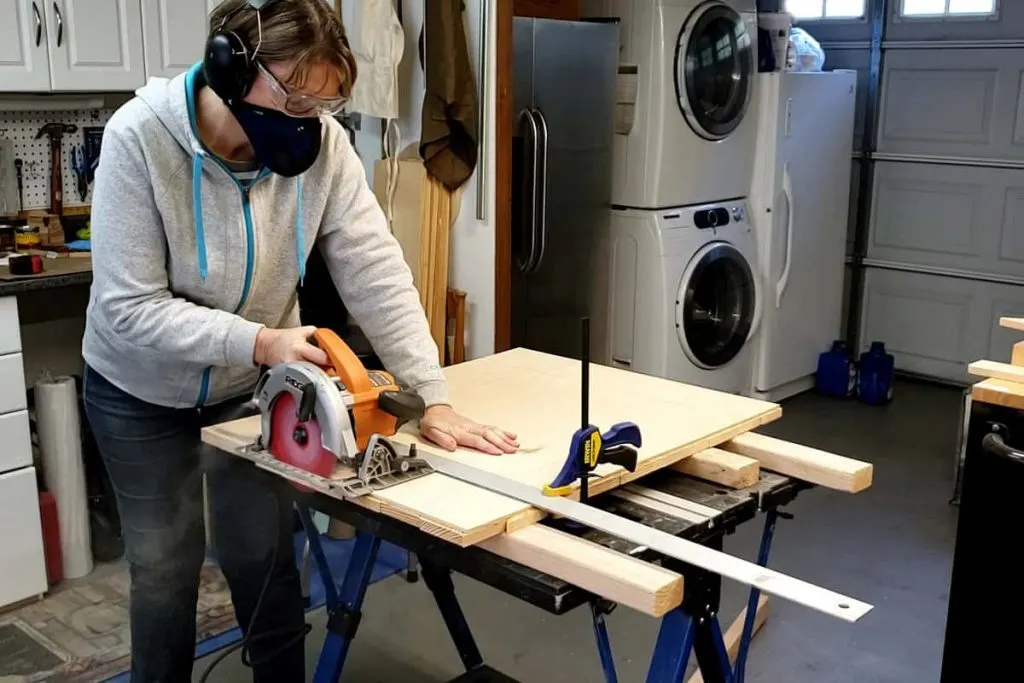
The more teeth on a saw blade the the finer the saw dust so it’s a good idea to wear a mask. Also, eye and hearing protection are always a good idea.
You should get a perfectly smooth edge like I did. If not give the edges a light sanding. Then wipe down the entire thing with a slightly damp rag or tack cloth.
Step 8: Make a frame for your mug rack
If you want your coffee mug rack framed follow the steps below.
- On the table saw Rip a few sections of the 1×3 material to 1-1/2″ wide to make the frame.
- Because these boards aren’t 3″ wide you’ll have
some wastesome scraps to use for another project. - Cut them standing on edge, two for the top and two for the sides to 26″ and 32″ long.
- It’s always best to cut a little long and then trim slightly as needed for a perfect fit.
- Sand the frame pieces with a sanding sponge.
- We’ll install them later.

How to finish your DIY Coffee Mug Rack
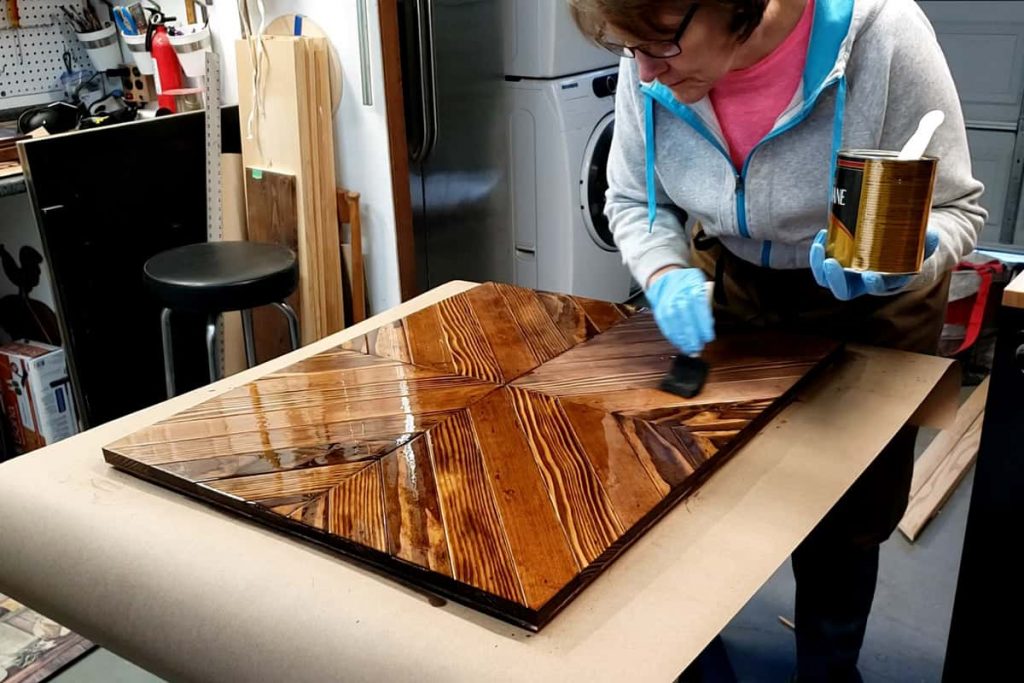
Step 9: Stain and Seal the Mug Rack
You can finish your chevron wall art or coffee mug rack to your liking. You can put a poly coat on the raw wood or stain it like I did.
If you’re going to stain it make sure there is no remaining wood glue in the seams. Wood glue does not take stain, at all.
If you see any remaining glue try trimming it out gently with a box knife and then give those areas a little sanding followed by a tack cloth over the entire project.
Stain in the color of your choice. Don’t forget to stain the frame pieces as well.
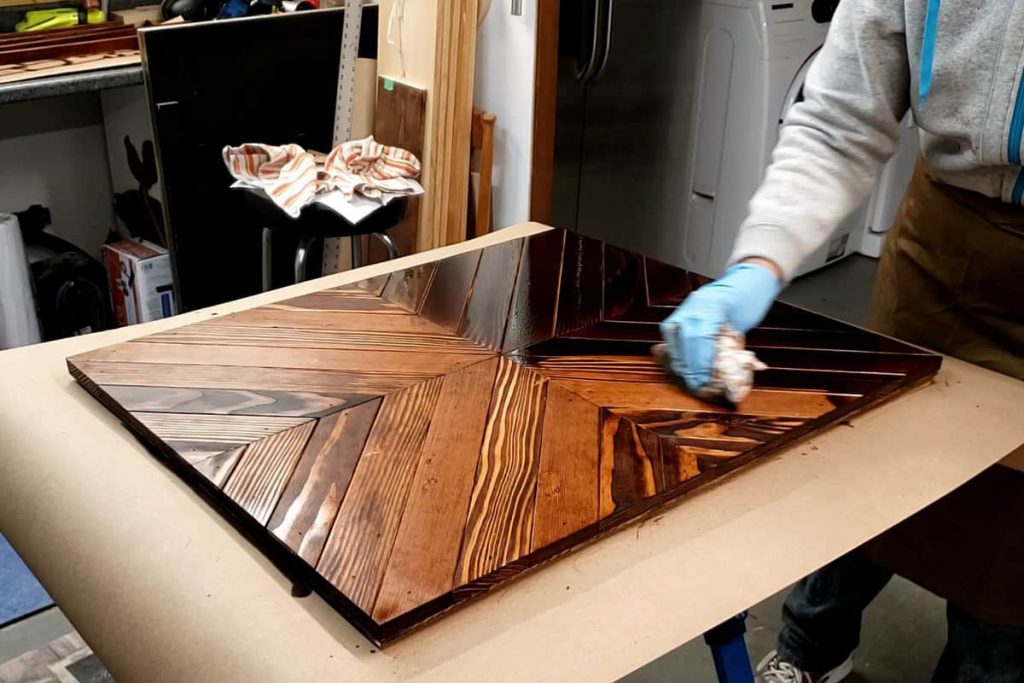

I applied a Satin Poly top coat to the mug rack and the frame pieces separately. This gives the cup rack some extra richness and protects it in case any of the coffee cups get hung up still a little wet.

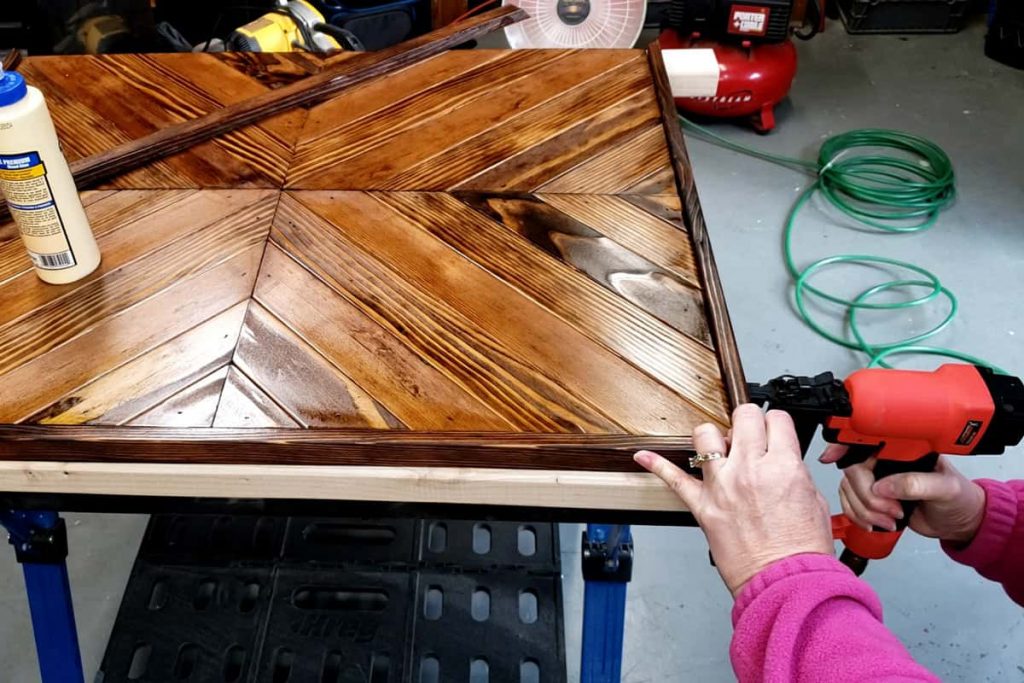
Step 10: Attach the Mug Rack Frame
It’s time to add the frame to your diy mug rack. Apply a little glue along the inside bottom edge of the frame pieces and nail in place with the brad nailer. Wipe away any excess wood glue that might ooze out.

Use it as DIY Chevron Wall Art
If you wanted to stop right here you’d have a beautiful Wooden Chevron Wall Art to display on any wall in your home. It’s pretty fabulous all by itself!
I’m seriously considering making one for myself to hang in my dining room!
But onward we go because this DIY project is all about making a Coffee Mug Rack for my daughter and son-in-law.
Step 11: Adding the Mug Rack hooks
I spent way too much time figuring out the placement of these mug rack hooks so I know it might bring you some frustration too. Below you’ll find the measurements I used. It’s about as perfect as I could get it.
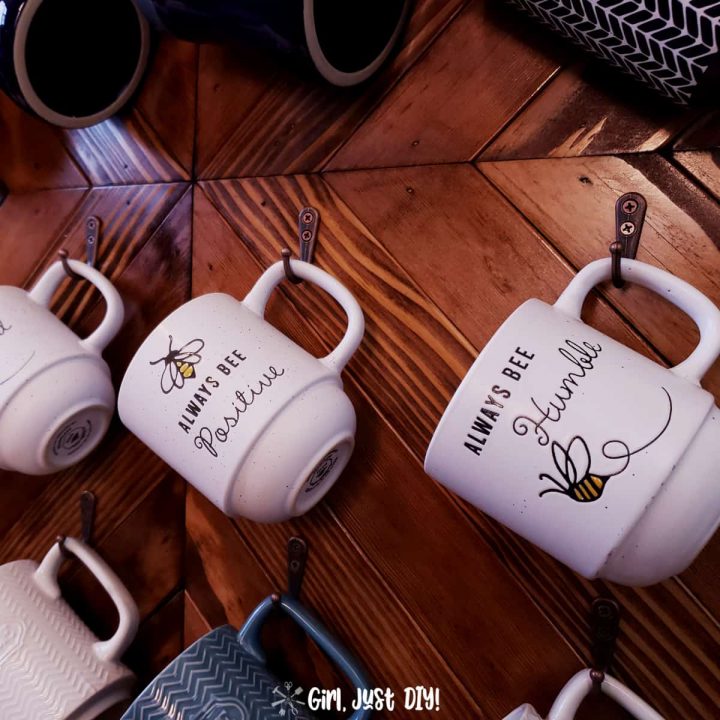
You may decide to add more hooks if you have smaller cups. But then you might cover the pretty chevron design in the the center.
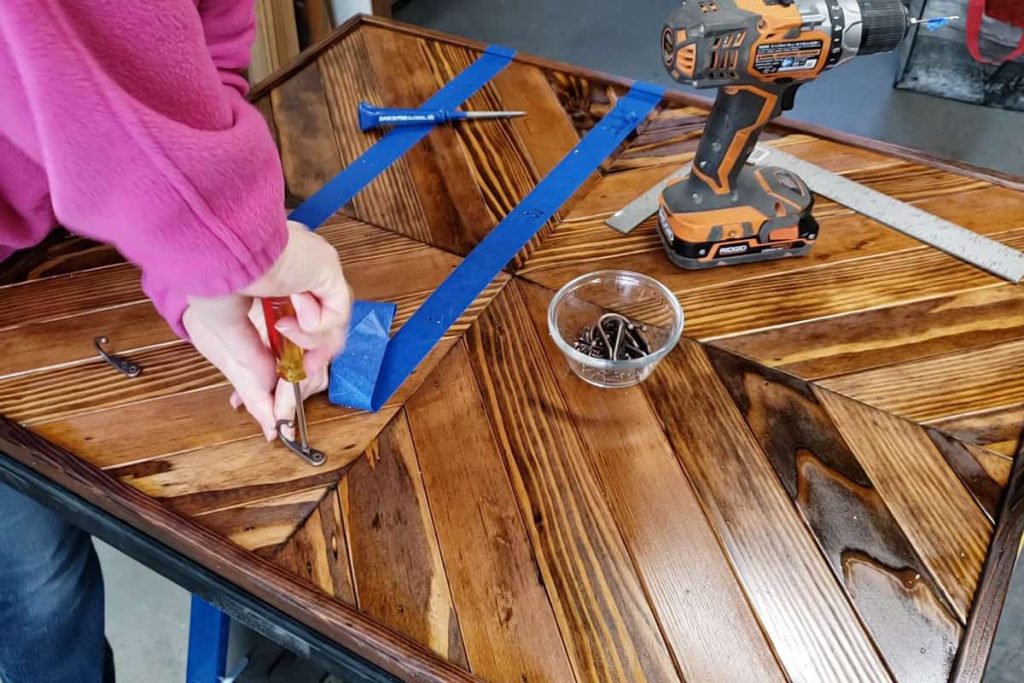

For these cup hooks I used the measurements are as follows. I suggest placing painter’s tape along the measurements for each Row of mugs so you don’t scratch the finish while you’re working.
Starting with the top row all measurements listed are to the top center of the hook. Use a Carpenter’s Square to draw a straight line on the painter’s tape for each row of hooks.
- Measure down from the top inside edge of the frame
- Row 1 – 3/4″
- Row 2 – 8-1/4″
- Row 3 – 16-7/8″
- Row 4 – 24-1/4″
- From the left and right inside edges measure in 3-1/4″ and 9-3/4″ for a total of 4 marks each row for the mug hooks
- To attach the hooks line up the top of the hook with the mark you made and dot the tape under the top hole with a sharpie.
- Use a Scratch Awl on the sharpie dot to dent the wood then predrill and install the first screw.
- Make sure the hook is straight then do the same process to install the bottom screw.
This is what it will look like with all your favorite coffee cups hanging from it.
Securely Hang Your Mug Rack
They were so thrilled when I gave this to them on Christmas morning and I couldn’t wait to get it hung up at their house. Below is the picture of it hanging in their kitchen by their coffee cart.
This DIY Mug Rack weighs 15 lbs without the mugs. So I went for extra strength and used 2 of these amazing Claw-Type Drywall Hooks that are rated at 45 lb each.
That was overkill but using two keeps the mug rack stable if there are more mugs on one side of the rack than the other. Plus I wanted to make sure this thing stayed on the wall.
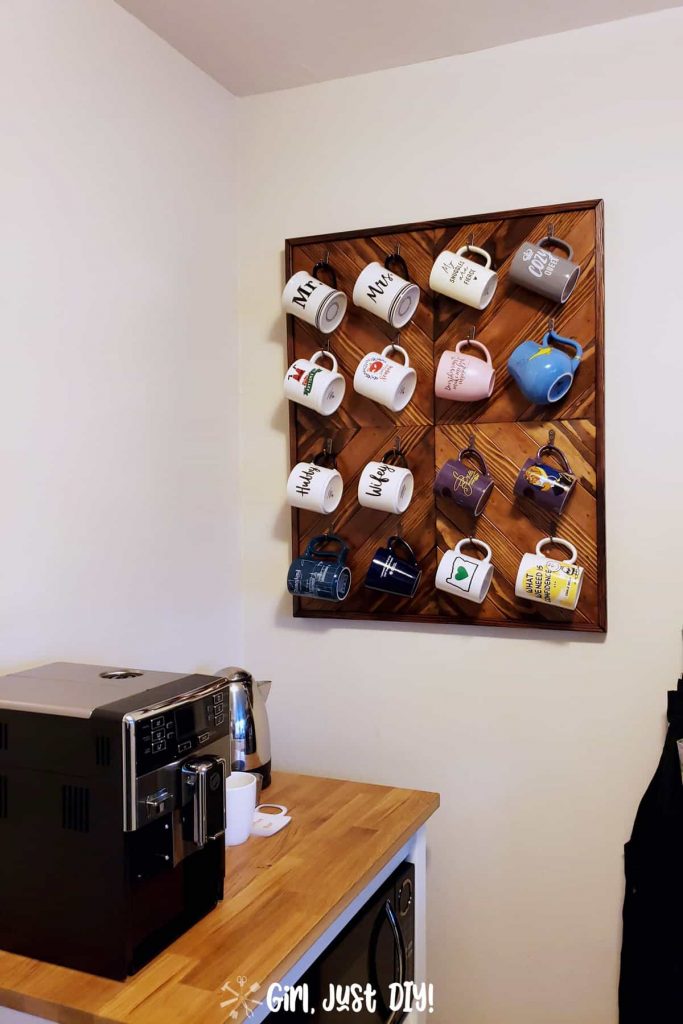

On the back of the mug rack I installed heavy duty D-Ring Picture hangers on either side with heavy-duty wire. I’m sorry I didn’t get any pictures of this part while we installed it at their house.
Here’s a link to a video that shows you how to properly and securely tie wire for a picture frame.
And that’s it, you’ve just built a beautiful coffee cup rack for your kitchen!
LOVE IT!! PIN IT!!
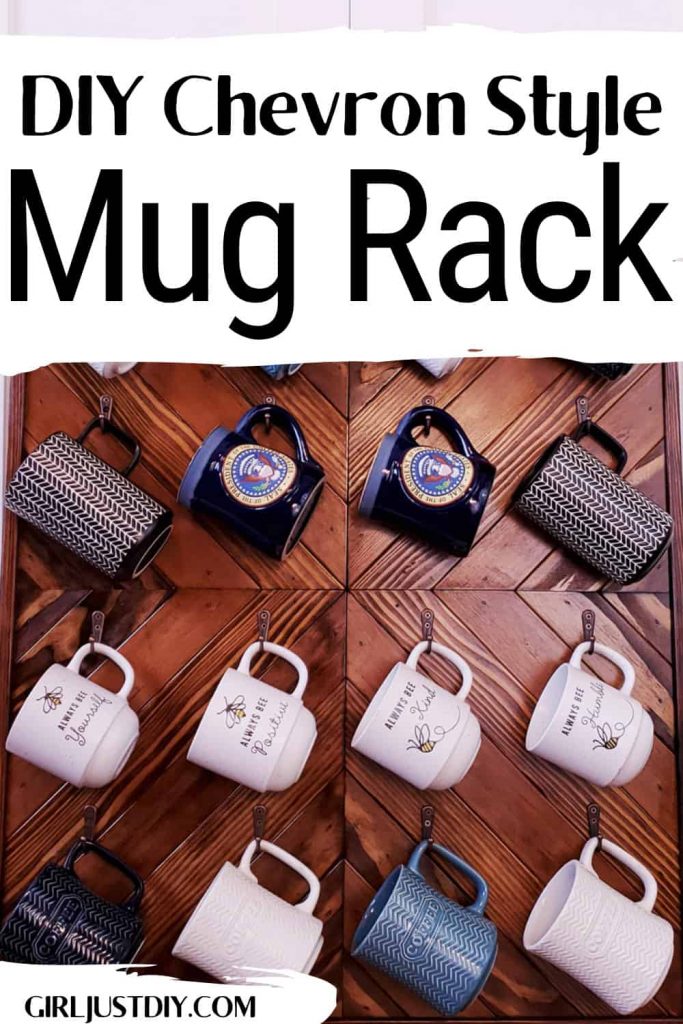

DIY Coffee Mug Rack
Build this beautiful Chevron Style DIY Coffee Mug Rack to display all your favorite coffee cups. This easy woodworking project also works great as wall art.
Materials
- 1/4" Plywood
- 1" x 3" x 8' Douglas Fir Boards (6, or 7 if framing)
- Craft or Builder's Paper
- Painter's Tape
- Wood Glue
- Wood Stain
- Brad Nails
- Mug Hooks
Tools
- Table Saw
- Miter Saw
- Circular Saw
- Brad Nailer
- Straight Edge
- Carpenter's square
- Speed Square
- Tape Measure
- Electric Sander
- Sanding Sponge
- Paint Brush or Rag
- Polyurethane or similar top coat
Instructions
- Determine the proper size for your rack - these instructions are for a 26"x32" rack.
- Cut the plywood backing for your coffee mug rack using the table saw or a circular saw.
- Measure and mark four equal sections. This will determine spacing for the chevron pattern.
- Measure and cut the boards to create the chevron pattern.
- Assemble the Chevron Pattern on one half first. Use a clamped straight edge or a level while gluing and nailing the boards into place.
- Sand for a smooth finish. Start with 120 grit and finish with 220. You can go to 320 grit if desired but I don't think it's necessary since it will be on the wall.
- Trim the excess boards flush with the plywood backing. You can use a clamped straight edge with a circular saw or a jig saw. I prefer the circular saw with a fine tooth blade for the smoothest edge.
- Make a frame for your mug rack. Rip lengths of the boards on the table saw to 1-1/2" wide then miter cut to 45° cut (cut them standing on edge) two for the top and two for the sides to 26" and 32" long. It's best to cut them slightly longer and shave off a little at a time to get the best fit.
- Stain and seal the mug rack. You can seal this with poly if yo like the plain wood look or stain it first with stain in your favorite shade. I used a Honey Shade of stain that my daughter really loves.
- Install the Mug Rack hooks with equal spacing in each section so that you can see the pretty chevron pattern in the center.
- Attach heavy duty D-ring picture hangers and wire on the back of the mug rack and use Claw-type sheetrock hangers on the wall to hang your new chevron style coffee mug rack.
Notes
Thanks for following along, I hope you love this coffee cup rack, or maybe just as Chevron Wall Art for your home. The total time estimate includes dry time of the stain and poly.
Jennifer
Tuesday 20th of January 2026
Hi. Love the "Always bee..." where did you get them? I had one like this that i want to replace. Thanks.
Toni
Thursday 29th of January 2026
Hi Jennifer, I got this set of cups at either Home Goods or Marshall's
Maddy
Monday 26th of September 2022
Love this mug rack! Thanks for sharing this DIY
Toni
Tuesday 3rd of January 2023
Thank you, I'm really proud of this one!
Carolann
Monday 31st of January 2022
Wow Toni! This turned out amazing ? you are so talented I just love it!
Toni
Tuesday 15th of February 2022
Thank you so much friend, my daughter loved it and I wish now I'd made two, one for me but without the hooks so I can just have it on the wall as decor.
Erin
Thursday 11th of March 2021
This turned out beautifully! I love the Chevron pattern.
Toni
Tuesday 30th of March 2021
Thank you, it turned out better than I saw it in my head!
Cheryl r Atkinson
Saturday 6th of March 2021
What an amazing mug rack. #1 I don't have tools like thay#2 I wouldn't know how to use them if I did. You created an awesome mug rack.
Toni
Tuesday 30th of March 2021
Thank you Cheryl, I really love it too! And could too totally learn to use tools like these if you wanted to. It's like anything new we learn how to do. I remember the first time I tried to sew... it wasn't pretty. My first cake didn't rise at all. And I've thrown out my fair share of wood that I cut wrong and torn apart projects that didn't work out. :)