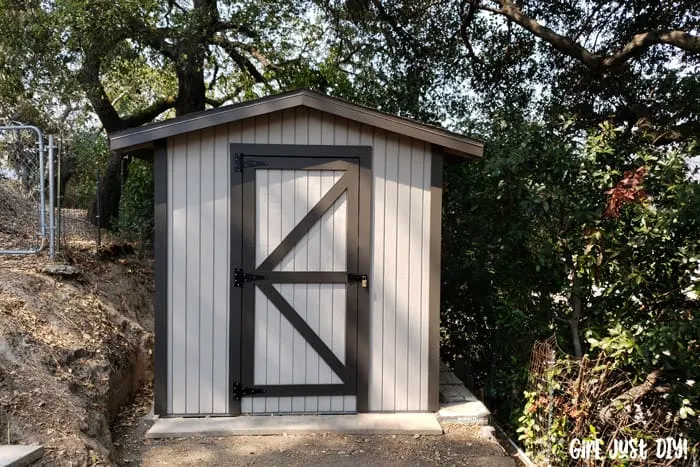
Friends, this post has been such a long long time in the making. It was slow going because 2020 (need I say more?). But the 8×10 Shed Plans are finally completed and I’m so excited to share this project with you.

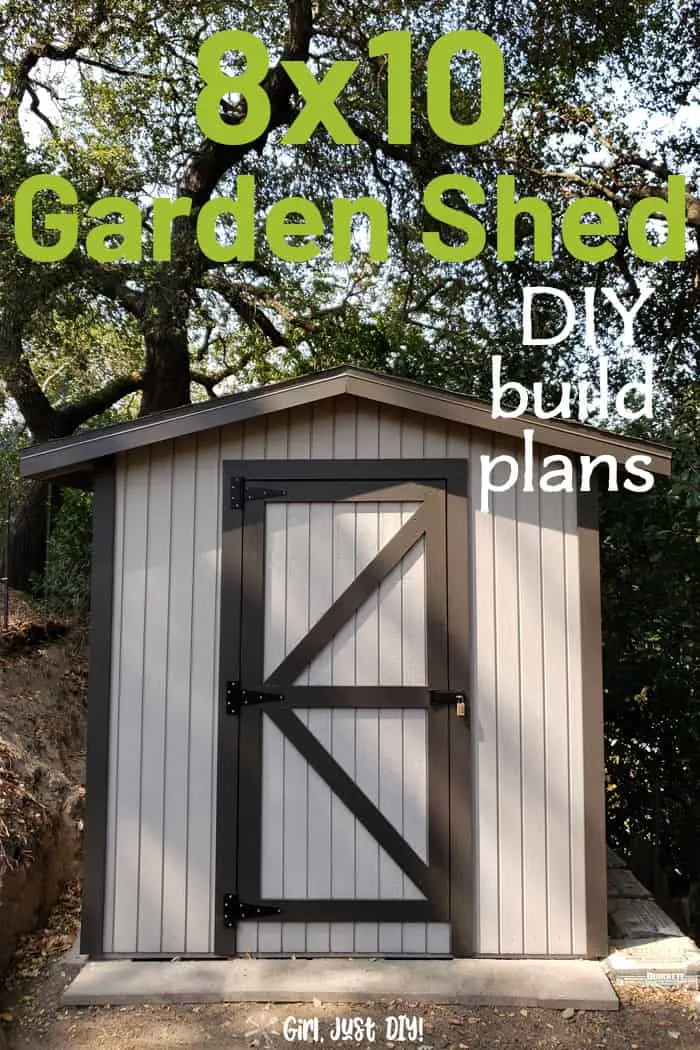
Many years ago we built a similar shed that we still use. Since our house is small and we want to use our garage less for storage and more as a work shop we decided to build another shed for those seldom-used items.
Now after some shifting around our original shed in the backyard can be used as the garden shed it was intended to be.
More Outdoor Projects
2×4 Outdoor Table – Modern 2×4 Bench
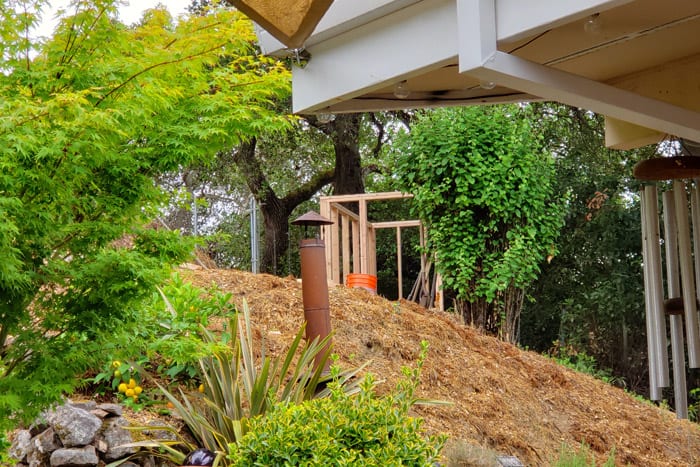
We built our new shed as a 7×9 because we’re extremely limited for flat space. We had to tuck it onto our hillside and that’s the size that worked for us. Because of this, some pictures might vary slightly from the plans for building an 8×10 shed.
How to build a shed on a budget
To be honest, building a shed won’t really be cheap, but building one yourself versus buying one or having one built will save you roughly $1000 for an 8×10 Shed.
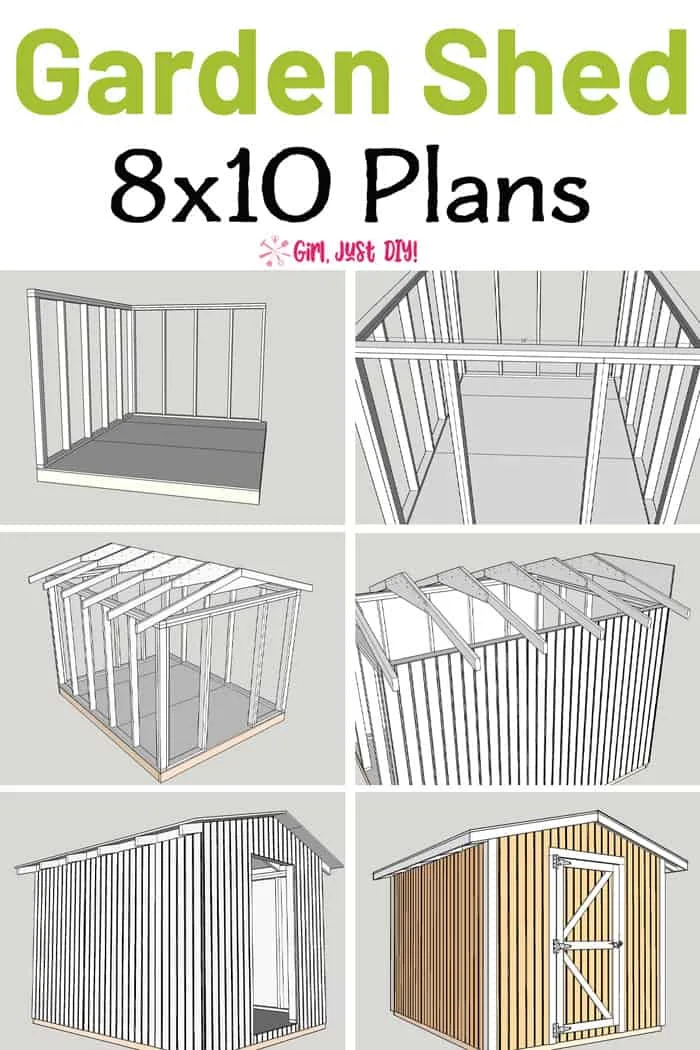
The detailed 8×10 Shed Plans I’ve created can be accessed below. You can modify the size up or down on your own as needed.
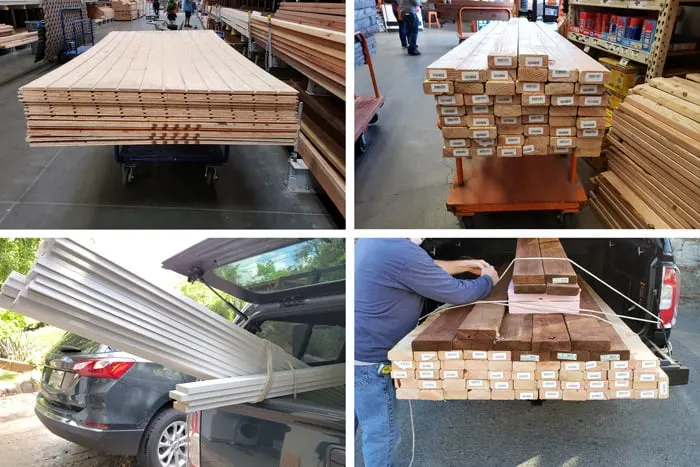
Originally we purchased this DIY Kit except we ordered it from Home Depot. After schlepping it home and inspecting it we weren’t happy with the durability or the size. Because we were afraid it wouldn’t hold up long term back to the store it went.
This page contains links to products, if you purchase something after clicking on a link I may earn a small commission (at no cost to you). If you do make a purchase, thank you!
You can read about affiliate links here.
Materials List
- 2×4 lumber per the plans
- Pressure Treated 2×6 lumber
- Pine 2x6s
- ¾” Construction Grade Plywood
- Texture 1-11 (T1-11) per the plans
- 1×4 Pine Trim boards
- Galvanized Rafter Tie
- Galvanized Steel Angle Brace
- Joist Hangers for 2×6
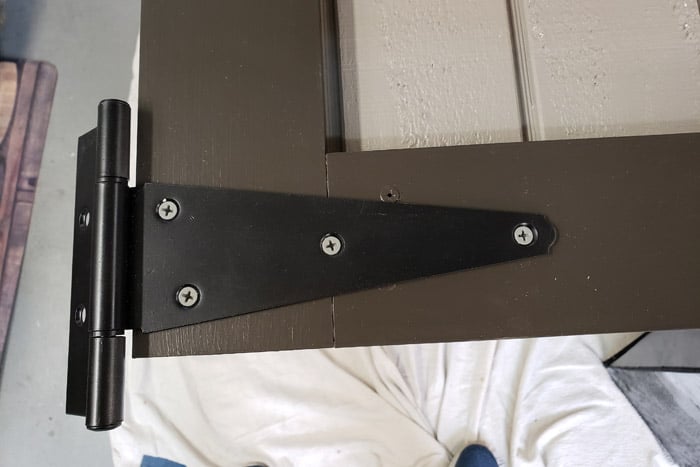
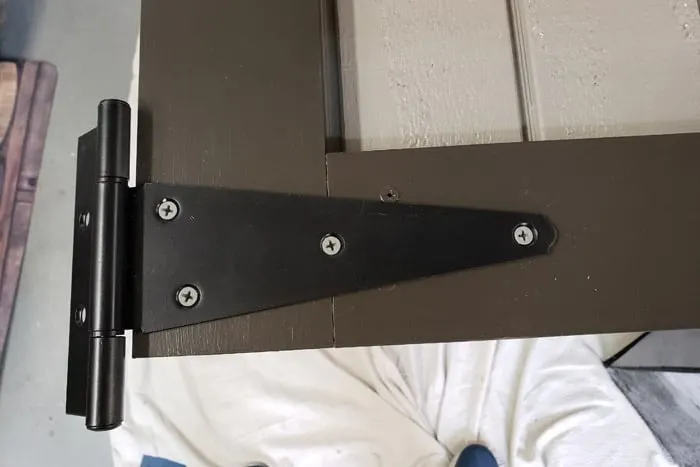
- 8″ Heavy Duty Tee Hinges
- Rotating Post Safety Hasp
- Roll Roofing Felt Paper
- Bundles Asphalt Shingles
- Drip Edge
- Exterior Primer
- Paint or Stain
- Framing Nails
- Finish Nails
- Exterior Grade Wood Screws
8×10 Shed Plans Tools List
- Miter Saw
- Table Saw (optional)
- Circular Saw
- Rip Cut Guide (optional but suggested if not using table saw)
- Reciprocating Saw (Sawzall)
- Cordless Drill
- Saw Horses
- Framing Nail Gun and Compressor (if not cordless nailer)
- Tape Measure
- Chalk Line
- String Line
- Straight Tin Snips
- Framing Square
- Carpenter’s Speed Square
- 4’ Level
- 4’ Straight Edge
- Bar Clamps
- 16 oz Hammer
- Airless Paint Sprayer 5/8 HP
After coming up with the 8×10 shed plans we went to our local big box home store to get the majority of building our supplies. We bought the primed trim molding at a local molding supplier.
It wasn’t much more expensive and was better quality than what a big box normally carries.

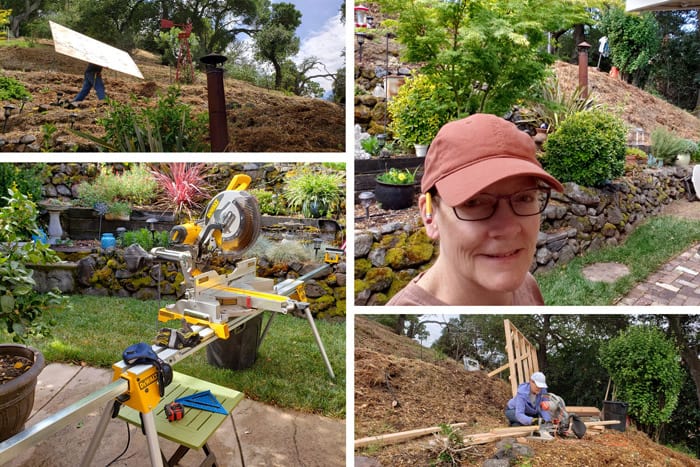
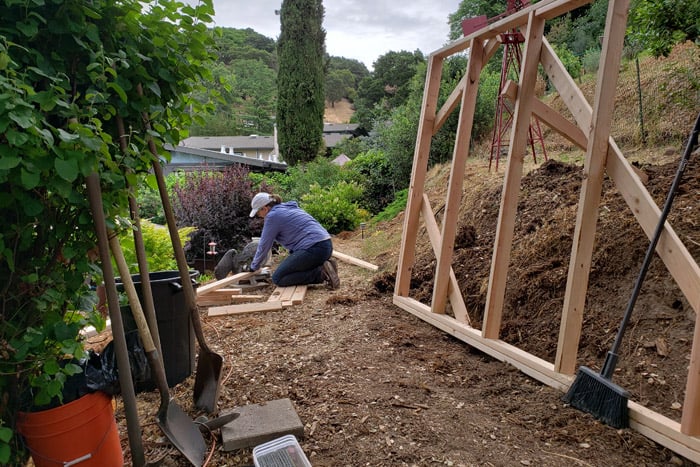
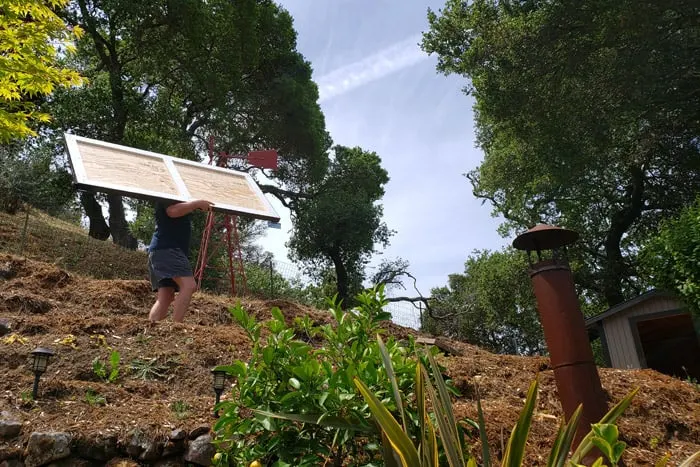
Building the shed was more challenging by our hill. I didn’t count the trips up and down per day but I know I got lots of good leg and glute work in during the process. So I count that a win. And my husband did the heaviest lifting up the stairs so I am blessed to have his muscle.

Prepare the Site for your 8×10 Shed
I can’t give you instruction on the best site preparation methods for your shed location. Only to say that it should be flat and stable. Everyone’s property is different and there are lots of ways to obtain a level build site. I linked to a few sources in the 8×10 Shed Plans below that you can use if needed.
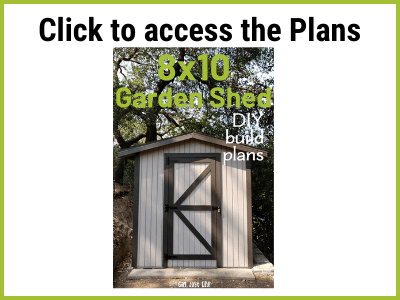
We don’t have a lot of extra flat area around our house so we needed to put our shed on our hillside. To do this my husband researched how to build a retaining wall with cement bags.
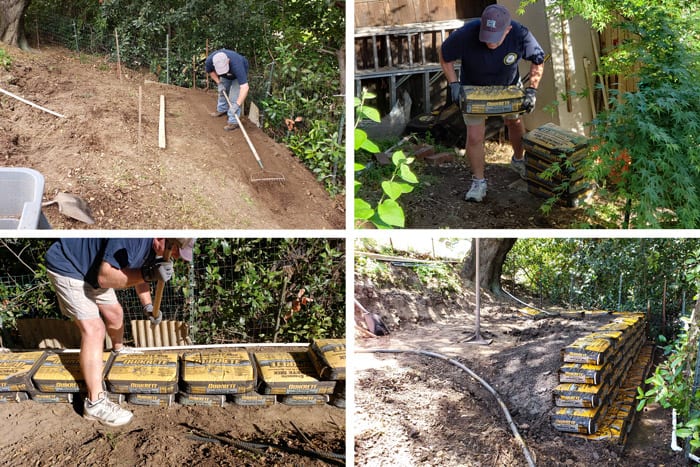
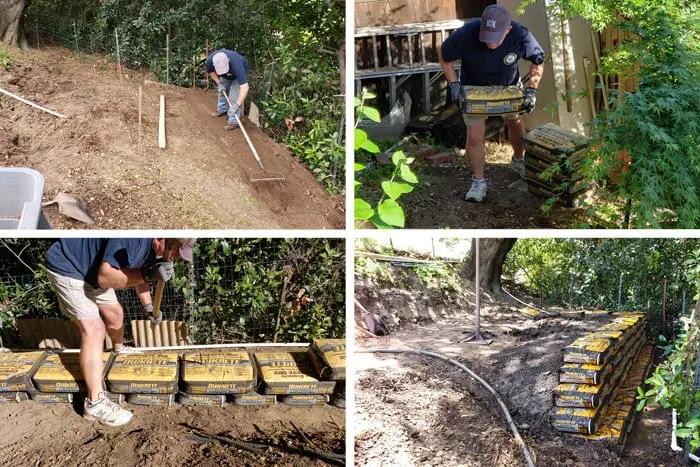
Yes, that’s correct, we used cement bags to build our retaining wall. And my husband carried every 60 lb back up the steep hillside himself. We held them in place with rebar first pinned deep into the ground and then into each other.
Don’t worry, we watered the bags often and well. We’re not the first people to use this method.

How to Build an 8×10 Shed from Plans
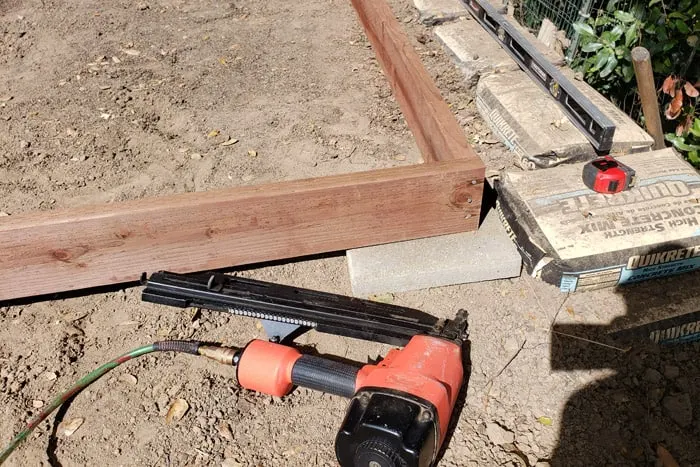
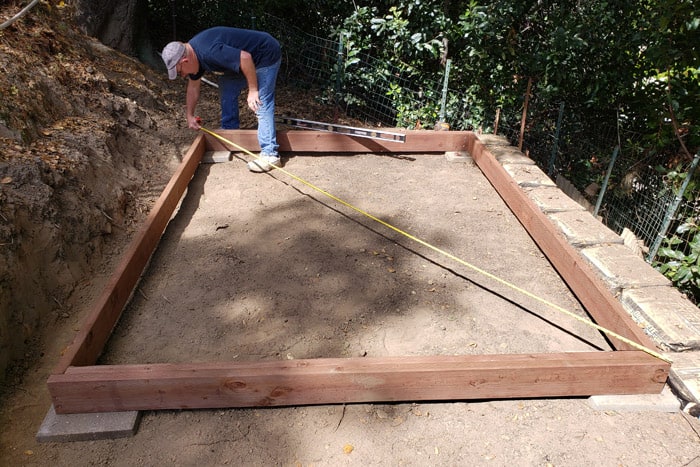
STEP 1: BUILD THE SHED PLATFORM
PLATFORM FRAME
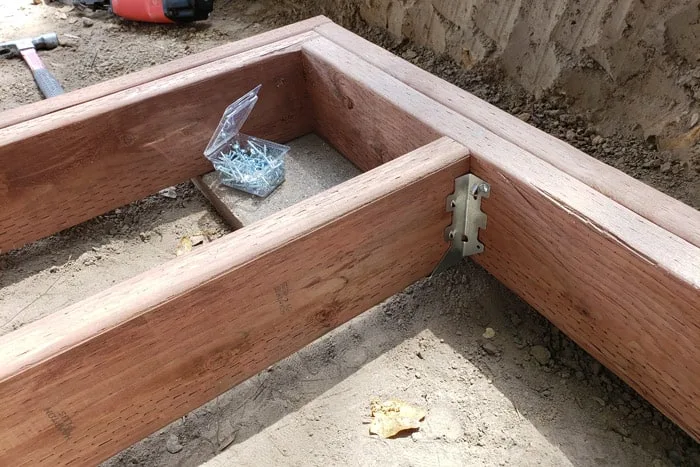
With your site prepared and cement support blocks or pillars level and in place begin building the platform.
These plans call for using doubled 2x6s that are pressure treated. This gives additional moisture protection to the center of the frame, and allows for lapped joints with more nailing.
Cut Pressure Treated 2×6 boards Per the Plans:
- Place the front and back 2x6s on their sides at the front and the back of your prepared area (cement pillars, slab, etc).
- Between them place the side 2x6s
- Square up the corners and connect with the framing nailer using 16P nails.
- Check for square with a tape measure and ensure the measurements corner to corner match.

- Toenail two more 2x6s inside the front and back boards.
- Check for square and place the last two 2x6s inside the left and right boards and toenail to 2x6s.
- Check for square a final time and adjust as needed.

After we got the frame built we added more cement block supports along all sides.
If your pressure treated lumber is still wet you might have issues with nails holding. We did, so we ended up adding extra long screws to the outside frame.
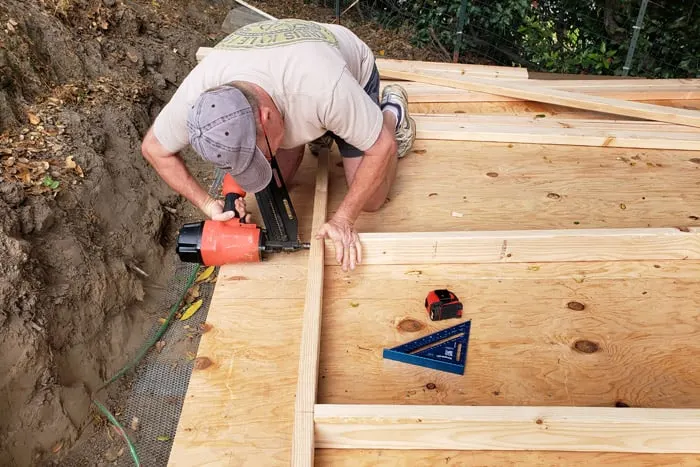
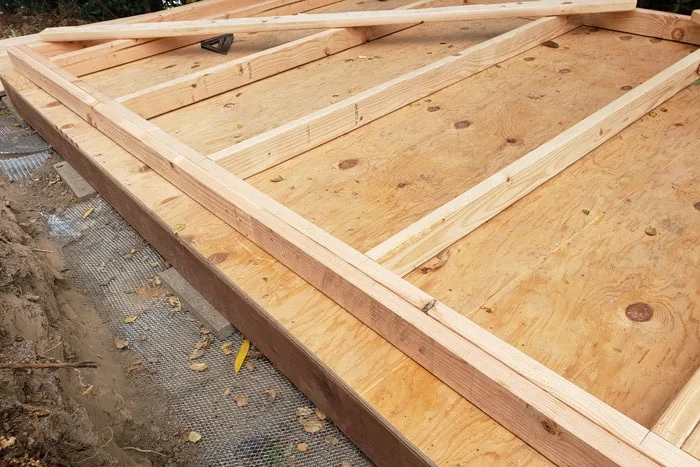
PLATFORM FLOOR JOISTS
Add the floor joists using Joist Hangers. The joists should be spaced to line up with and accommodate where plywood edges meet with sufficient nailing for both.
- From the left front of the platform frame measure and mark according to the plans along the side boards.
- Repeat down the right side.
- Line up the joists so the marked measurement is in the center of the joist and the tops of both boards are flush.
- Position the joist hanger and secure in place with nails or screws.

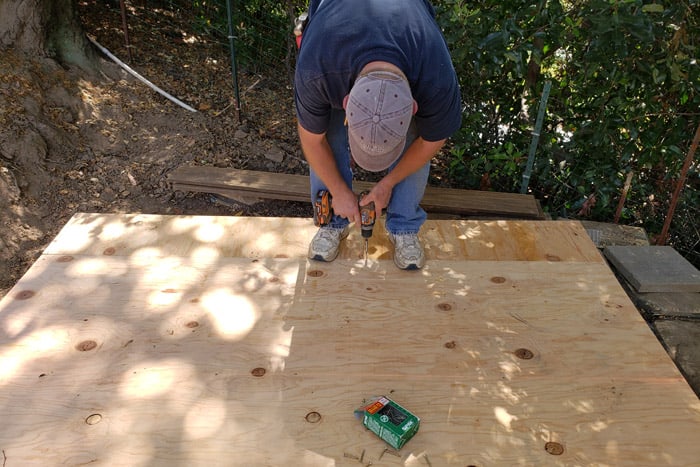
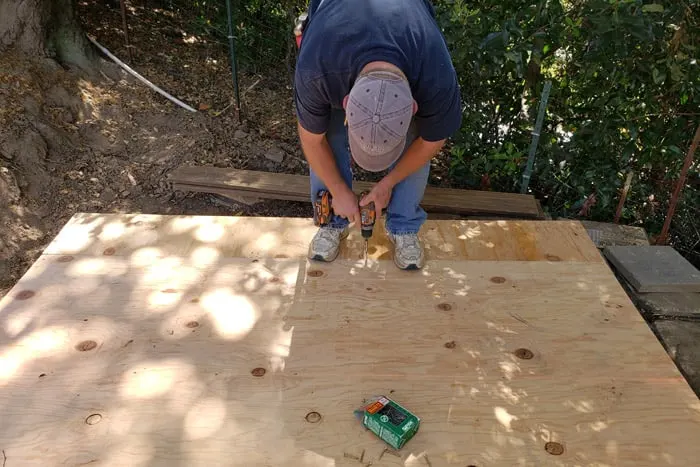
ADD THE FLOOR DECKING
Use a framing nailer with 8d nails to attach the decking.
- Transfer the mark for the center of the joists onto the outer side of the platform frame.
- Lay plywood onto the platform according to the plans and tack in place.
- Use a chalk line to transfer joist marks onto the plywood decking as a nailing/screwing guide.
- Secure fully.
How to Frame an 8×10 Shed
STEP 2: BUILD SHED WALLS
SHED SIDE WALLS
Cut the 2x4s Per the plans – for the two side walls cut:
Follow these steps to build the walls using a framing nailer with 16p nails.
- Stand the Bottom Plate and one Top Plate on their edges and measure and mark with a speed square for stud placement
- Stand the Bottom Plate along the edge of the platform. This is the wall’s Bottom Plate.
- On both ends attach studs to the edge of the Bottom Plate using a framing square and nail.
- Attach the studs in the middle with the center lined up with the marks.
- Attach the Top Plate lining up the studs to the marks on the top plate.
- Check for square, make necessary adjustments and attach the second Top Plate.
- Set aside to build the second side wall.
- To keep the walls square until assembly attach temporary bracings at the wall corners from scrap 2x4s

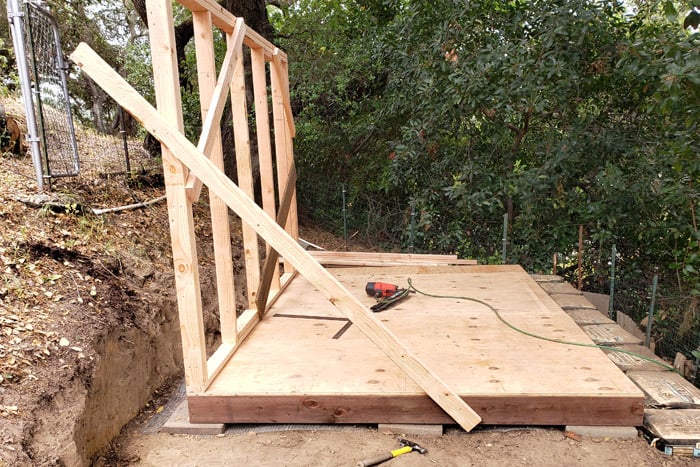
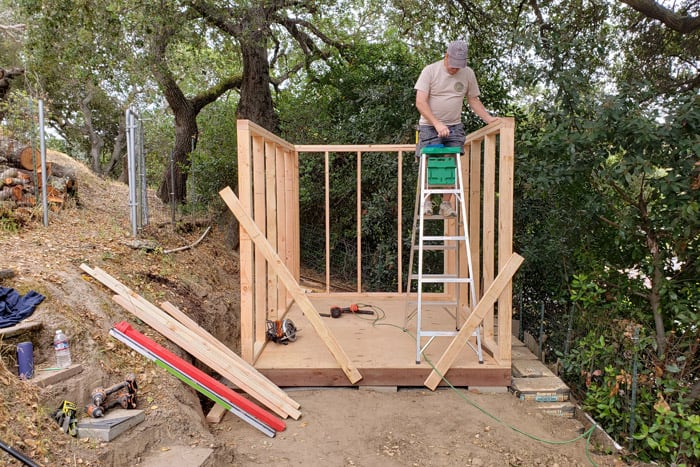
See how little working room we had on the left side of the shed? Once the walls started going up it was a tight squeeze.

SHED BACK WALL
Cut 2x4s per the plans for the back wall
- Stand the Bottom Plate on its side along the edge of the platform.
- On the Bottom Plate and Top Plates measure and mark according to the plans
- On both ends nail a stud to the Bottom Plate.
- Attach studs according to the measured marks.
- Line up and attach the Top Plate to the studs.
- Check for square and attach the second top plate.
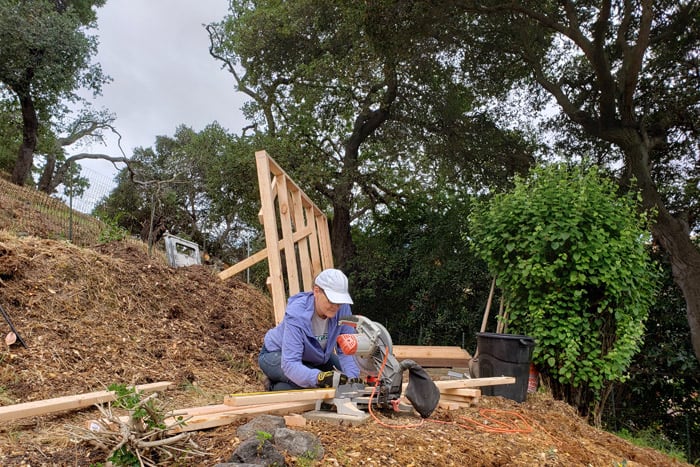
Working space was tight up on the path but we made it work. We stood the walls as we completed them against the hillside propped up with a 2×4.

We made the repetitive stud cuts on the big miter saw down on the patio and used the smaller miter saw up top as needed.
This is NOT my favorite way to work, I’m too old for working on the ground LOL. It’s so hard on the legs but we did what we had to to get the job done. And the fewer trips down the hill the better.

STEP 3: ERECT SIDE AND BACK WALLS
With a helper follow these steps to erect the walls.
ERECT LEFT SIDE WALL
- Line up the left wall to the left side of the platform so the wall is level.
- Use a 4’ Level to ensure the wall is level in all directions.
- Attach with a few nails to the platform with a framing nailer.
- Use a 2×4 as a temporary brace to hold the wall in place.
- Nail fully to the platform.

We used scrap 2x4s to brace the walls as we built them and to hold them up as needed. They’re easy to pound out afterward if you reduce the pressure on the compressor first so they don’t go all the way in.
ERECT THE BACK WALL
- Place the back wall in place making it flush along the edge of the side wall and platform. Tack with a few nails to the platform.
- Adjust both walls for level and nail the back wall to the left wall in a few places.
- Nail fully to the platform and left wall.
ERECT RIGHT WALL
- Stand the right wall in position next to the back wall.
- Follow the previous steps and nail in place to the platform and back wall.
- Put a temporary brace on the right wall.

When we built our DIY Patio Gazebo we used temporary bracings that worked as an extra set of hands.
STEP 4: BUILD THE FRONT WALLS
Build two identical front walls to create the door opening. If you want a wider door opening than 36″ you’ll need to adjust the shed plans on your own accordingly.
Cut 2x4s for the front walls per the plans:
Follow the same steps to build the Front Walls:
- Connect the Bottom Plate to the studs.
- Attach a partial Top Plate.
- Square up the walls.
- Nail fully and repeat to build the opposite front wall.
STEP 5: INSTALL THE FRONT WALLS
Install the two front side walls to the side walls to create the door opening.
- Level and nail the front walls to the side walls.
- Nail the Door Header between the front walls.
- Top with the final Top Plate and nail.
- Remove the temporary braces from the side walls.

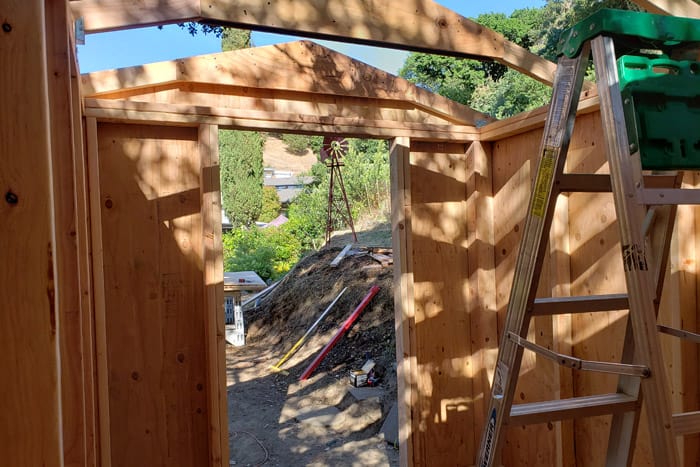
This will be the view of the shed from the patio below.

HOW TO BUILD ROOF TRUSSES FOR A SHED
STEP 6: BUILD THE ROOF TRUSSES/RAFTERS
This roof is built with a 15° pitch. Please note, this design may not be steep enough to support a winter load of snow.
If you need your shed built with a steeper pitch, before you access the plans research load requirements and suggested pitch for your local conditions. Any modifications to the plans might increase materials and are made on your own and done at your own risk.
CUT THE TRUSS BOARDS
Use 2x4s to make roof trusses:
- Cut truss boards with a 15° miter on both ends.
- Save the cutoff scraps for a later step

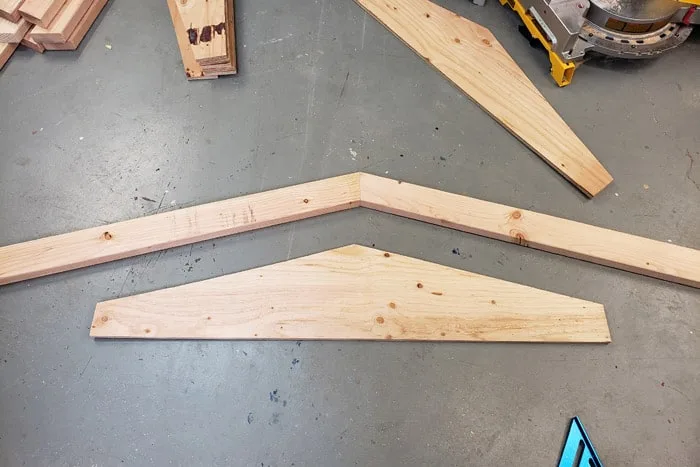
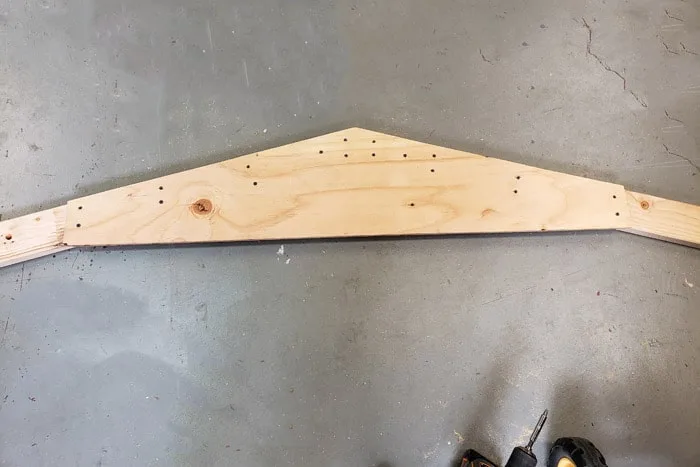
The truss sections will be connected with a gusset described as follows.
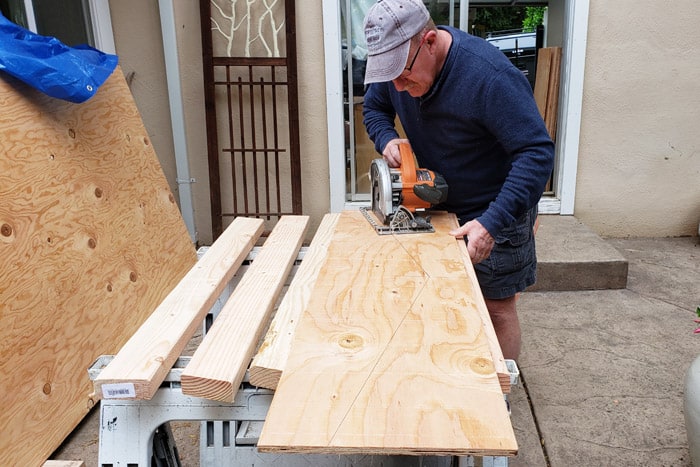
HOW TO MAKE TRUSS GUSSETS
The gussets described and instructed in the plans are the same ones we used to build our two sheds. It’s possible you can make the gussets smaller in scale and save on plywood. I’ve seen examples online of smaller ones on similar size sheds but this is how we built ours.
- Draw a line down the center of plywood.
- Lay two ends of the truss together on top of plywood and trace as instructed in the plans.
- Use a circular saw to cut out the gusset.
- Use the first gusset as a pattern to cut the required amount.

You can also purchase metal gussets plates like these that you can see on the interior of an 8×10 Tuff Brand online. But the item description says they aren’t for structural use.
So you’ll have to use your judgment if gusset plates are right for your storage shed.
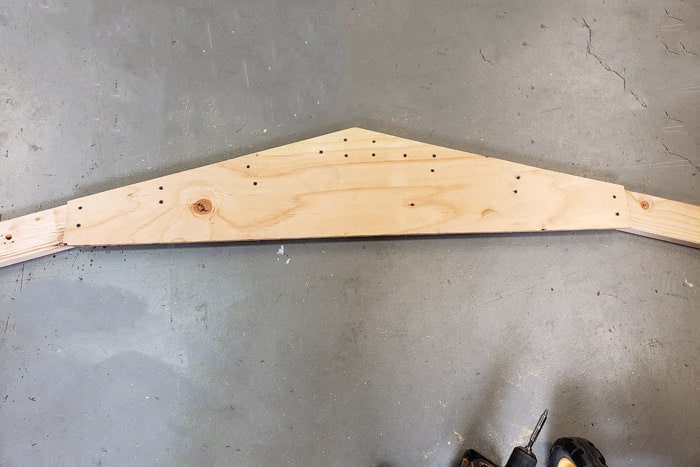
ATTACH THE GUSSETS TO THE TRUSS
- Lay the Truss sections on a flat surface with the ends together to create the roof peak.
- Attach the gussets as instructed in the plans.
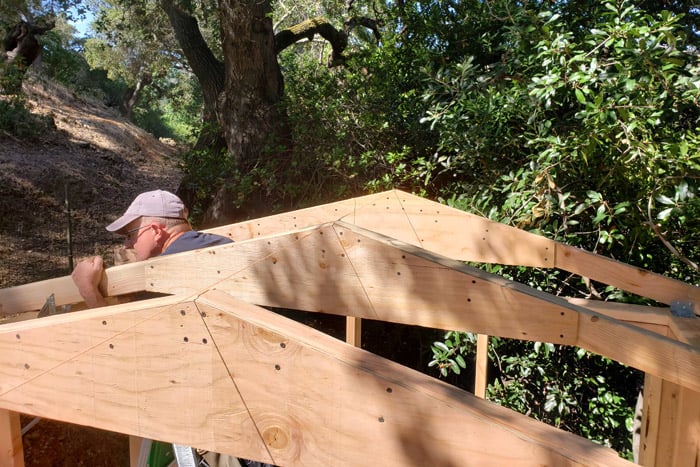
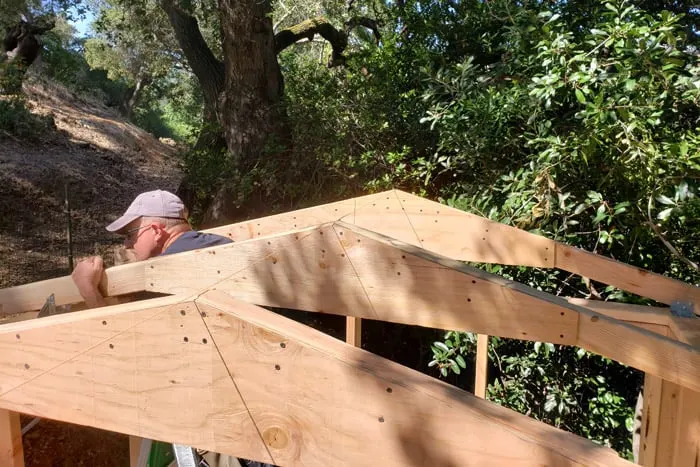
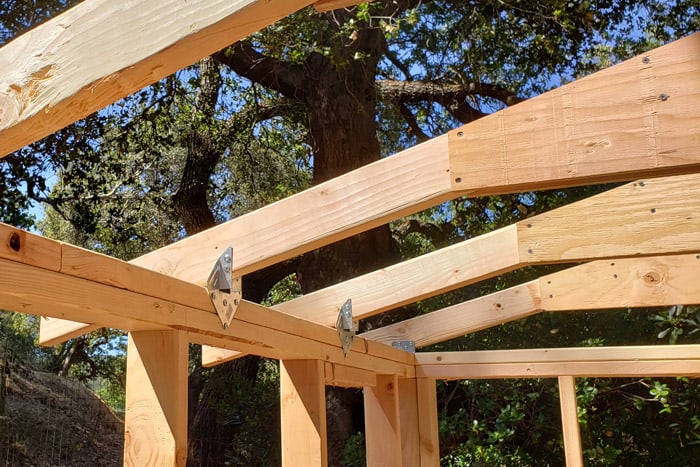
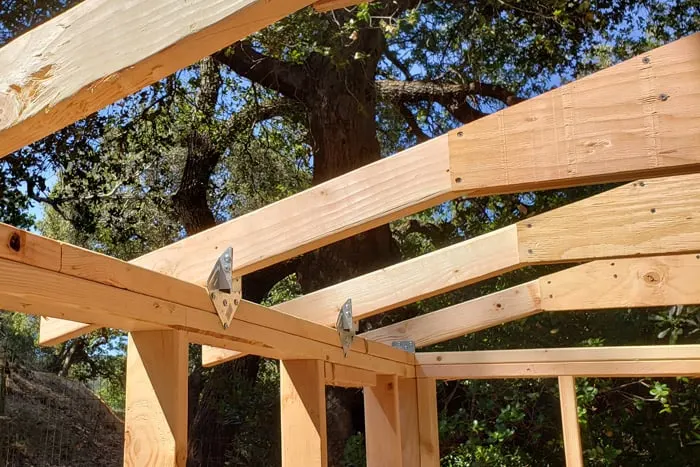
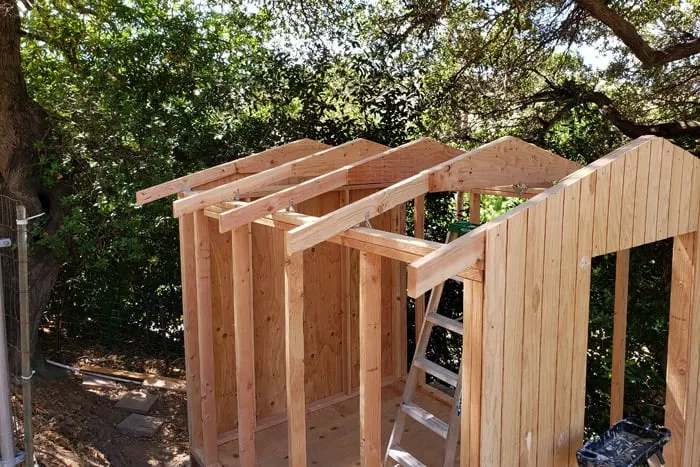
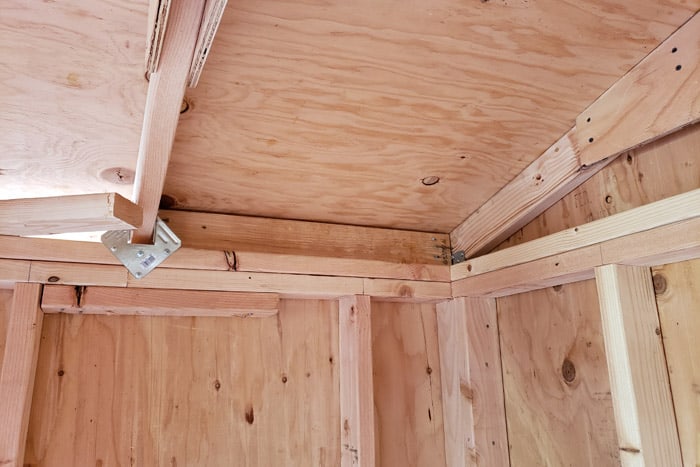
STEP 7: INSTALL THE SHED ROOF TRUSSES
This isn’t as complicated as it might appear. Work in the order outlined in the plans for a perfectly center roof peak.
- Clamp a 4′ straight-edge vertically to the front wall along the center.
- Line up the peak of a Truss with the straight edge along the outer wall of the shed.
- Use corner braces on each side to attach the Truss to top plate.
- Repeat the process on the back.
- Run a string line guide to attach the middle trusses.
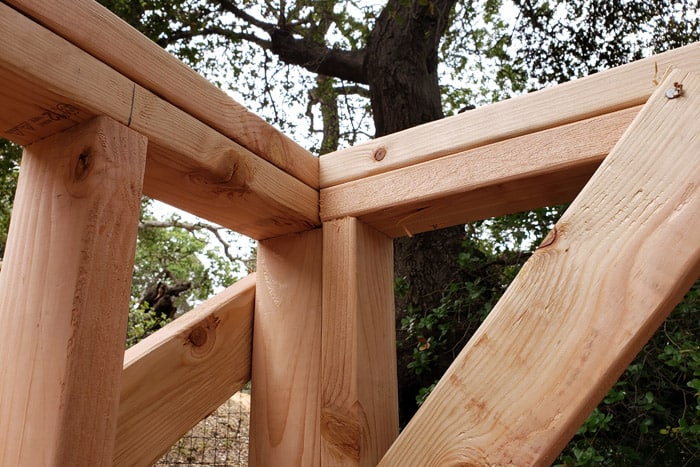
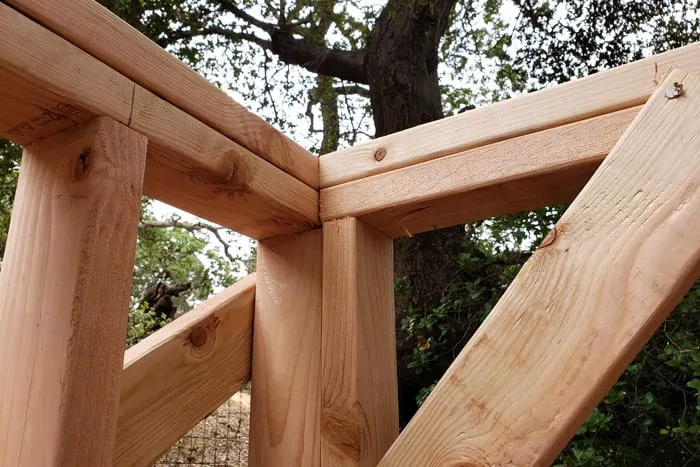
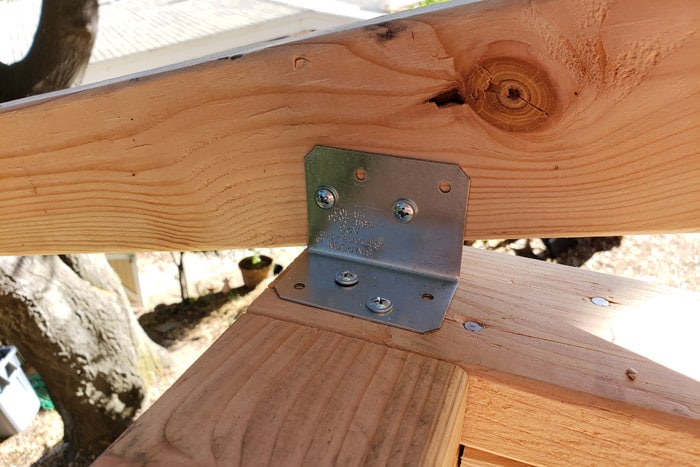
- Install the middle trusses with Rafter Ties as instructed in the plans.

Here you can see the string line running from front to back. Use that to center the peak of the trusses.
Here you can see how we installed the rafter ties. You can also place them on the outside of the stud wall but we didn’t want them visible from the outside.
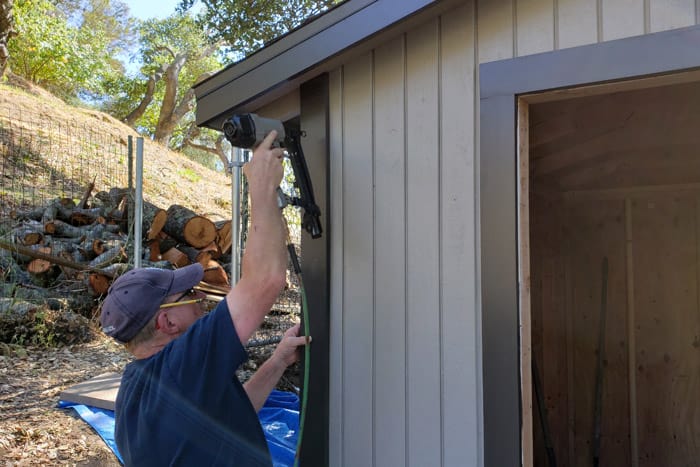
STEP 8: INSTALL EXTERIOR SIDING
You can use regular plywood or T1-11 Siding to wrap your shed. We used T1-11 because it gives it a nicer look and the joints lap for a more water tight seal.
Choose the bottom reveal you want for your platform. The measurements in the plans accommodate covering the gable peaks using a single 8’ sheet of siding. This gives a good overlap on the platform but keeps it off the ground.
FRONT AND BACK WALL SIDING INSTALLATION
INSTALL T1-11 TO FRONT AND BACK WALLS
This step varies slightly from the plans because we installed the siding to the front and back sides of the shed first. This gave extra support to the end trusses until the roof sheathing is installed.
Cut siding as per the plans for the back wall
- Start on the left edge to install the siding as instructed.
- Tack in place and use a Sawzall (reciprocating saw) to trim the excess above the truss.
- Repeat with the second sheet of siding then fully nail/screw following the nailing pattern.
- For the front wall follow the instructions in the plans for installing and trimming for the door opening.
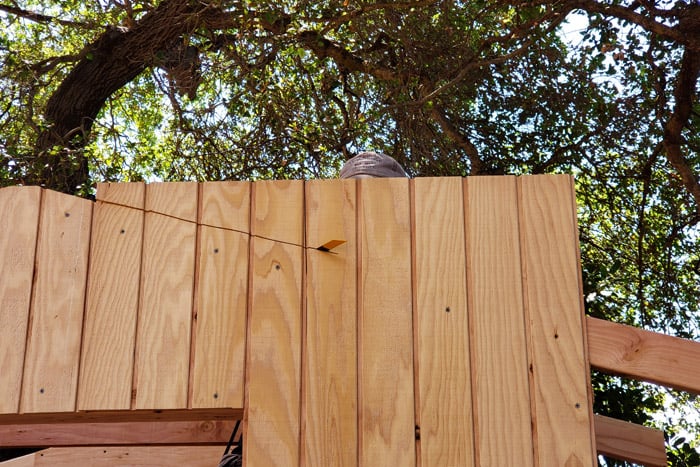
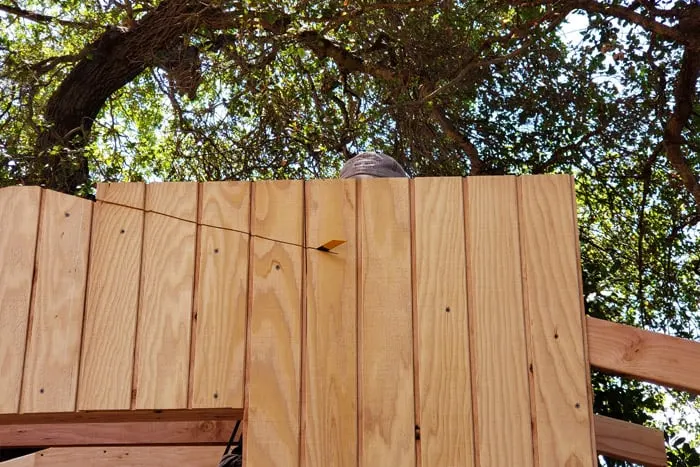
It’s always so satisfying to see the siding going on, when it finally starts to look like a shed.

INSTALL T1-11 to LEFT & RIGHT SIDE
Cut the sheets of siding per the plans.
- Line up the left edge of siding along the left edge of the shed and butt it up to the bottom of the roof trusses.
- Nail in place and install the next sheets.
- Be sure to use the nailing pattern outlined in the plans.

STEP 9: INSTALL THE 8X10 SHED ROOF SHEATHING
These plans call for creating a small overhang on the front of the shed and none on the back. You can adjust the overhang on your own as you like.
Cut plywood for the roof sheathing per the plans:
- Start at the front left install the cut plywood sections in the illustrated pattern in the 8×10 Shed Plans
- Attach with 8d nails to the roof trusses.

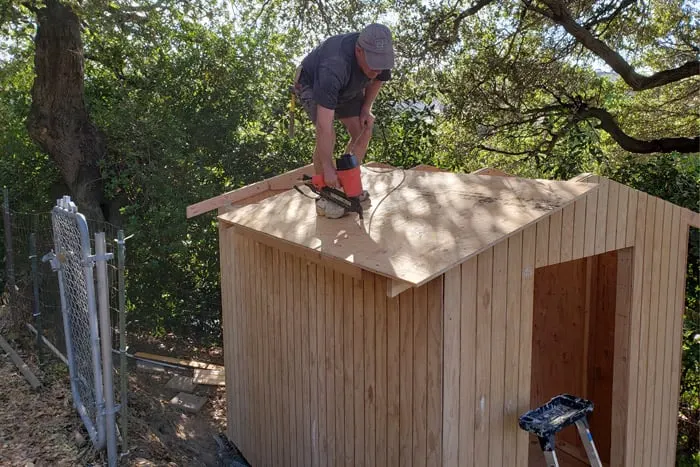
My husband is such a great motivator for me, he always works so hard.

STEP 10: ADD FRONT OVERHANG SUPPORT
To create the front overhang you’ll use 2×6 boards cut with a 15° bevel.
Cut 2x6s for the overhang to length with the proper bevel per the plans
- Clamp both boards under the roof sheathing with the points centered to the roof peak.
- This creates an overhang allowance for the fascia trim.
- Attach with exterior wood screws through the roof sheathing.
STEP 11: FILL IN TRUSS GAPS
Fill in the gaps between roof trusses with leftover 2×4’s from the truss builds in Step 6.
- Measure gaps individually and cut 2x4s saved from building the trusses to fit between.
- Toenail each end into the truss.
- Nail through the roof sheathing into the 2x4s with 8d nails to secure further.

Finishing Touches Make the Shed Complete
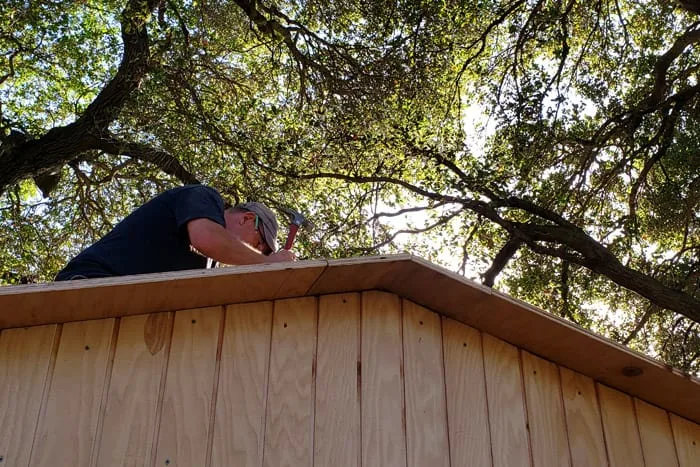
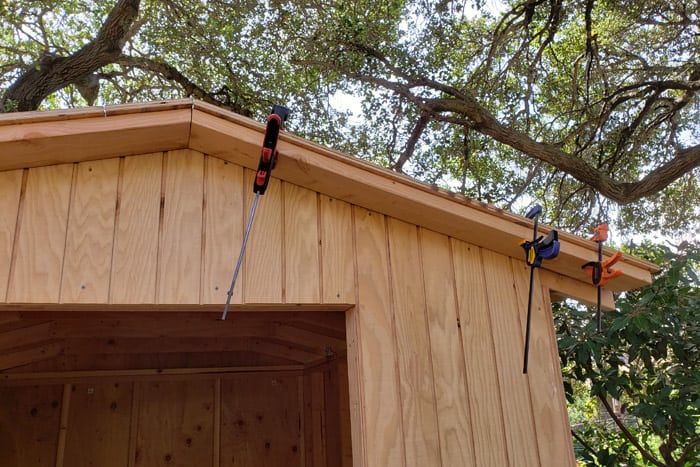
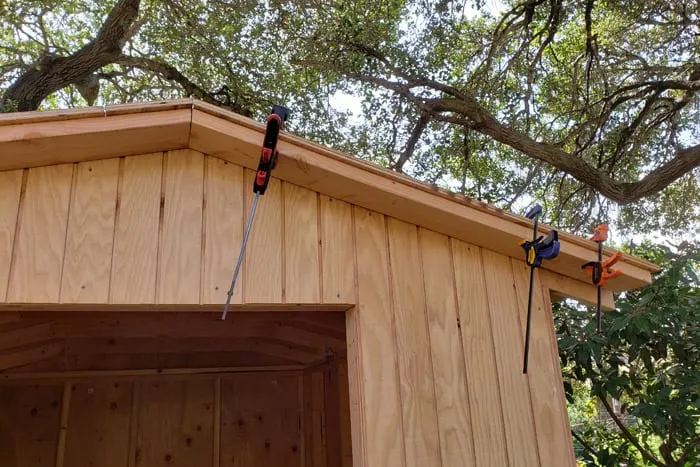
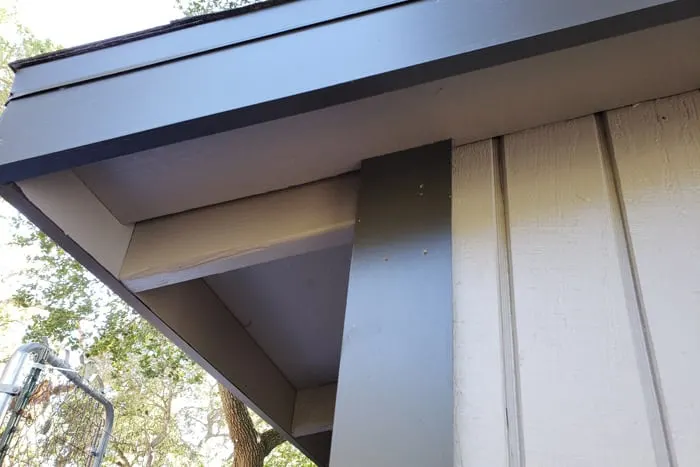
STEP 12: INSTALL FASCIA
The fascia calls for using 1×4 pine boards. It’s best to purchase pre-primed boards. You can get these at a big box store or a local molding company.
Cut the 1×4 trim boards to lengths and angles per the plans
- With a finish nailer and finish nails attach the fascia to the front and back peaks.
- Attach the side fascia boards and nail to the ends of the trusses.
- Nail where the ends of the fascia overlap the sides as shown.

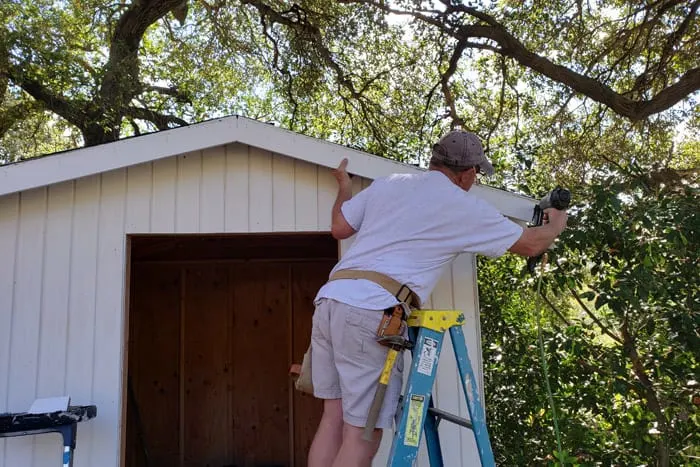
STEP 13: INSTALL TRIM
Cut 1×4 trim to length per the plans
CORNER TRIM
The trim pieces will overlap on the corners similar to the facia.
- Hold a scrap piece of trim along the side corner as a spacing guide.
- Line up the face trim so that it overlaps the scrap.
- Use the finish nailer to nail in place every 8″.
- Attach the side trim boards at each corner.

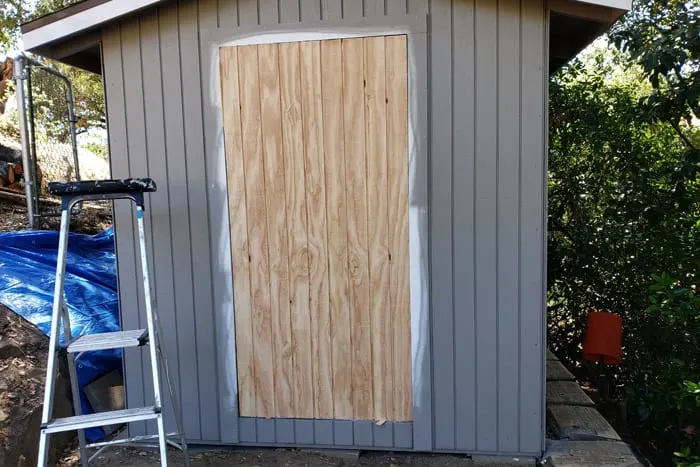
Like I mentioned, I painted the trim boards before we installed them. It was much easier than painting them in place like I had to do the door trim which we installed a bit too early.
I advise filling the nail holes with a bit of Spackle and touching up the paint.

DOOR TRIM
Measure the framing of your door opening at top, middle and bottom. If it’s narrower than the plans at any point the narrowest point will dictate trim placement and door width.
- Clamp the top trim board centered, level, and flush with the door frame header.
- Install the side trim boards level and flush with the door framing on either side of the door.
- Align and nail the top Door Trim (trim to length if necessary before nailing in place).
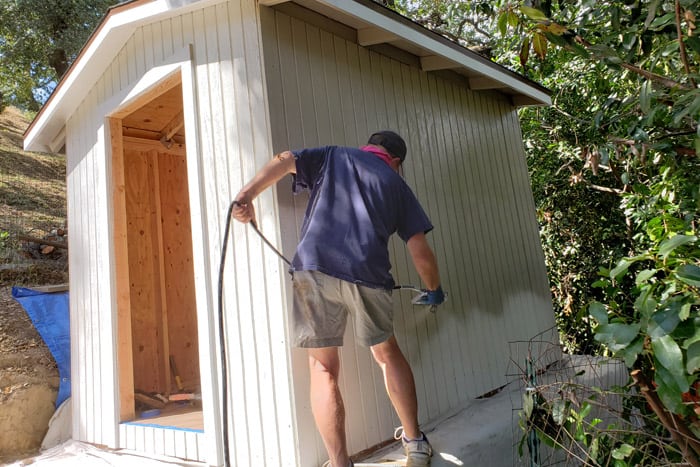
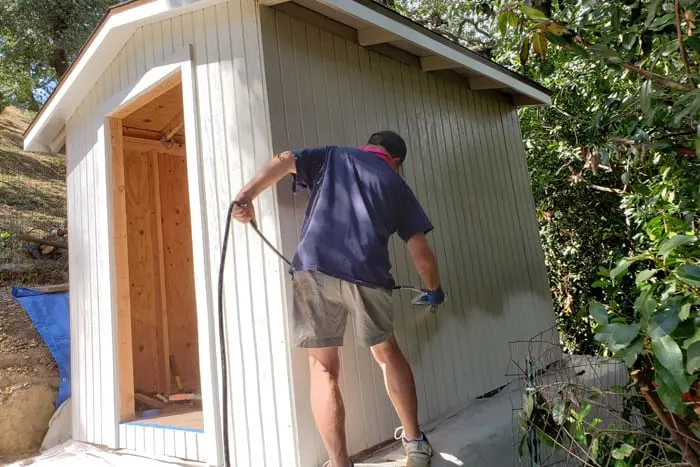
PRIME AND PAINT YOUR 8×10 SHED
You might paint your shed in a different order than we did. Before we installed the Fascia we primed the entire shed using Zinsser 1-2-3 Primer and an Airless Paint Sprayer. We should have left the door trim off but were smart enough to not install rest of the trim until we pre-painted it in the final contrasting trim color.
The airless paint sprayer we used isn’t contractor grade but it made quick work of priming and painting. After the primer was dry we painted the body with good exterior paint in the color we chose. It took nearly two gallons and I finished up by painting the Facia and door trim on the shed by hand the day I pre-painted the trim boards.


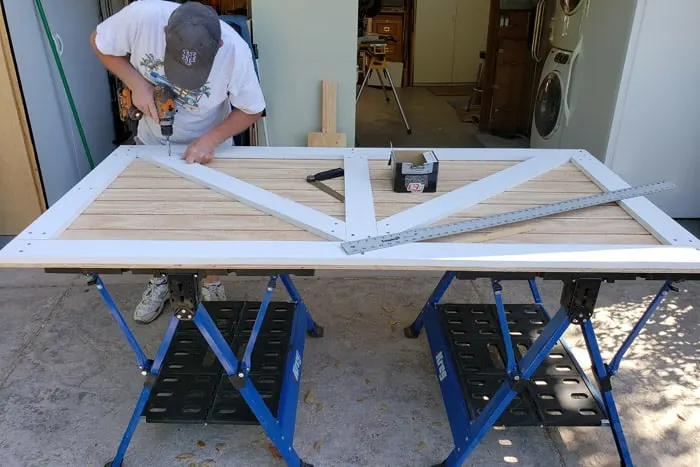
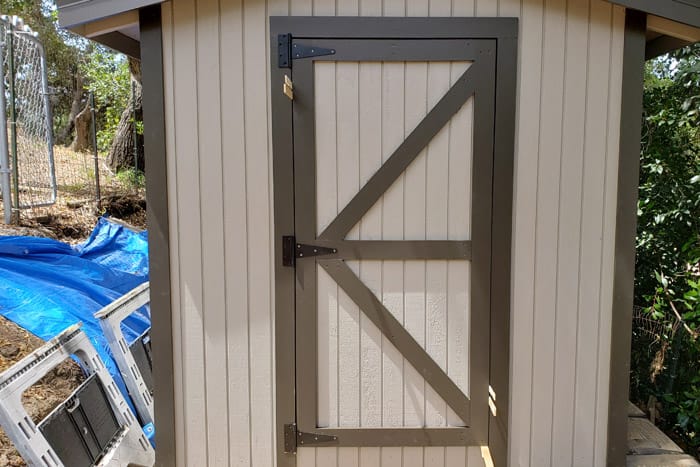
STEP 14: BUILD AND INSTALL DOOR
Following are basic steps to build a shed door using a ¼” clearance on all sides. With an opening of 36” x 73-½” the door construction will be 35-½ x 73.” Your measurements may be different if the door framing was slightly smaller or larger than these instructions call for.
BUILDING THE SHED DOOR
When cutting your door slab be sure the grooves in the door slab will align with the siding on the shed.
Cut the sections for the door per the plans from Siding and 1x4s
- Lay the T1-11 on saw horses or other flat surface
- Use 1-¼” Nails or screws and attach the trim to frame the face of the door.
- Turn over and repeat on the back making sure to align the front and back edges.
- If adding angled detail on front (as shown) use a ruler and pencil or angle finder to mark and cut angles before nailing.


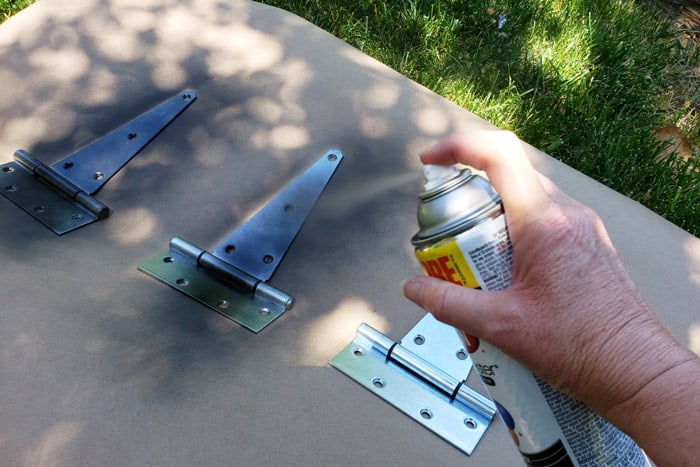
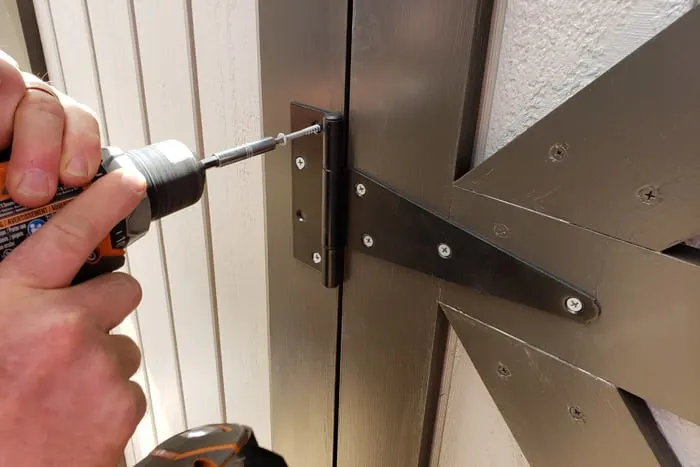
I couldn’t find black hinges locally so a quick shot with some black spray paint did the trick.

INSTALL THE DOOR
- Attach 3 Heavy Duty 8” Gate Hinges to the door along the top, middle and bottom trim using 2” exterior wood screws. This length screw will reach the trim on the back of the door as well.
- Place stacked Paint Sticks (to ¼” thick) or wood shims along the bottom of the door opening. You can tape them in place to keep them from moving.
- Position the door on top of the paint sticks. Use more along the hinge side to achieve even spacing on both sides of the door.
- Screw the hinge to the door frame trim using 2” exterior screws. This length screw will reach the framing making for a more secure installation.
This door was not light after we added the trim on both sides. But, it was the last thing we (ok, he) had to carry up the hill. Until it was time to fill it 😀

We found that paint sticks and some shims worked best to get the perfect spacing and reveal.

Screw the hinges to the trim with long enough screws to reach into the framing.

I almost forgot. After you install the door, measure and mark for a door stop that you’ll nail on the door jam.
Lastly install a lock. I bought this Rotating Post Safety Hasp because the screws are completely covered when closed and locked. And we love and use only these Brass Combination Locks on our outdoor locks.


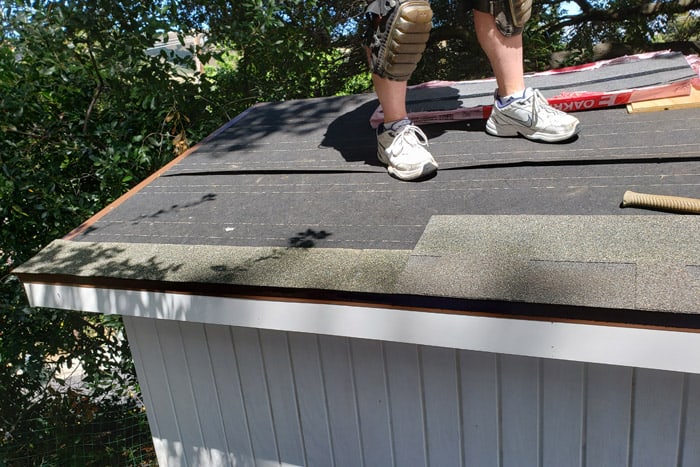
STEP 15: ROOFING YOUR 8×10 SHED
I considered providing basic instructions for roofing the shed but decided it would be better to direct you to YouTube for some specific direction.
Take all safety precautions when working on a roof of any height.
I included links to sever sources in the plans that should be helpful if you’ve never done any roofing. They will teach you all you need to know about nailing and seam overlap allowances.
Here are some pictures of my husband installing the roof. You’ll need:
- Asphalt shingles to cover the roof surface
- Roofing Felt Paper
- Roofing Nails
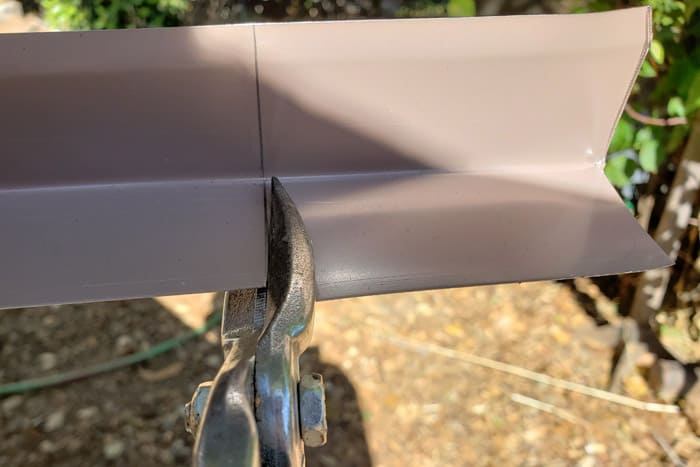
- Drip Edge Flashing
- Roofing Stapler or staple gun

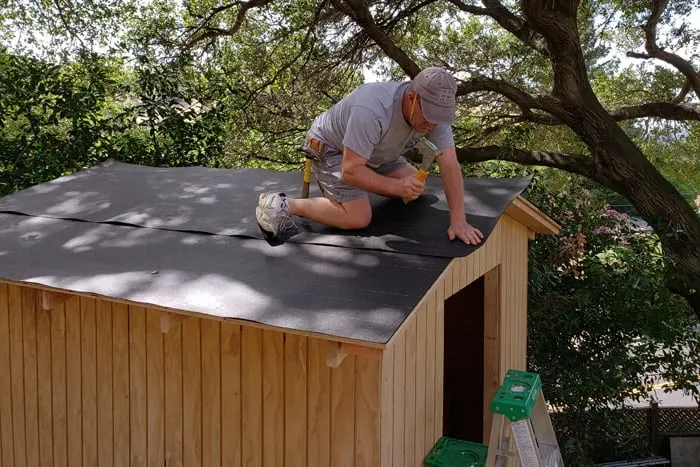

Try to get your cuts as clean and close as possible. The shingles will extend slightly over the top but you don’t want major gaps for water to seep in.

The starter row of a roofing job is so important so you don’t get water backing up under the shingles.

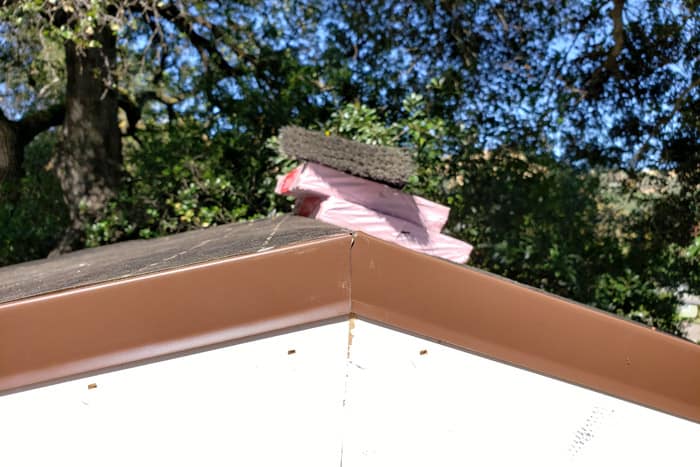
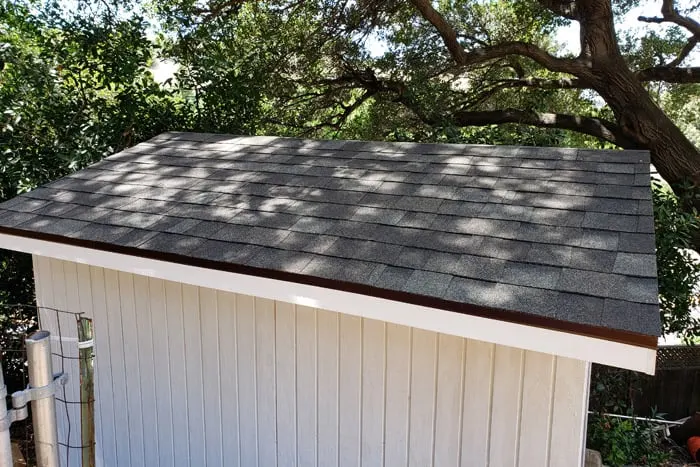
All done after the ridge cap is installed. You can purchase them but they’re easy enough to DIY from shingles.

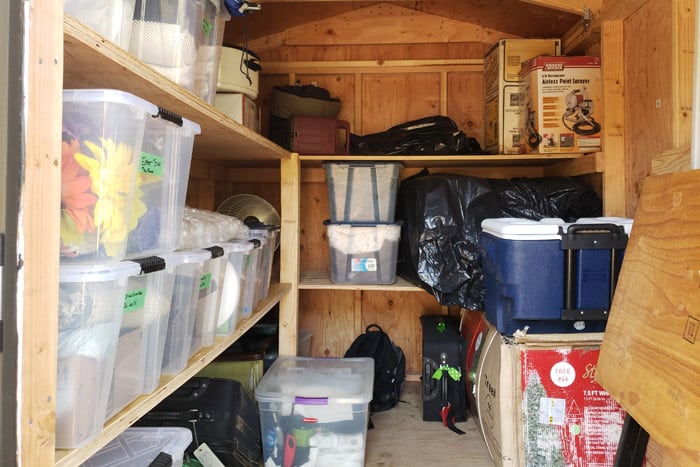
Build shelving inside the shed as necessary for your specific storage needs. We built simple shelves along one wall and the back, tall enough to stack two of these plastic storage containers.
As you can see we’ve already moved lots of big stuff we use infrequently into the shed. This was after taking out some camping stuff for an upcoming trip.

We’re so happy with the shed. I added everything up and the total to build our shed was $1700. That’s in Northern CA so it could be cheaper in your area. That’s is a savings of roughly $900 compared with purchasing this Tuff Brand (after sales tax) that we had considered.

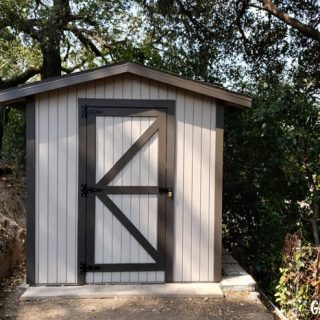
Here’s a view of the 8×10 Storage Shed from the side, it’s hard to get side views with the steep slope.


Want to build it? Pin IT


How to Build an 8x10 Shed from Plans
Step-by-step 8x10 Shed Plans to DIY a garden or storage shed. Build this gabled DIY storage shed to extend your garage space.
Materials
- 2×4 lumber per the plans
- Pressure Treated 2×6 lumber
- Pine 2x6s
- ¾” Construction Grade Plywood
- Texture 1-11 (T1-11) per the plans
- 1×4 Pine Trim boards
- Galvanized Rafter Tie
- Galvanized Steel Angle Brace
- Joist Hangers for 2×6
- 8″ Heavy Duty Tee Hinges
- Rotating Post Safety Hasp
- Roll Roofing Felt Paper
- Bundles Asphalt Shingles
- Drip Edge
- Exterior Primer
- Paint or Stain
- Framing Nails
- Finish Nails
- Exterior Grade Wood Screws
Tools
- Miter Saw
- Table Saw (optional)
- Circular Saw
- Rip Cut Guide (optional but suggested if not using table saw)
- Reciprocating Saw (Sawzall)
- Cordless Drill
- Saw Horses
- Framing Nail Gun and Compressor
- Tape Measure
- Chalk Line
- String Line
- Straight Tin Snips
- Framing Square
- Carpenter’s Speed Square
- 4’ Level
- 4’ Straight Edge
- Bar Clamps
- 16 oz Hammer
- Airless Paint Sprayer 5/8 HP
Instructions
- 8x10 Shed Plans
- BUILD THE SHED PLATFORM - build the frame for the platform and then top it with plywood decking.
- BUILD SHED WALLS - construct the sides and back shed walls, brace the corners, and set aside.
- ERECT SIDE AND BACK WALLS - erect one side wall and nail in place, followed by the back wall and lastly the other side wall.
- BUILD THE FRONT WALLS - build the front walls and cut the necessary top plate parts.
- INSTALL THE FRONT WALLS - install the front walls to the side walls and top with top wall plates.
- BUILD THE ROOF TRUSSES/RAFTERS - construct the roof truss/rafters according to the plans.
- INSTALL THE TRUSSES - Mark and install the roof trusses with rafter ties.
- INSTALL EXTERIOR SIDING - Install siding on all sides of the shed.
- INSTALL THE ROOF SHEATHING - Cut and install the roof sheathing per the plans.
- ADD FRONT OVERHANG SUPPORT - Cut 2x6 lumber to support the front overhang.
- FILL IN GAPS BETWEEN TRUSSES - Use scrap 2x4 from step 6 to fill in gaps between trusses.
- INSTALL FASCIA - Cut 1x4 trim boards and install at peaks and along ends of roof trusses.
- INSTALL TRIM - Cut and install 1x4 trim boards to corners of shed and around door opening.
- BUILD AND INSTALL DOOR - Build and install the shed door.
- ROOFING YOUR SHED - Install roofing felt, drip edge, shingles, and ridge cap to the roof of your shed.
- PAINT THE SHED - You can stain your shed or prime and paint it using a 5/8 hp airless paint sprayer.
Notes
Access the plans for the full step-by-step process to build your own 8x10 Garden or Storage Shed.
Suzanka
Sunday 1st of May 2022
Amazing! I was thinking of building an outhouse with a compost toilet and I think it would be the same process except for a slant roof. I am put off by how much work this is! It sounds "easy" but so many steps. You make it look easy however!
Toni
Thursday 12th of May 2022
Thank you Suzanka, it's not easy for sure but if you've had a little woodworking experience it's easier. And I lean into my husband's strength a lot. We make a good team working on project like this. Good luck with your outhouse, I'm sure it will be just great!
fazan hamrock
Sunday 12th of December 2021
My husband uses these plans from Woodglut and he is very happy with them. However. I love yours!