Are you ready for some new decorations this Christmas? They don’t have to be expensive, and this Easy DIY Pinecone Swag will be perfect because it’s cheap and easy to make.
Stick with me to the bottom and you’ll see more pinecone projects from my friends too. I got together with some blogging friends and we all put our own spin on decorating with pine cones.
Now that Thanksgiving is behind us I’m ready to share Christmas decorating ideas with you and this challenge came at a perfect time. I don’t normally decorate until mid December because I like to be surrounded by Christmas until New Year’s Day.
For our Christmas challenge my friend Tonya at Hey There Delyla suggested we do a Christmas challenge with pinecones. So today I’m sharing a cute Pinecone Swag I made.
I have a few more easy craft projects I’ll be sharing with you in the next week so make sure you come back often to check on those. In the meantime check out these 25 Beautiful Christmas Ornaments you can get started on.
This page contains links to products, if you purchase something after clicking on a link I may earn a small commission (at no cost to you). If you do make a purchase, thank you!
You can read about affiliate links here.
DIY Pinecone Swag – Supply List
- 7 Pinecones
- 10′-14′ of 2″ Ribbon
- Scissors
- Small Craft Sticks
- Glue Gun
- Jute Twine
- Sewing Pins
- Command Hooks
How to Make a Pinecone Swag
Step 1: Prepare the ribbon
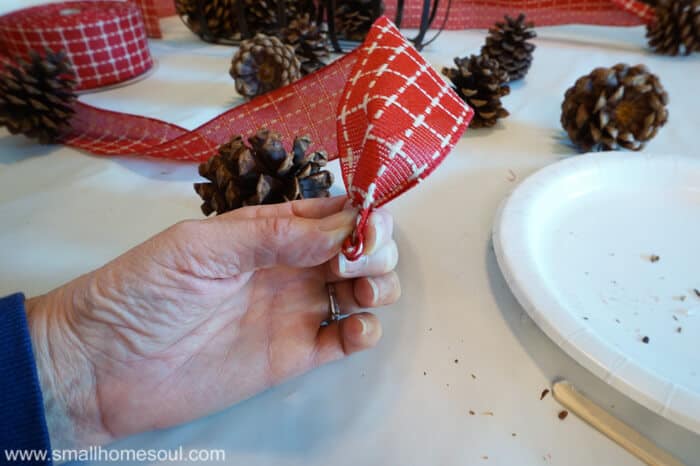
- Start by cutting seven lengths of ribbon in approximately 24” lengths.
- Take one length and gather the bottom of the ribbon into a little bunch, give it a small twist and fold up the end about 1/2″
Step 2: Gluing up the Pinecones
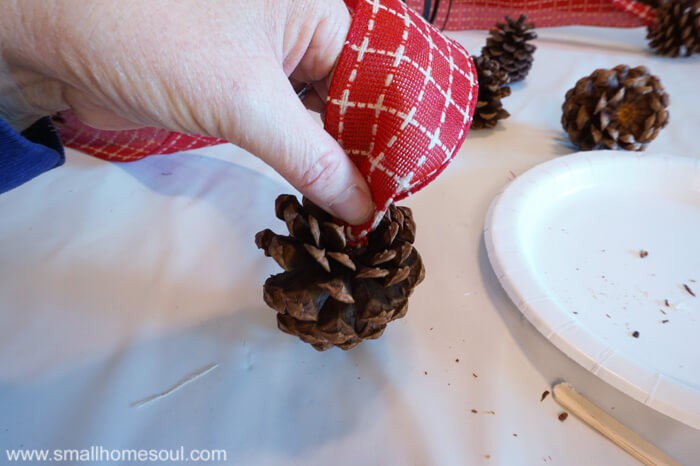
- Put a decent amount of glue into the end of the pine cone to start your pine cone swag.
- Place the folded end into the glue.
- Holding it with one hand use a craft stick to poke the ribbon into the glue so that all the ribbon has contact with the glue. This keeps the end of the ribbon from unfolding.

SEE MORE CHRISTMAS WREATH IDEAS
Monogrammed Door Hanging – Red and White Fluffy Wreath
Tinsel Wreath Ornaments
Continue the step above until all seven pinecones have ribbon attached.
Finishing the Pinecone Swag
Step 3: Bringing all ribbons together.
- Fold each of the ribbons in half lengthwise at the top
- Now lay them out and adjust until you get them into a nice staggered arrangement.
- Stack the ends of the ribbons like shown below.
- When I got mine adjusted where I wanted them I held them in place with a few sewing pins.

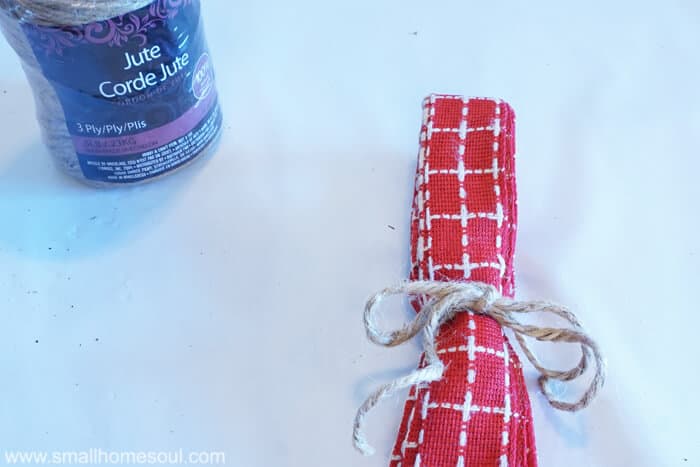
Step 4: Fashioning a pinecone swag hanger
- Determine the height you want and fold the top over to create a handle.
- Wrap a length of jute twine around two times and tied it tightly in the front ending with a simple bow.
- Lastly, trim the excess ribbon leaving about 1-1/2 inches below the jute.
If you don’t want to use pins to keep the ribbons from slipping you can stitch the all layers back to front a few times with a needle and red thread.

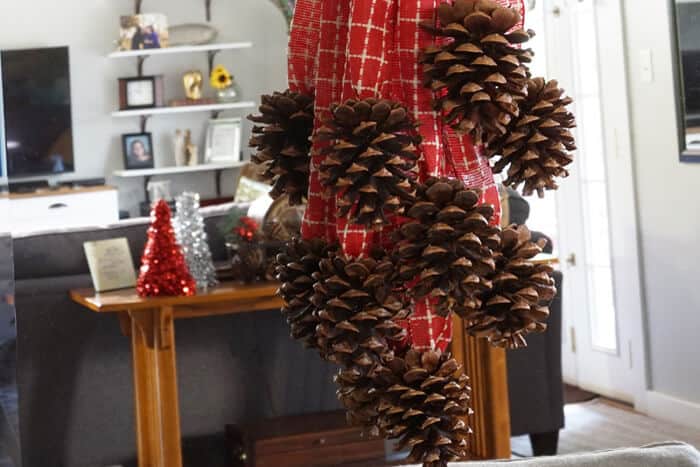
The DIY pine cone swag is pretty light and the twine-tied handle will hold it perfectly on a small Command Hook. If you want to use a wreath hanger instead tie a small length of twine in the top loop that will slip over the width of the hanger.
All that’s left is to find the perfect place to hang it. I used red ribbon for my pinecone swag but it didn’t look great on my front door. If you remember from my Fall Burlap Wreath my front door has a red tint so it sort of clashed with the red ribbon.
So I hung my new Pinecone Swag from the mirror in our living room. I’ve always wanted a wreath on my mirror and this is a great start.
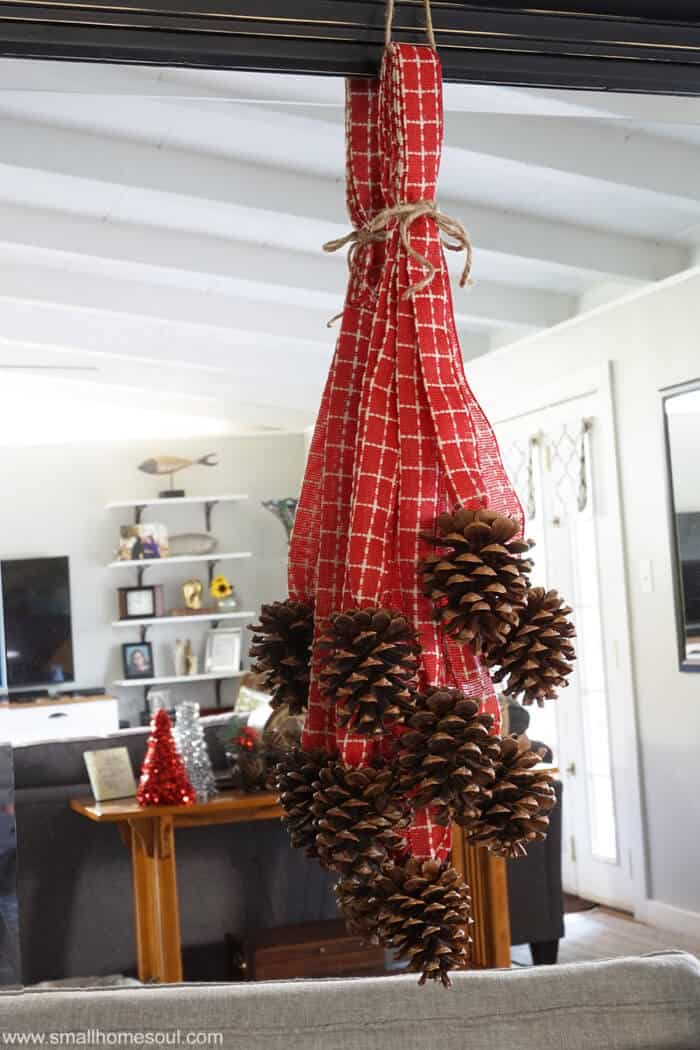
I love how it turned out and since I already had the pinecones from last year, the ribbon, and the jute this project was free to me. That’s the best kind of project, am I right?
Even if you had to buy the pinecones and the ribbons this would cost around $10 to make. Buying one in the store would cost much more.
I hope you enjoyed seeing how to make a Pinecone Swag and are inspired to make on for your home! Remember to to check out my friend’s pinecone projects below.
LOVE IT, PIN IT!!

Denise
Tuesday 6th of December 2016
What a cute and simple swag. I love everything about this project.
Sam @ Raggedy Bits
Monday 5th of December 2016
This turned out so lovely Toni!! I LOVE the ribbon you chose also!
Sue at Blu
Monday 5th of December 2016
Toni. I love so much about this project starting with the bright red ribbon contrasting the dark pinecones. This swag would be great even in a smaller version on lamp shades! Love it!
Toni Harvey
Monday 5th of December 2016
Thanks Sue, I've never tried one on a lamp but might have to give it a shot soon :)
Christy @theharperhouse
Friday 2nd of December 2016
what a cute idea Toni! I love love love that ribbon you used! And I love how something so simple as pinecones can really add texture to a space. Have a great weekend, my friend! xo, Christy :)
Toni Harvey
Monday 5th of December 2016
Thanks Christy, I appreciate it. I love bringing natural stuff into the house, it really changes the way the house looks. My weekend was great! I hope your week is wonderful!
Anika
Friday 2nd of December 2016
I Love it!!! It is so beautiful! The ribbon choice is just perfect!
Toni Harvey
Monday 5th of December 2016
Thanks Anika, I love that ribbon and wish I'd bought two spools last year when I found it.