So many women are into DIY these days. It’s fun, it’s challenging, and you can save a ton of money building and doing stuff yourself. Let me show you how to Build a 2×4 Outdoor Table with this tutorial.

This is a great beginner woodworking project and the first piece of furniture I made all by myself. It uses simple and inexpensive building materials. Perfect for stylish furniture for your home or patio on a small budget.
Patio furniture is ridiculously expensive so I decided to build my own 2×4 outdoor side tables. Our patio furniture set didn’t include any so I’d been making due with small folding plastic tables.
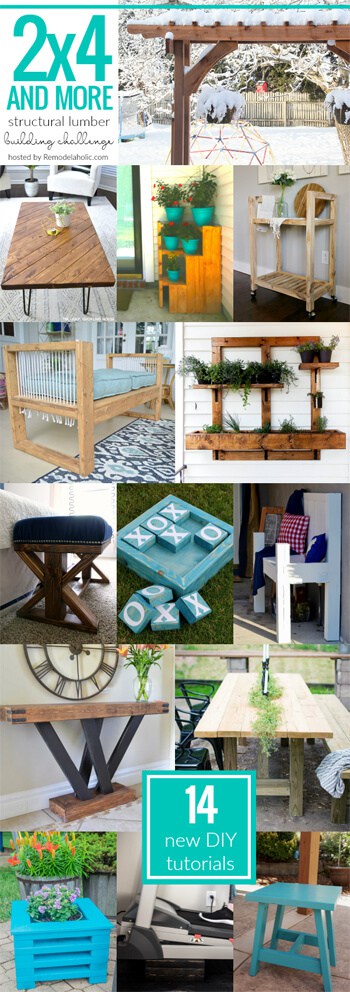
I’ve wanted to build a piece of furniture by myself for a while. So when another blogger posted in a group she was doing a 2×4 challenge, I knew I wanted in!
There are 14 bloggers participating so please make sure you check out their projects. You can find them linked to at the end of the post.
2×4 Outdoor Table Guidelines
The rules were simple, at least 85% of the project has to come from structural lumber like 2×4, 2×6, 4×4, etc. I knew exactly what I wanted to build because I was inspired by my friend Janice’s Barstool design.
I used her design as inspiration to build this side table.
I took the extra steps to create detailed Build Plans. Look for access to the plans below.

This post contains affiliate links for your convenience. If you purchase an item after clicking on one of my links I may make a small a commission, at no cost to you.
2×4 Table Supplies & Details
You’ll need three (3) 8’ 2×4 boards (they’re actually 1.5” x 3.5”)
- I recommend Kiln Dried so they won’t shrink or warp as they dry.
- Purchase four (4) 2x4s to ensure you have enough. Even the pros make a bad cut now and then.
- Select the straightest boards they have with no twists or warping as this will affect the outcome of your table.
Building Supplies
- Cordless Drill
- Kreg Pocket Hole Jig
- Miter Saw – this is a good starter saw
- Table Saw(if trimming your 2x4s – if not see my notes below)
- Exterior Pocket Hole Screws (3 Dozen 2-1/2” for Soft Wood)
- 24″ Clamps (optional but recommended)
- Wood Glue for each joint
- Palm Sander and Wood Filler are optional
- Sandpaper
- Putty knife
- Spackle or Wood filler
- Exterior Paint in your favorite color (optional)
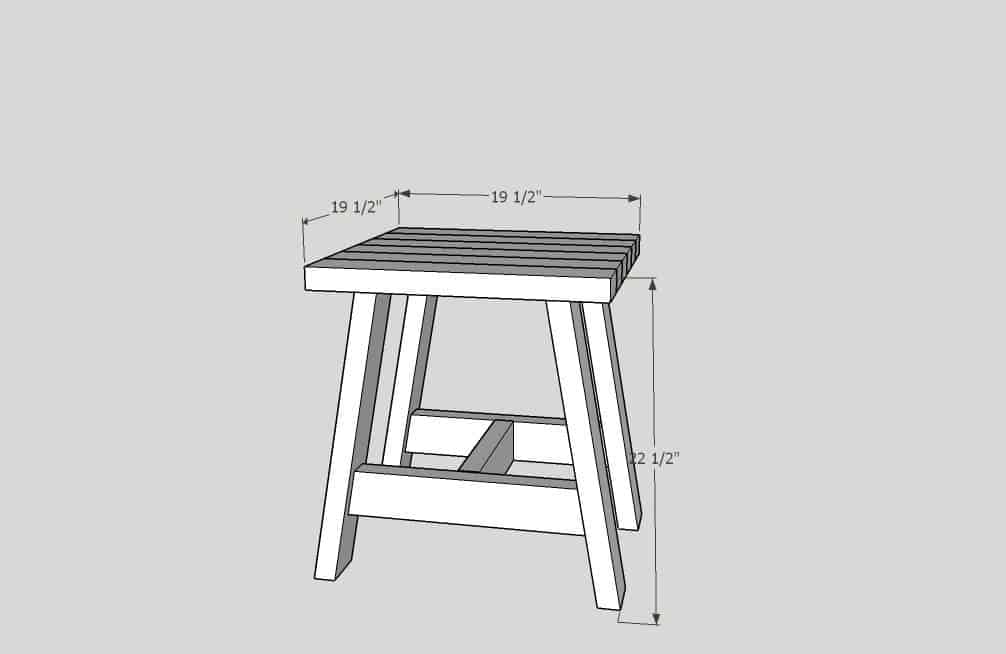
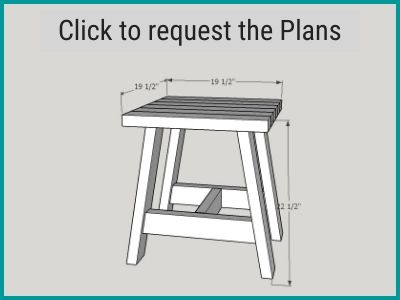
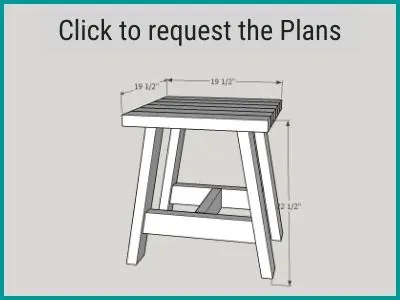
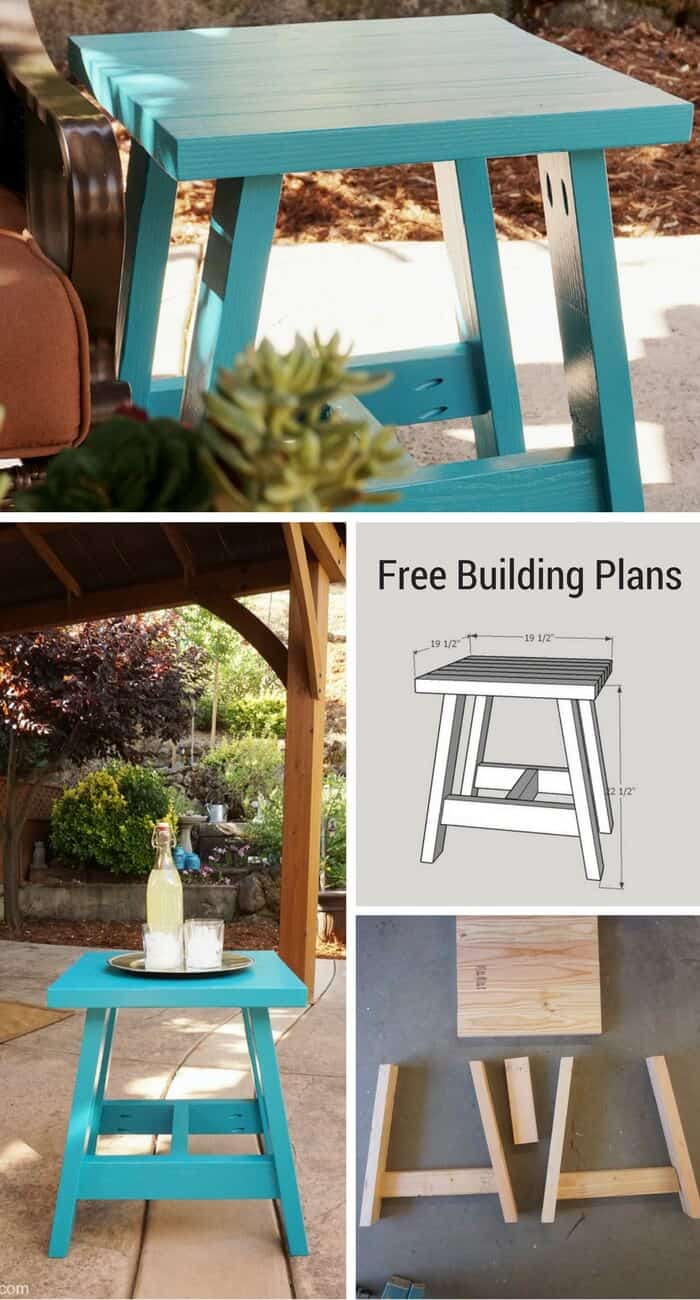
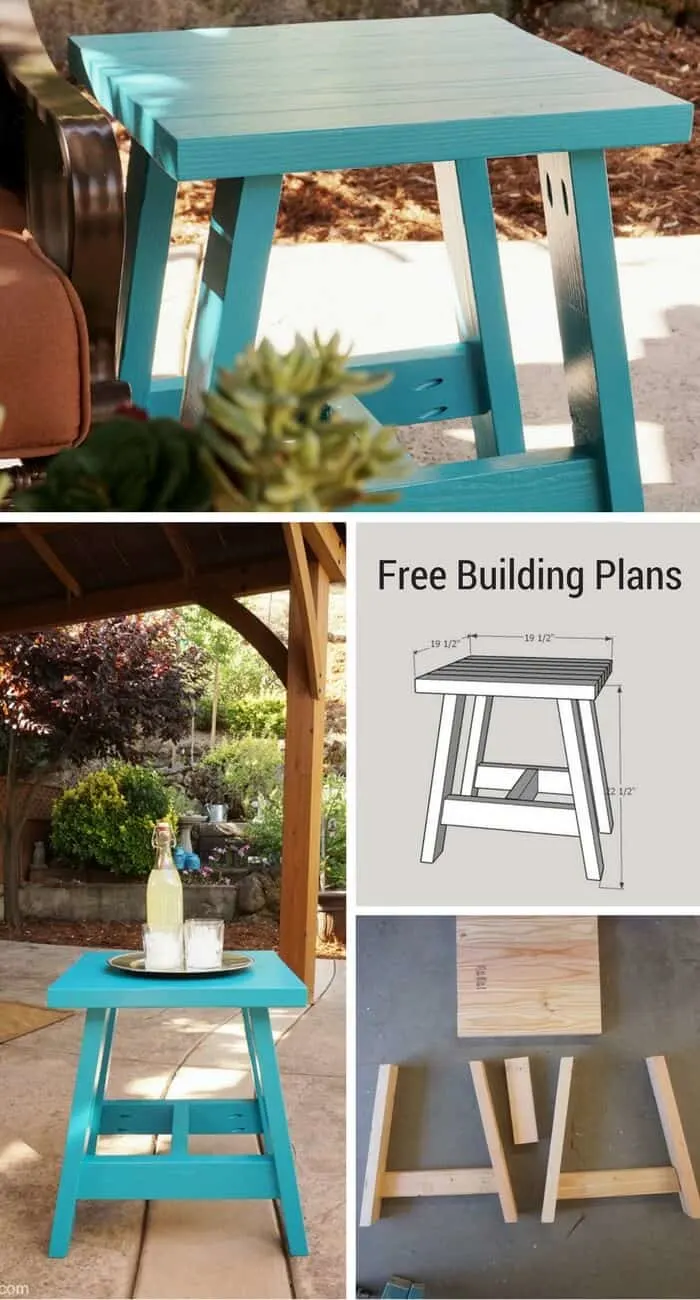
2×4 Outdoor Side Table Plans
Click the image below to access the build plans for this table.
2×4 Table Cut List
- Cut six (6) 2×4 boards Per the Plans – for the Top Slats of the table*
- Cut four (4) 2×4 boards per the plans for the Legs.
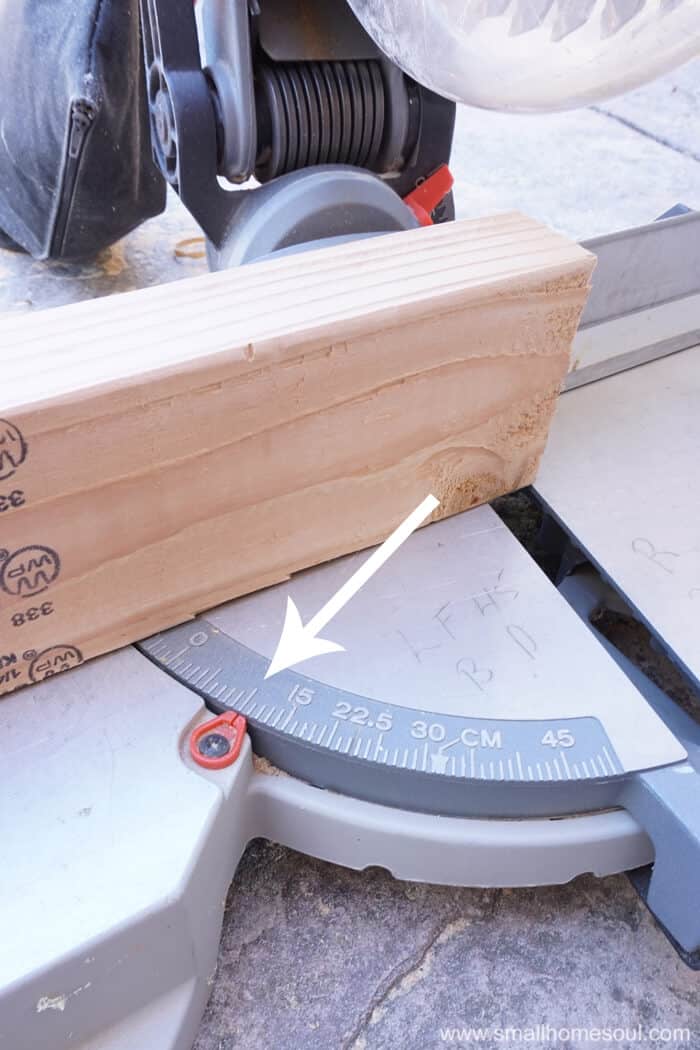
- Each leg will have a 10 degree Bevel cut at the top and the bottom of each leg. **
- Cut two (2) 2×4 boards Per the Plans for the Cross Leg Supports.
- Each support will have a 10 degree Miter cut on either end angling toward the center. **
- Cut one (1) 2×4 board per the plans for the Center Support.
* For my table I trimmed 1/8” off each short side of the 2×4’s for a more squared look. This isn’t necessary. If you choose not to trim your 2x4s increase the length of the six (6) top boards to 21” to ensure your table top is square.
** This website will better describe a Miter versus a Bevel.
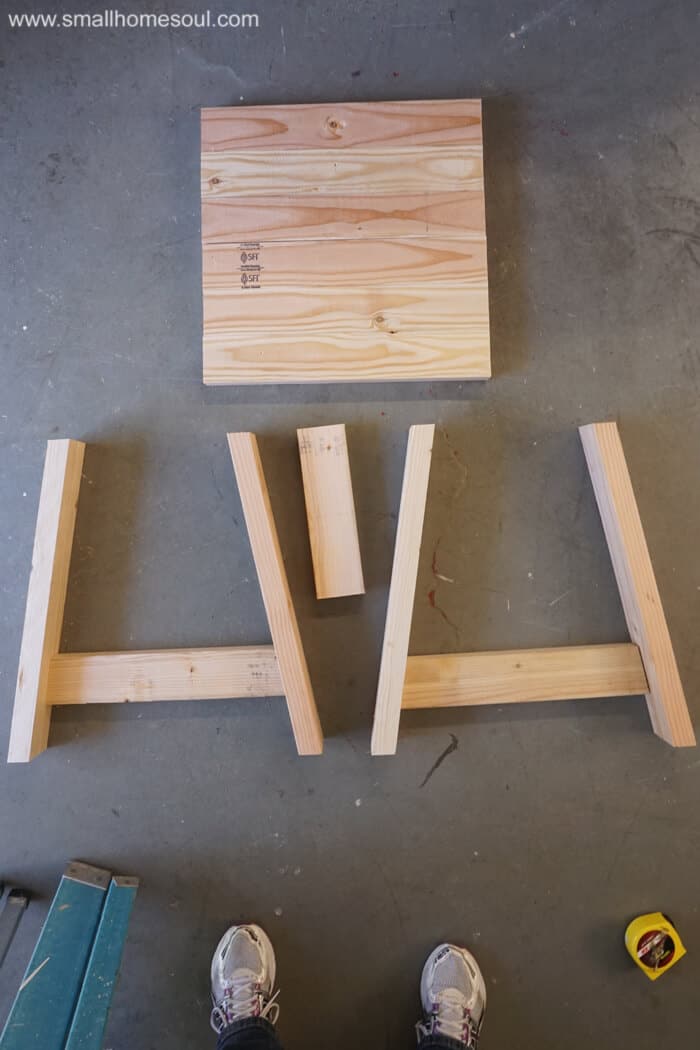
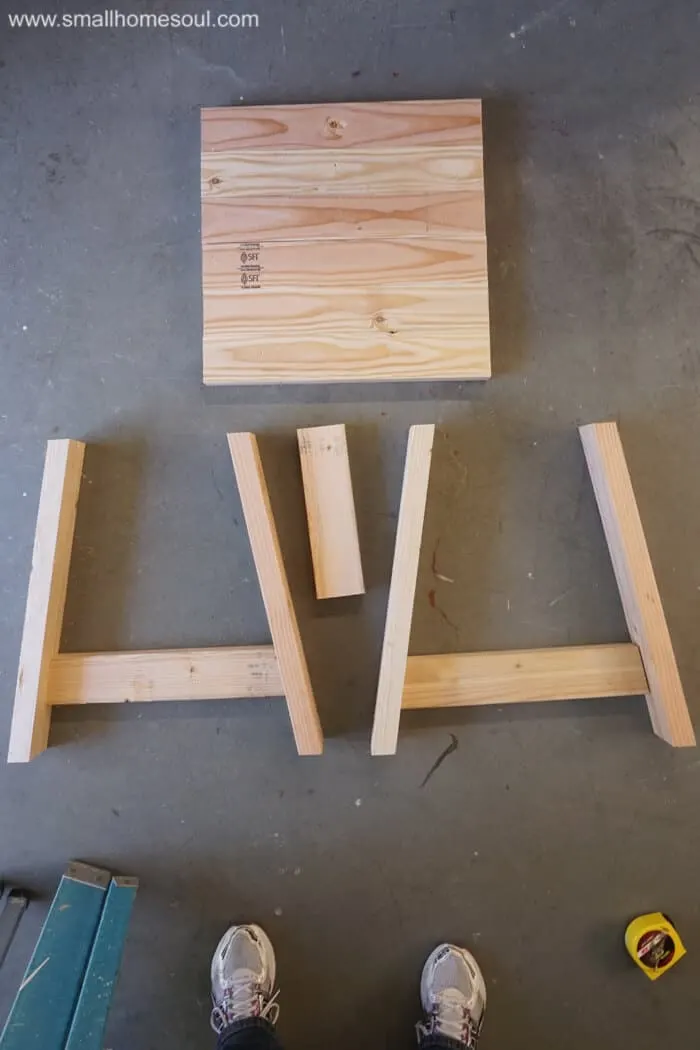
Step 1: Cut all your boards to length.
Cutting Instructions & Tips
- Cut all boards per the Build Plans
- Pay close attention to the bevel and miter cuts as noted. The plans go into more assembly detail.
- When cutting the Cross Leg Supports make sure the top is narrower than the bottom.
- Measure twice, cut once. Sometimes I really have to think about it before I make my cut to ensure the angle is correct. I hate wasting wood.
To cut the bevels for the legs I actually used the miter angle I’d already set by standing the 2×4 on end. This is a cheater way if you don’t have a compounding miter saw that can make a bevel cut.

Here’s what all your parts will look like when cut. I loosely put them together how they’ll be assembled.
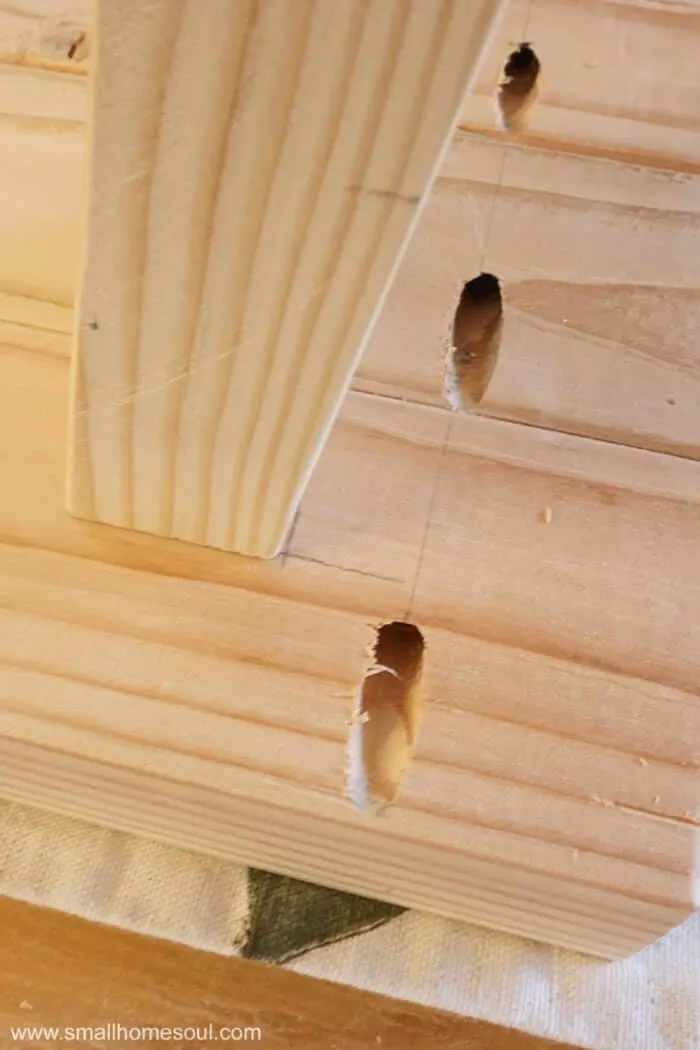
Step 2: Predrill all pocket holes.
Now grab your cordless drill because it’s time to make the pocket holes. Play around with a few scrap pieces to get the feel for it. If you’ve never used a Kreg Jig to make pocket holes I suggest you bookmark my friend Anika’s recent article and video “How to Use a Kreg Pocket Hole Jig.”
I wish I’d seen this before I started because there is a small learning curve but once you’ve done it a few times it’s awesome!
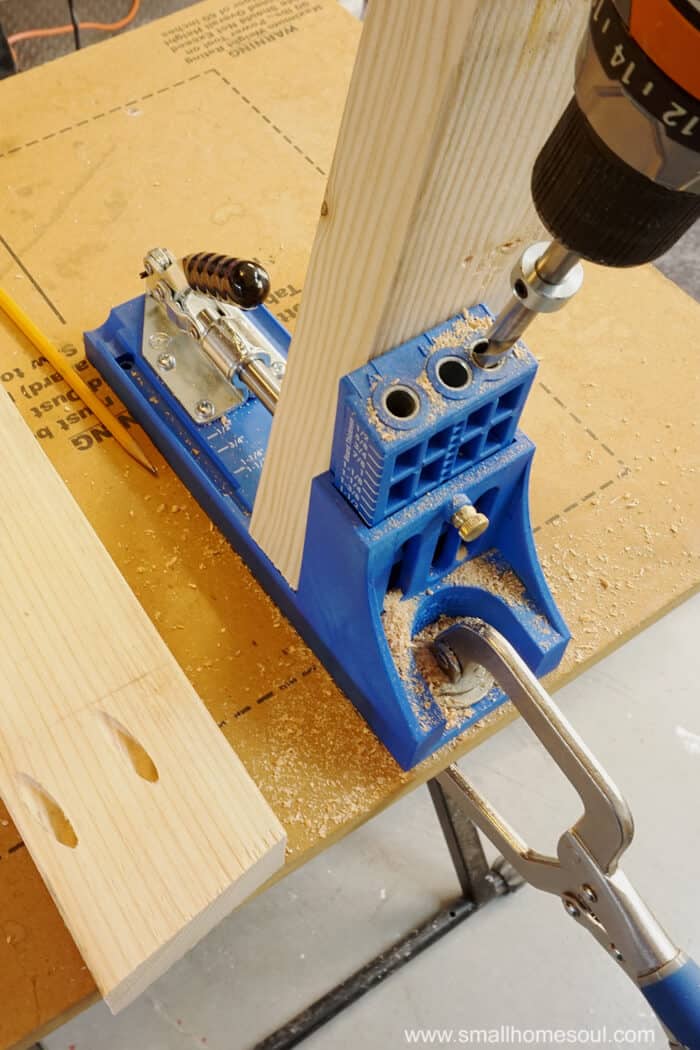

When all the pocket holes are drilled according to the building plans, I suggest pre-screwing the pocket hole screws part way into the pocket holes. This will make the assembly go a bit quicker. Make sure the screw doesn’t protrude from the board.
MORE PROJECTS USING 2x4s
Modern 2×4 Bench – Tall Plant Stand
33 Projects with 2x4s – Giant Jenga
To determine the proper spacing of pocket hole screws for the top boards I researched on the Kreg website. I wanted enough for good connection and support, but I needed to make sure the pocket holes connecting the top slats wouldn’t be in the way when I was ready to assemble the base.
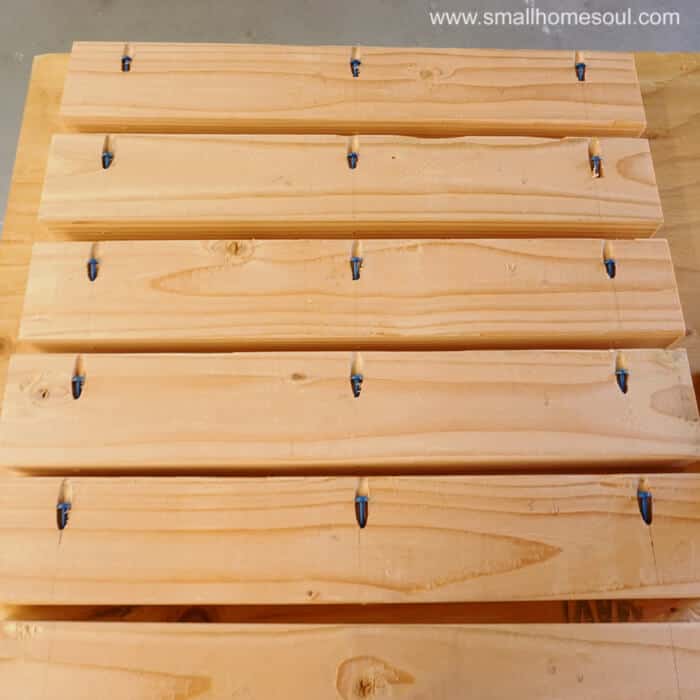
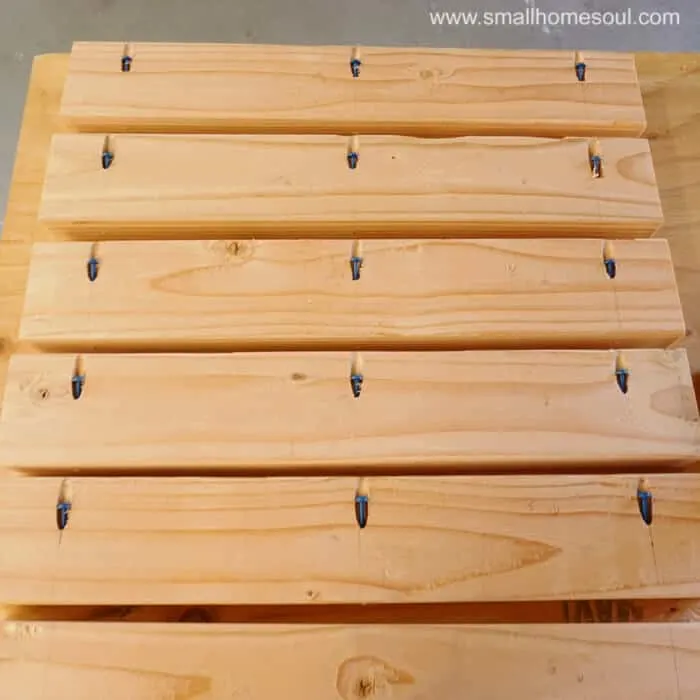
This is covered in the Build Plans but only 5 of the top slats will get pocket holes, they aren’t needed for the 6th board.
Step 3: Assemble the 2×4 table top.
Long clamps will make this project go much smoother.
- Start with the top and lay the boards on a flat work surface.
- Run a bead of wood glue between each 2×4 and clamp all six boards together.
- Working on one board at a time screw in each pocket hole screw the remainder of the way.
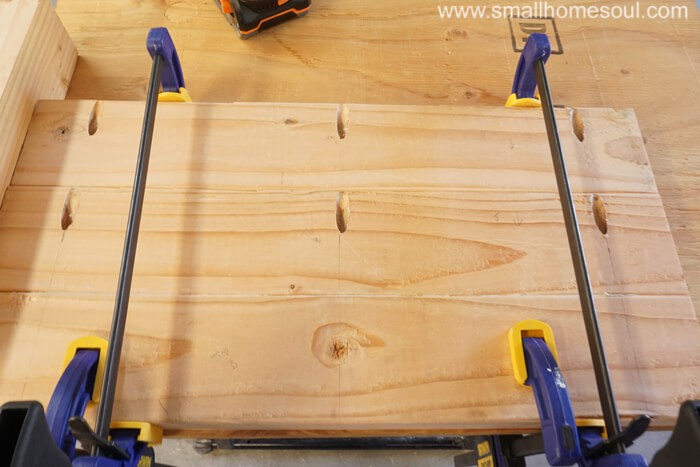

I made my shorter clamps work but it’s always best to have the right tools. You can see more of this in the Build Plans. I will have longer bar clamps before my next project.
Shhh don’t tell my hubby, he kept telling me to go buy some but I wanted to build the table with what we already had. I was successful, but long bar clamps would have made it easier.
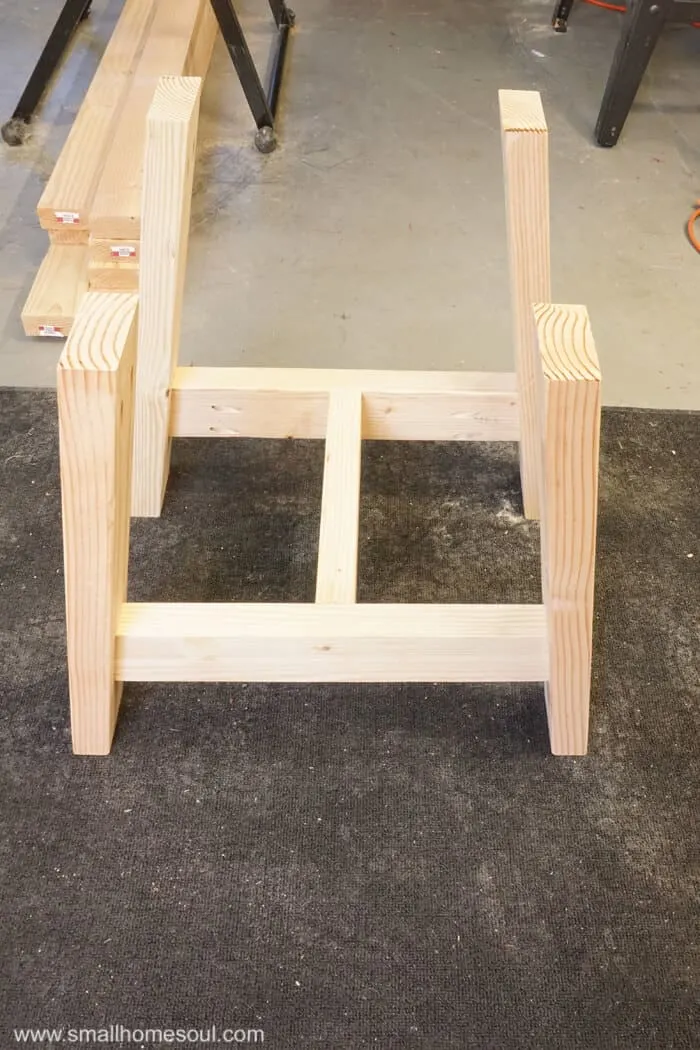
Step 4: Assemble the table base.
- Take two of the legs cut at 10 degree bevels and one of the mitered cross leg supports.
- Measure up each leg from the bottom and make a mark at 4-3/4″.
- The bottom of the cross leg support will sit on that line and will be centered on the leg.
- Hold the cross leg support in place and drive in the pocket hole screws.
This is where I wish I had one of the Kreg Jig right-angle clamps. I was working by myself and while I made it work, that clamp would have saved so much time and ensured my joint was as perfect as I wanted it to be.


Don’t you love the yellow garden glove, that grippy texture helped me hold on tightly to the 2×4.
After the front and back legs are assembled it’s time to attach the Center Support.
- Find and mark the center of each cross leg support.
- Attached the center support to each of the table legs.
You can see better how I connected the Center Support in the video below.

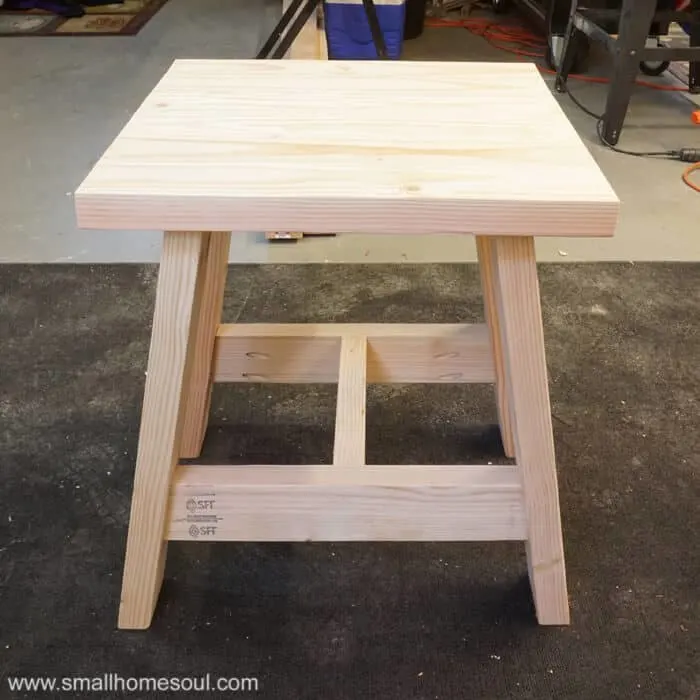
Step 5: Attach 2×4 table top to the base.
After the base of the table is assembled it’s time to attach the top.
- Make a few marks on the underside of the the table top so the overhang is even all around.
- Turn the top upside down on your work surface with the slats running horizontally.
- On the front and back near the edge draw a line near the corners at 1-5/8” then draw a line at 2-3/4” on the sides.
- The corner of the leg will line up where the two lines meet.

- Attach each leg to the table top using the pocket holes and screws.
Your table is done 🙂

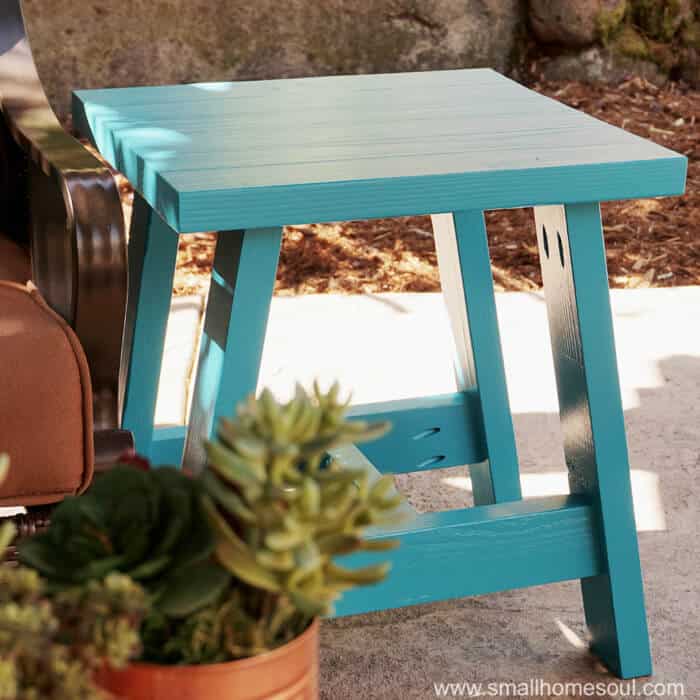
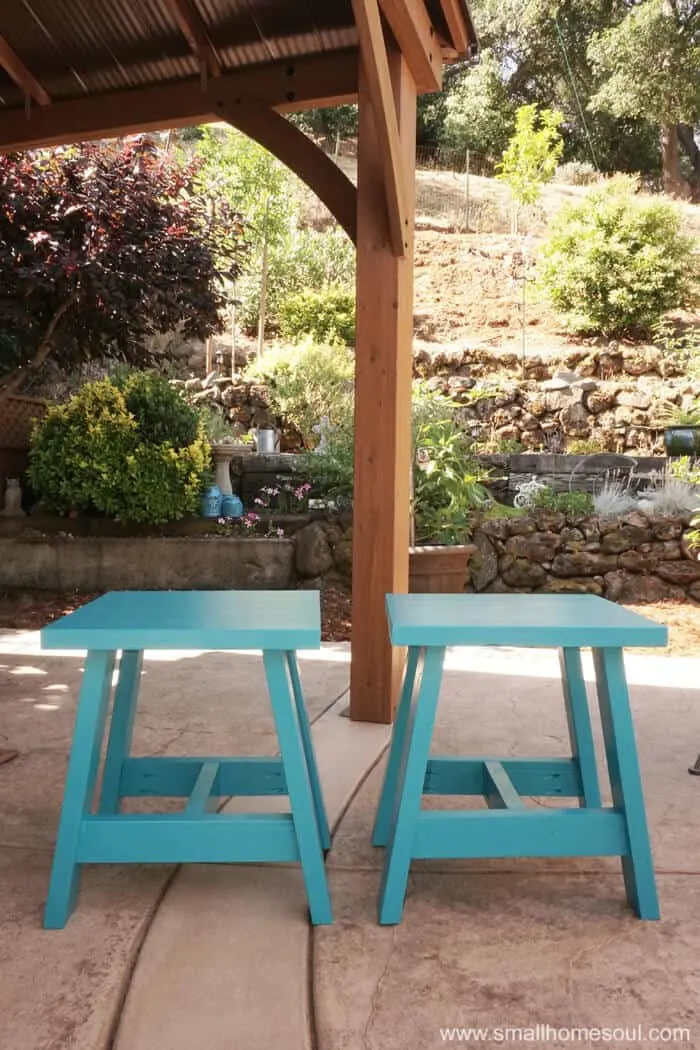
I decided to paint mine a fun color for my patio. Last Summer I did a Patio Refresh Series but it still wasn’t bright enough for me with all the brown on the fence and on our rust-colored patio furniture.
I put it to a vote on Instagram and on Facebook and Teal won. I walked into the hardware store and literally chose the first paint chip I picked up. Hawaiian Teal, how could that be bad?
MORE WOODWORKING PROJECTS
Rolling Printer Cart – L Shaped Desk
Simple Storage Box – 8×10 Garden Shed
So how much did these tables cost? I bought kiln dried 2x4s for my 2×4 Tables that cost about $3.29 each. That’s less than $15 per table and with the cost of paint it’s around $20 per table. Buying a wood table would cost much much more.

I’m so glad I built two 🙂
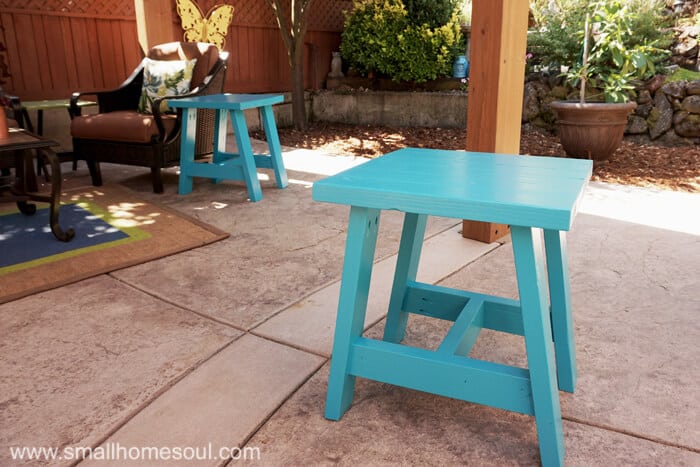

They’re ready to hold a refreshing beverage while I enjoy the shade of our new gazebo.
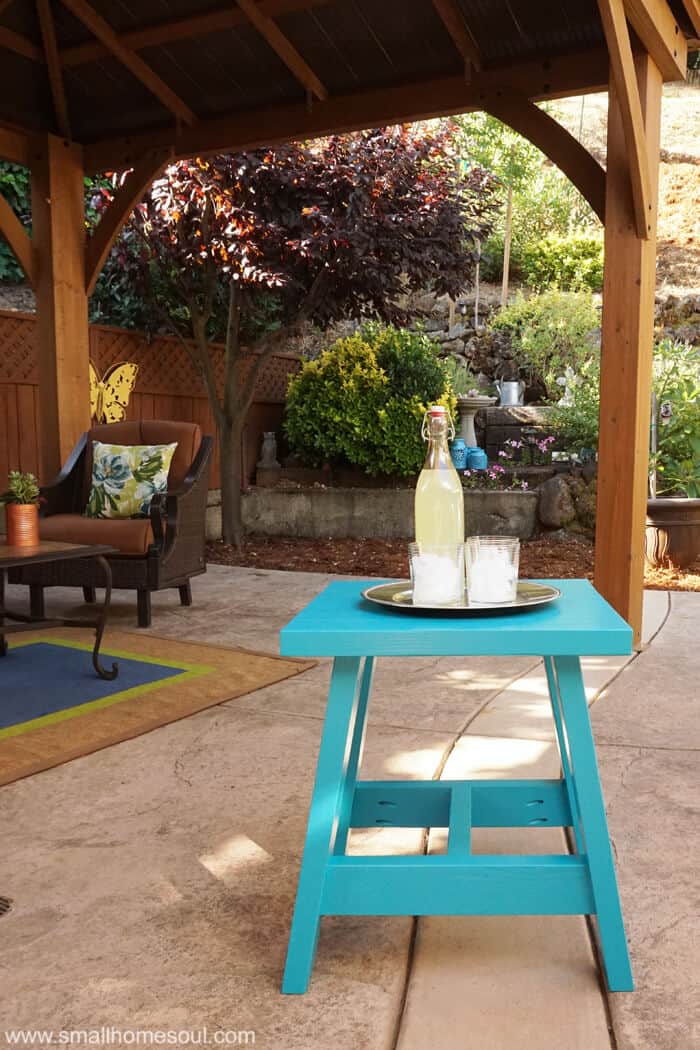

I hope you love these tables as much as I do. They’re stylish and sturdy, and in a pinch they can even be used as extra seating.
I’m beyond thrilled with my new 2×4 tables, my patio is already brighter and more cheery.


Thanks for sticking with me on this very long post. Again in case you passed it, here’s the link to request building plans to build your own 2×4 Outdoor Table.
Pin It for Later!
The #2x4andMore challenge inspired me to build my 2×4 Outdoor Table. Don’t forget to check out all the projects in this challenge by visiting these talented bloggers.
Remodelaholic | The Ugly Duckling House
Charleston Crafted | Woodshop Diaries
At Charlotte’s House | Making Joy and Pretty Things
Frazzled Joy | Ginger Snap Crafts
Everyday Party Magazine | Hertoolbelt
North Country Nest | Our House Now a Home
Practical and Pretty | Girl, Just DIY!
Adam
Monday 12th of June 2023
Do you think it would be possible to do the miter and bevel cuts here with a hand saw?
Toni
Wednesday 26th of July 2023
Well, I'm sure all the craftsmen of old did all their cuts with a hand saw. I'm sure there are many today who could do it, I am not that skilled or patient LOL
Susan
Friday 2nd of June 2023
I love these and am making two of them. I bought 2 1/2” pocket screws for 2x4’s. They are hard to bury and I had to have my husband drill them in. Way too hard for my wrists. I see you used the blue ones for soft plywood. I will buy more of those tomorrow to finish the tables. I am opting for “Lagoon Blue”. Could not find a teal in a spray. Also I picked the best 2x4’s I could and they are still not very good. I hope it looks better with paint.
Toni
Wednesday 26th of July 2023
The challenge of using building lumber for furniture is the twists and bows that can occur. I pick through the stacks at the store to get the best ones. Storing them flat once you get them home is also key. Good luck, I'm sure the'll look amazing!
Daniel
Tuesday 21st of February 2023
I would love to purchase the plans but, I live in Germany and only have a German bank card (Maestro) and Paypal.
Toni
Wednesday 1st of March 2023
Thanks for reaching out Daniel, I'm glad we were able to get you the plans via an alternative payment. Happy Building!
Sherrie
Tuesday 12th of April 2022
what do you by "short side"?
Toni
Thursday 12th of May 2022
By short side I meant to refer t it as the Edge of the board. If a board has one side longer thatn the other, the long side it called "the face" and the short side is called "the edge."
Shane
Thursday 8th of April 2021
I have purchased the plans and it says it is my library. Where is my library?
Toni
Thursday 8th of April 2021
Hi Shane, I'm sorry you couldn't find the plans. I've sent you a few emails this morning, it seems your email address in the purchasing app was missing the t at the end before the .com. I edited your email address and resent you the receipt which will include a link to download the plans. Please reply to my email and let me know that you were successful in downloading the plans. Thanks!